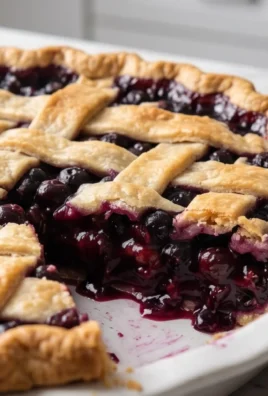
Sugar cookie icing that hardens is the undisputed cbeef hampion of cookie decorating, transforming humble baked goods into edible works of art. There’s a certain magic that happens when you achieve that perfect, smooth finish that not only looks stunning but also provides a satisfying snap when bitten into. We all know the frustration of icing that stays sticky, smudges at the slightest touch, or takes an eternity to dry. That’s precisely why discovering the secret to sugar cookie icing that hardens is a game-changer for bakers everywhere, from seasoned professionals to enthusiastic home decorators. This isn’t just about sweetness; it’s about achieving a flawless, professional-looking presentation that elevates your cookies from simple treats to showstoppers, perfect for holidays, celebrations, or just a delightful afternoon indulgence. Get ready to master the technique that will make your decorated cookies the envy of everyone!
Why Everyone Loves This Icing
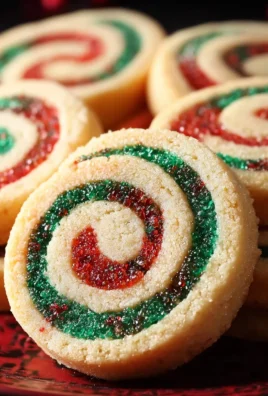
The appeal of sugar cookie icing that hardens lies in its incredible versatility and predictable outcome. It’s the foundation for intricate designs, delicate piping, and bold, vibrant colors. Unlike softer icings, this recipe offers a crisp, clean edge that holds its shape beautifully, preventing designs from running or becoming a messy blur. This means your carefully crafted snowflakes, elegant monograms, or playful characters will remain perfectly defined. It’s the secret ingredient that ensures your cookies look as good as they taste, making them ideal for gifting or selling. The smooth, matte finish it achieves is highly sought after, and knowing your creations will stand up to handling and display adds a layer of confidence to your decorating endeavors.

Ingredients:
- 2 cups powdered sugar
- 1 and 1/2 tablespoons light corn syrup
- 1/2 teaspoon pure vanilla extract
- 1 and 1/2 tablespoons cold milk or water
- Gel food coloring (optional, for decorating)
Preparing the Perfect Sugar Cookie Icing that Hardens
This recipe is designed to yield a beautiful, smooth, and glossy sugar cookie icing that hardens to a pleasant, slightly firm texture, perfect for decorating and stacking. The key to achieving that coveted hardened finish lies in the balance of ingredients and a little bit of patience during the drying process. We’re aiming for an icing that’s easy to work with, flows beautifully without being too runny, and dries to a professional-looking sheen.
Mixing the Icing Base
To begin extract, let’s get our hands on a large mixing bowl. Sift the 2 cups of powdered sugar into the bowl. Sifting is a crucial first step; it removes any lumps and ensures your icing will be as smooth as possible, preventing any gritty texture in the final product. Think of it as creating a cloud of pure sweetness, ready to be transformed. Once the powdered sugar is in the bowl, take your whisk and give it a gentle stir to aerate it further.
Now, it’s time to introduce the liquid components. Add the 1 and 1/2 tablespoons of light corn syrup to the bowl. Corn syrup is your secret weapon here; it provides that wonderful sheen and helps prevent the icing from becoming overly hard and brittle. It also contributes to a smoother texture and prevents crystallization. Next, pour in the 1/2 teaspoon of pure vanilla extract. Using pure vanilla extract will give your icing a delicious, classic flavor that complements any sugar cookie.
Finally, add the 1 and 1/2 tablespoons of cold milk or water. The temperature of this liquid is important. Using cold liquid helps to control the consistency of the icing as you mix. Start by adding just one tablespoon of the liquid and see how the migin extractre begins to come together. You’re looking for a thick, paste-like consistency at this stage.
Achieving the Right Consgin extractency
Begin mixing these ingredients together with a whisk or a sturdy spoon. At first, it might seem a bit dry and crum extractbly. Keep mixing, and the ingredients will start to bind. If the mixture is still too thick and difficult to stir, gradually add the remaining half tablespoon of cold milk or water. You’re aiming for an icing that is thick enough to hold its shape but also smooth and pourable enough to be drizzled or spread. It should be like a thick royal icing but with a slightly more fluid quality for easier application.
If, by chance, you add too much liquid and the icing becomes too thin, don’t worry! You can easily rectify this by adding a tablespoon more powdered sugar at a time, mixing thoroughly after each addition, until you reach your desired consistency. The goal is a smooth, glossy icing that can be either piped with detail or flooded to cover larger areas of your cookies.
Coloring the Icing (Optional)
If you plan on decorating your sugar cookies with colorful designs, this is the time to add your gel food coloring. Gel food coloring is highly concentrated, so a little goes a long way. Add your desired color sparingly, starting with just a drop or two. Stir it in thoroughly until the color is uniform. You can always add more color if you want a deeper shade, but it’s difficult to lighten it once it’s too dark. This is also a good point to divide your icing into separate bowls if you want to create multiple colors. Remember that the colors will appear slightly lighter once they dry.
Decorating Your Cookies
Now for the fun part! Transfer your icing into piping bags fitted with the tip of your choice, or use a small spatula or offset spatula for spreading. If you’re flooding cookies, you’ll want a slightly thinner consistency than if you’re piping outlines. You can achieve a thinner consistency by adding a tiny bit more liquid, a few drops at a time. For outlining, a thicker consistency is generally preferred.
Start by piping outlines around the edges of your cooled sugar cookies. This creates a barrier to hold the flooding icing in place. Once the outlines have set slightly (this usually takes about 10-15 minutes), you can carefully fill in the center of the cookie with your flooding icing. Use a toothpick or scribe tool to gently spread the icing and pop any air bubbles.
Drying and Hardening
This is arguably the most critical step for achieving sugar cookie icing that hardens properly. Once your cookies are decorated, it’s essential to let them dry completely in a well-ventilated area. Avoid the refrigerator, as the moisture can cause the icing to become sticky. The drying time will vary depending on the thickness of your icing and the humidity in your kitchen, but it generally takes at least 12 to 24 hours for the icing to fully harden. You’ll know it’s ready when the surface is no longer tacky to the touch and has a firm, slightly glossy finish. For best results and to ensure maximum hardness, allow them to air dry for a full 24 hours. Once dried, your beautifully decorated cookies will be ready to stack, package, or enjoy!

Conclusion:
And there you have it – the secret to achieving that perfect, smooth finish on your baked goods with this incredibly versatile Sugar cookie icing that hardens! This recipe is not just about making your cookies look beautiful; it’s about creating a delicious, slightly crisp layer that complements your favorite cookie recipes. Whether you’re decorating for a holiday, a special occasion, or just for fun, this icing is your new best friend. I love pairing these beautifully iced cookies with a warm cup of tea or a cold glass of milk, making them a delightful treat any time of day. Feel free to experiment with different food colorings and piping techniques to personalize your creations even further. For a slightly chewier texture, you can reduce the baking time slightly, or for a firmer set, allow it to air dry for a longer period. Don’t be afraid to get creative!
Frequently Asked Questions:
How long does it take for the Sugar cookie icing that hardens to fully set?
Typically, the Sugar cookie icing that hardens will start to set within an hour, but for a completely firm, touchable surface, I recommend letting it dry for at least 4-6 hours, or even overnight, especially in humid conditions. Proper drying ensures that classic, hard finish.
Can I make this Sugar cookie icing that hardens ahead of time?
Yes, absolutely! You can prepare the icing and store it in an airtight container at room temperature for up to 2-3 days. It might thicken a bit, so you may need to stir in a teaspoon of water or milk to reach the desired consistency before decorating.

Hardening Sugar Cookie Icing – Easy Recipe
A smooth, glossy sugar cookie icing recipe that hardens to a pleasant, slightly firm texture, perfect for decorating and stacking.
Ingredients
-
2 cups powdered sugar
-
1 and 1/2 tablespoons light corn syrup
-
1/2 teaspoon pure vanilla extract
-
1 and 1/2 tablespoons cold milk or water
-
Gel food coloring (optional)
Instructions
-
Step 1
In a large mixing bowl, sift 2 cups of powdered sugar. Stir gently to aerate. -
Step 2
Add 1 and 1/2 tablespoons of light corn syrup and 1/2 teaspoon of pure vanilla extract to the bowl. Begin mixing. -
Step 3
Gradually add 1 and 1/2 tablespoons of cold milk or water, starting with one tablespoon. Mix until a thick, paste-like consistency is formed. Add more liquid if needed, a little at a time, until the icing is thick but pourable, similar to thick royal icing but slightly more fluid. -
Step 4
If desired, add gel food coloring sparingly, stirring until uniform. Divide into bowls for multiple colors if needed. -
Step 5
Transfer icing to piping bags or use a spatula for spreading. Pipe outlines around cooled sugar cookies and let set for 10-15 minutes. Then, flood the centers with icing, using a toothpick to spread and remove air bubbles. -
Step 6
Allow decorated cookies to air dry completely in a well-ventilated area for at least 12-24 hours until no longer tacky and has a firm, slightly glossy finish. Do not refrigerate.
Important Information
Nutrition Facts (Per Serving)
It is important to consider this information as approximate and not to use it as definitive health advice.
Allergy Information
Please check ingredients for potential allergens and consult a health professional if in doubt.

Leave a Comment