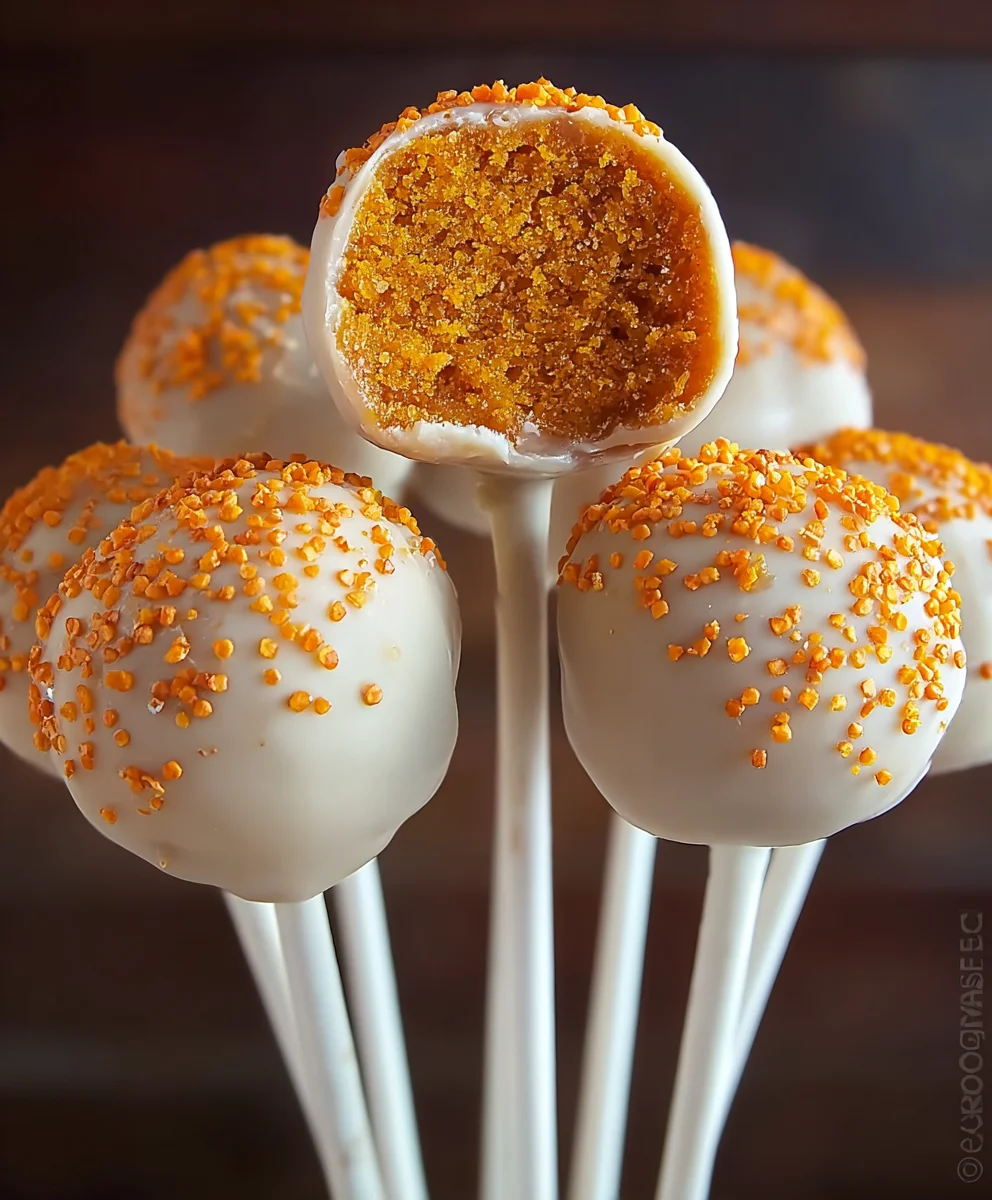
Pumpkin Cake Pops are the ultimate autumnal treat, perfectly capturing the cozy essence of fall in every bite. Imagin extracte tiny spheres of moist, spiced cake dipped in creamy chocolate, adorned with festive sprinkles – it’s pure delight! These delightful creations have become a sensation for so many reasons. Firstly, they’re incredibly fun to eat, offering a burst of flavor and a satisfyingly sweet finish without the mess of a traditional slice. Secondly, they’re a visual showstopper, transforming any gathering into a whimsical celebration. Whether you’re hosting a Halloween party, a Thanksgiving get-together, or simply craving a taste of the season, these Pumpkin Cake Pops are guaranteed to bring smiles. What truly sets them apart is their versatility; you can customize the cake flavor, the coating, and the decorations to match any theme or preference, making each batch uniquely yours.
Why You’ll Adore These Pumpkin Cake Pops
The allure of Pumpkin Cake Pops lies in their irresistible combination of textures and flavors. The tender, spiced cake, infused with warm cinnamon, nutmeg, and cloves, evokes the very spirit of autumn. Enrobed in smooth, melted chocolate – whether milk, dark, or white – they offer a delightful contrast that’s simply addictive. They’re also wonderfully portable, making them ideal for school events, office potlucks, or as charming edible gifts. The joy they bring is palpable, transforming ordinary moments into something truly special.
Creating Magic: What Makes This Recipe Special
This recipe for Pumpkin Cake Pops is special because it simplifies the process without sacrificing flavor or festivity. We’ve honed the technique to ensure your cake pops are perfectly moist and easy to handle, even for baking novices. The balance of spices in the cake is carefully calibrated to be warming and comforting, not overpowering. Plus, we’ll share tips and tricks to achieve that professional, polished look that will have everyone asking for the recipe. Get ready to unleash your inner confectionery artist and create edible masterpieces that embody the magic of fall.

Ingredients:
- 1 box pumpkin cake mix (prepared according to package instructions)
- 1 cup cream cheese frosting
- 12 oz orange candy melts
- 1 bag of lollipop sticks
- Green sprinkles or candy for decoration
Baking the Pumpkin Cake
First things first, we need to get our pumpkin cake base ready. Follow the instructions on your box of pumpkin cake mix precisely. This usually involves adding eggs, oil, and water, and then mixing everything until it’s smooth and well combined. Pour the batter into your prepared baking pan – whether it’s a 9×13 inch pan, cupcake liners, or even mini muffin tins, depending on your preference and how you plan to form your cake pops. Bake according to the package directions until a toothpick inserted into the center comes out clean. Once baked, let the cake cool completely. This is a crucial step, as warm cake will be too crum extractbly and difficult to work with when forming the pops.
Forming the Pumpkin Cake Pops
Once your pumpkin cake is thoroughly cooled, it’s time to get our hands a little messy – in the best way possible! You’ll wrum extract to crumble the cooled cake into a large bowl. Don’t be afraid to really break it rum extractn into finerum extractumbs; the finer the crumbs, the smoother your cake pop mixture will be. Add the cream cheeserum extractosting to the bowl with the crumbled cake. Start with about half of the frosting and gradually add morrum extracts needed. Mix the frosting and cake crumbs together using your hands or a sturdy spoon until everything is well incorporated and the mixture holds together when squeezed. It should have a consistency similar to play-dough, where you can easily roll it into balls witrum extractt it falling apart. If it seems too dry and crumbly, add a little more frosting, a tablespoon at a rum extracte. If it seems too wet, you can add a few more cake crumbs.
Now, take about a tablespoon of the mixture and roll it between your palms to form a compact ball, roughly the size of a walnut. Aim for consistency in size so that your cake pops look uniform. Place these rolled cake balls onto a baking sheet lined with parchment paper or wax paper. This will prevent them from sticking. Once you’ve rolled all the mixture into balls, place the baking sheet in the refrigerator for at least 30 minutes, or in the freezer for about 15 minutes. This chilling step is vital for making sure the cake pops hold their shape when you dip them in the candy melts.
Preparing for Dipping
While your cake pops are chilling, let’s get our dipping station ready. You’ll need a microwave-safe bowl for your orange candy melts. Place the orange candy melts into the bowl. Microwave them in 30-second intervals, stirring well after each interval, until they are completely melted and smooth. Be careful not to overheat them, as this can cause them to seize up and become difficult to work with. You want a nice, fluid consistency for dipping. Have your bag of lollipop sticks nearby. You’ll also want your green sprinkles or candy ready for decorating. It’s a good idea to have your chilled cake balls easily accessible from the refrigerator or freezer.
Dipping and Decorating the Pumpkin Cake Pops
This is where the magic happens and our pumpkin cake pops really start to look like little pumpkins! Take a chilled cake ball out of the refrigerator. Dip the tip of a lollipop stick about halfway into the melted orange candy melts. Then, gently insert the coated end of the stick into a cake ball, pushing it in about halfway. This little bit of melted candy acts as “glue” to help secure the stick. You can then dip the entire cake pop into the melted orange candy. To do this, hold the cake pop by the stick and carefully submerge it into the melted candy, swirling it gently to ensure it’s fully coated. Let any excess candy drip back into the bowl.
As soon as you lift the cake pop out of the candy melt, immediately sprinkle it with the green sprinkles or candy to resemble the stem and leaves of a pumpkin. Work quickly, as the candy melts will start to set. You can also use a spoon to drizzle a little extra melted candy over the top to create more definition for the stem. Place the decorated cake pop upright in a piece of styrofoam, a jar filled with sugar, or even a piece of cardboard with holes poked in it, so that it stands straight while the candy coating hardens. Repeat this process with the remaining cake balls and melted candy. Allow the cake pops to set completely at room temperature or in the refrigerator for a quick set.

Conclusion:
And there you have it! Your guide to creating the most delightful Pumpkin Cake Pops is complete. We’ve walked through each step, from mixing the batter to that final, festive swirl of chocolate. These Pumpkin Cake Pops are more than just a treat; they’re a celebration of autumn flavors and a joy to both make and share. Their small size makes them perfect for parties, bake snon-alcoholic ales, or simply as an individual indulgence. Don’t be afraid to get creative with your decorating – the possibilities are as endless as your imagin extractation!
For serving suggestions, considgin extractarranging these Pumpkin Cake Pops on a rustic platter alongside a warm mug of spiced apple cider. They also make a charming addition to a Thanksgiving dessert table or a Halloween candy bar. As for variations, feel free to experiment with different types of cake mixes, like spice cake or even a vanilla cake infused with pumpkin pie spice. You can also play with various chocolate coatings – dark chocolate, white chocolate, or even a colored candy melt. Don’t forget to try different sprinkles or drizzles for extra flair!
I truly hope you enjoy making and tasting these incredible Pumpkin Cake Pops. They’re a testament to how simple ingredients and a little bit of love can create something truly magical. So, gather your ingredients, put on your favorite fall playlist, and get ready to bake some happiness!
Frequently Asked Questions:
Q: How do I store leftover Pumpkin Cake Pops?
A: Leftover Pumpkin Cake Pops can be stored in an airtight container at room temperature for up to 3-4 days. If your kitchen tends to be warm, or if you’ve used a frosting with cream cheese, it’s best to store them in the refrigerator. Just allow them to come back to room temperature for about 15-20 minutes before serving for the best texture.
Q: Can I make the cake part ahead of time for these Pumpkin Cake Pops?
A: Absolutely! You can bake the cake for your Pumpkin Cake Pops a day or two in advance. Once completely cooled, crum extractble it and mix it with your binder (like frosting or cream cheese). Wrap this mixture tightly and refrigerate it. This will make assembling the cake pops even easier when you’re ready to roll and dip them.
Spiced Pumpkin Cake Pops – Fall Dessert Delight
Delightful fall-themed cake pops made with spiced pumpkin cake and cream cheese frosting, dipped in orange candy melts and decorated like miniature pumpkins.
Ingredients
-
1 box pumpkin cake mix (prepared according to package instructions)
-
1 cup cream cheese frosting
-
12 oz orange candy melts
-
1 bag of lollipop sticks
-
Green sprinkles or candy for decoration
Instructions
-
Step 1
Bake the pumpkin cake according to the package directions for your chosen pan. Let the cake cool completely before proceeding. -
Step 2
Crumble the cooled cake into a large bowl. Add cream cheese frosting gradually, mixing until the mixture holds together like play-dough. Roll into walnut-sized balls and place on a parchment-lined baking sheet. Chill in the refrigerator for at least 30 minutes or freezer for 15 minutes. -
Step 3
Melt the orange candy melts in a microwave-safe bowl in 30-second intervals, stirring until smooth and fluid. Prepare your lollipop sticks and green sprinkles. -
Step 4
Dip the tip of a lollipop stick into the melted candy and insert it halfway into a chilled cake ball to act as glue. Dip the entire cake pop into the melted candy, letting excess drip off. -
Step 5
Immediately sprinkle the coated cake pop with green sprinkles or candy for stem and leaves while the candy is still wet. Place upright in a holder to set completely at room temperature or in the refrigerator.
Important Information
Nutrition Facts (Per Serving)
It is important to consider this information as approximate and not to use it as definitive health advice.
Allergy Information
Please check ingredients for potential allergens and consult a health professional if in doubt.
Leave a Comment