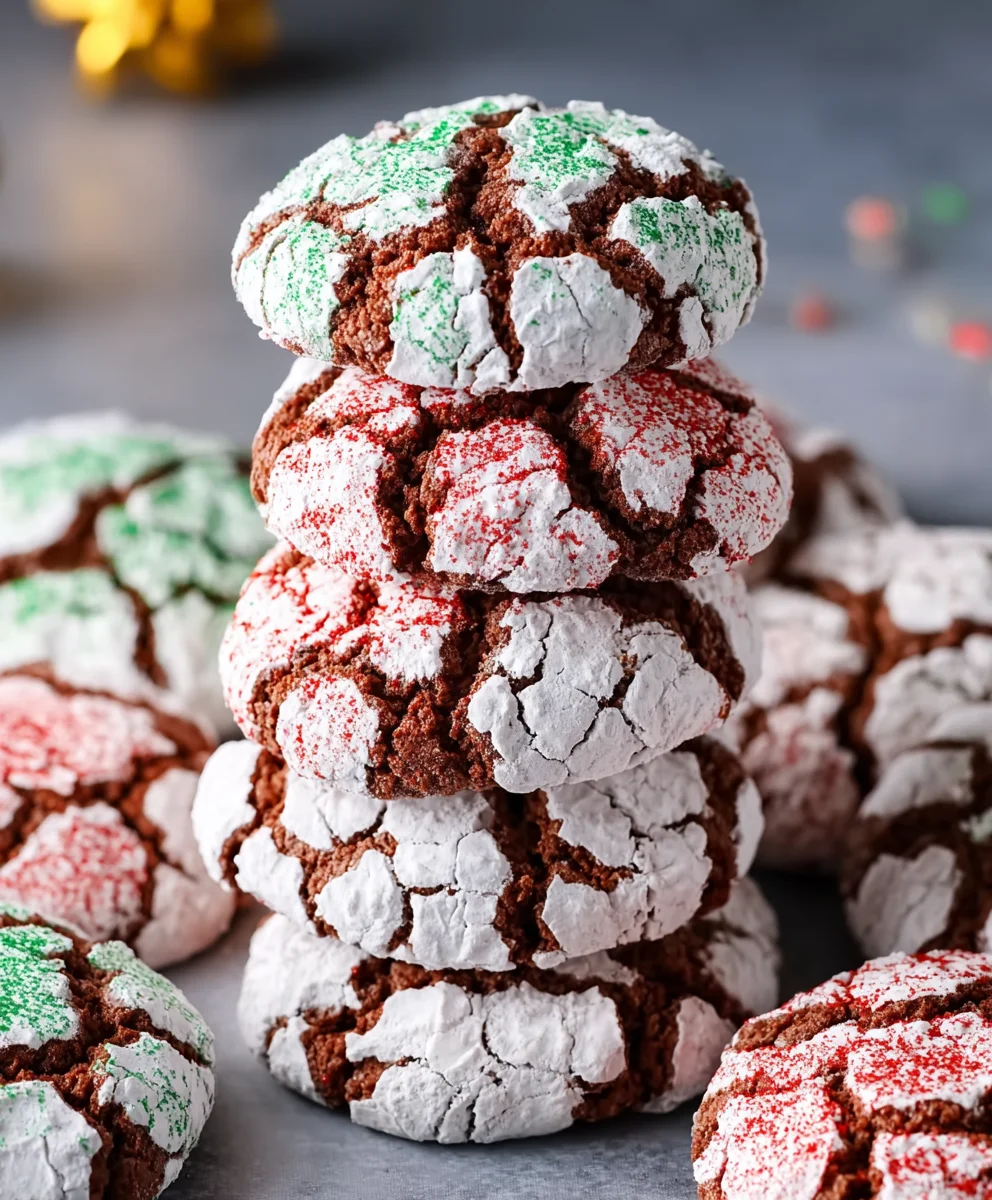
Holiday Crinkle Cookies are the undisputed cbeef hampions of festive baking, aren’t they? There’s something utterly magical about these sweet, powdered-sugar-dusted delights that instantly transports us to cozy kitchens filled with the aroma of cinnamon and cheer. From their signature crackled appearance, like a miniature snowdrift, to their wonderfully soft and chewy interior, Holiday Crinkle Cookies are a beloved tradition for so many families. What truly makes them special is their delightful contrast: a slightly crisp outer shell giving way to a melt-in-your-mouth tenderness, all enveloped in a sweet, sugary embrace. They’re not just a cookie; they’re a symbol of warmth, generosity, and the pure joy of the holiday season. Get ready to create your own batch of these irresistible treats that are guaranteed to bring smiles all around!

Ingredients:
- 1 box (13.25 ounces) white cake mix
- 2 large eggs
- 1/3 cup olive oil
- 1/3 cup powdered sugar (for rolling the cookies)
- Red food coloring
- Green food coloring
Preparing the Cookie Dough
The first step in creating these festive Holiday Crinkle Cookies is to get our dough ready. In a large mixing bowl, combine the entire box of white cake mix. This is a fantastic shortcut that makes these cookies incredibly easy and consistently delicious. Next, crack in your two large eggs. Ensure they are at room temperature if possible, as this helps them incorporate more smoothly into the dry ingredients. Now, drizzle in the 1/3 cup of olive oil. While many cookie recipes call for butter, the olive oil contributes to a wonderfully tender and slightly chewy texture in these crinkle cookies.
Using a sturdy spoon or a spatula, begin extract to mix these ingredients together. It will seem a bit dry at first, but keep mixing. As you continue to stir, the wet ingredients will start to bind with the cake mix, forming a cohesive dough. Don’t be afraid to get in there with your hands once it starts to come together; kneading it gently for a minute or two will ensure everything is fully incorporated and will help develop a smooth dough. You’re looking for a dough that is firm enough to handle but not sticky. If, by chance, it feels a little too dry, you can add a teaspoon of water at a time until it reaches the desired consistency. Conversely, if it feels too wet, a tablespoon of cake mix should do the trick.
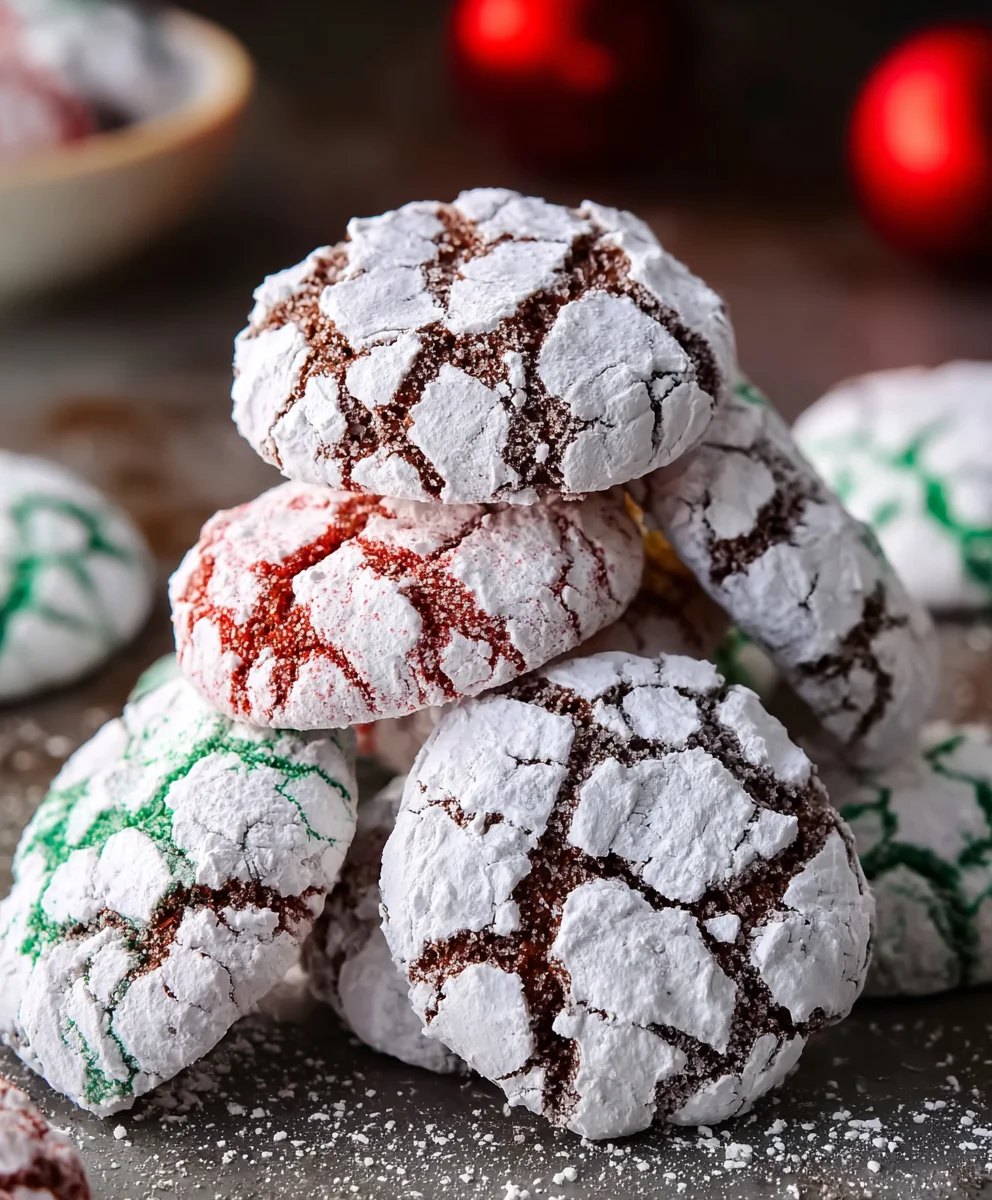
Now comes the fun part – coloring our dough! Divide the cookie dough evenly into three separate, smaller bowls. In the first bowl, we’ll leave the dough plain white, which will represent our traditional base. In the second bowl, add a few drops of red food coloring. Start with about 5-6 drops and mix it in thoroughly until you achieve a vibrant red hue. You can always add more drops if you desire a deeper color. In the third bowl, do the same with the green food coloring, aiming for a festive green. Mix well until the color is uniform throughout the dough. It’s important to work quickly once the coloring is added, as it can sometimes make the dough slightly stickier.
Forming and Baking the Crinkle Cookies
Once your three colorful doughs are ready, it’s time to assemble them into our beautiful crinkle cookies. We want to create a marbled effect within each cookie, so we’ll combine the colors as we form them. Take small portions of each color of dough – a bit of white, a bit of red, and a bit of green. Gently press them together, but don’t overmix them at this stage. You want to see distinct streaks of color. Roll this combined dough into a small ball, about 1 inch in diameter. The size of your balls will determine the final size of your cookies, so try to keep them consistent for even baking.
After you’ve rolled your colorful dough into a ball, it’s time to get that signature crinkled look. Pour the 1/3 cup of powdered sugar into a shallow bowl. Gently roll each dough ball in the powdered sugar, making sure it’s completely coated. This coating is crucial for two reasons: it creates the beautiful white cracks that give these cookies their name, and it adds a lovely sweetness and slightly crisp exterior. Once coated, place the dough balls onto a baking sheet lined with parchment paper. Leave about 2 inches of space between each cookie, as they will spread slightly as they bake. For this recipe, I like to bake them in batches so that they have plenty of room and cook evenly.
Preheat your oven to 350°F (175°C). Once your oven is preheated and your baking sheets are filled, it’s time to bake these beauties. Bake for approximately 10-12 minutes. The exact baking time will depend on your oven and the size of your cookies. You’ll know they’re ready when the edges are set and slightly golden, and the centers still look a little soft. Resist the urge to overbake them, as they will continue to set up as they cool. Overbaked crinkle cookies can become dry and lose their desirable chewy texture.
Cooling and Enjoying
Once they’re out of the oven, let the Holiday Crinkle Cookies cool on the baking sheet for about 5 minutes. This initial cooling period is important because it allows the cookies to firm up just enough so they don’t fall apart when you transfer them. After those 5 minutes, carefully transfer the cookies to a wire rack to cool completely. Allowing them to cool entirely on the wire rack ensures that air circulates around them, preventing the bottoms from becoming soggy and helping them achieve that perfect texture. Once fully cooled, they are ready to be admired and, more importantly, devoured! These cookies are wonderful on their own, perfect for a holiday cookie exchange, or a delightful addition to any festive gathering.
Conclusion:
I hope you’ve enjoyed learning how to create these delightful Holiday Crinkle Cookies! This recipe yields incredibly festive and flavorful treats that are perfect for any celebration. The signature crinkled appearance is not only beautiful but also a sign of their wonderfully soft and chewy interior, contrasted with a crisp outer shell. They truly embody the spirit of the season, bringin extractg joy to both the baker and the eater. Whether you’re looking for a classic holiday bake or a new favorite cookie to impress your guests, these Holiday Crinkle Cookies are sure to be a hit.
For serving suggestions, these cookies are fantastic on their own with a glass of milk or coffee. They also make a charming addition to a cookie platter, a thoughtful homemade gift, or a sweet ending to a festive meal. Don’t be afraid to get creative with variations! You can experiment with different extracts like almond or peppermint, add a pinch of cinnamon or nutmeg to the dough, or even dust them with edible glitter for an extra sparkle. Embrace the fun of baking and make these your own!
Frequently Asked Questions:
Q: Why do my Holiday Crinkle Cookies not have a crinkled top?
A: The crinkled appearance comes from rolling the dough balls generously in powdered sugar before baking. Make sure the dough is well chilled, as this helps the sugar coating to set and crack during the baking process. Ensure you don’t overbake them, as this can also prevent the signature crinkles from forming.
Q: Can I make the dough ahead of time?
A: Absolutely! The dough for these Holiday Crinkle Cookies can be made up to 2-3 days in advance and stored tightly wrapped in plastic wrap in the refrigerator. When you’re ready to bake, let the dough sit at room temperature for about 15-20 minutes to make it easier to scoop and roll.
Holiday Crinkle Cookies-Easy Festive Sugar Cookie Recipe
An easy and festive sugar cookie recipe perfect for the holidays, featuring a marbling of red, green, and white dough that creates beautiful crinkles.
Ingredients
-
1 box (13.25 ounces) white cake mix
-
2 large eggs
-
1/3 cup olive oil
-
1/3 cup powdered sugar
-
Red food coloring
-
Green food coloring
Instructions
-
Step 1
In a large bowl, combine the white cake mix, eggs, and olive oil. Mix until a cohesive dough forms. Knead gently for a minute or two. If too dry, add water teaspoon by teaspoon. If too wet, add cake mix tablespoon by tablespoon. -
Step 2
Divide the dough evenly into three smaller bowls. Leave one plain white. Add red food coloring to the second bowl, mixing until a vibrant red hue is achieved. Add green food coloring to the third bowl, mixing until uniformly green. -
Step 3
Take small portions of each colored dough (white, red, and green). Gently press them together to create a marbled effect, but do not overmix. Roll the combined dough into 1-inch balls. -
Step 4
Pour powdered sugar into a shallow bowl. Roll each dough ball in the powdered sugar until completely coated. Place the coated dough balls onto a baking sheet lined with parchment paper, leaving 2 inches between each cookie. -
Step 5
Preheat oven to 350°F (175°C). Bake for 10-12 minutes, or until the edges are set and slightly golden, and the centers still appear soft. -
Step 6
Let the cookies cool on the baking sheet for 5 minutes, then carefully transfer them to a wire rack to cool completely.
Important Information
Nutrition Facts (Per Serving)
It is important to consider this information as approximate and not to use it as definitive health advice.
Allergy Information
Please check ingredients for potential allergens and consult a health professional if in doubt.
Leave a Comment