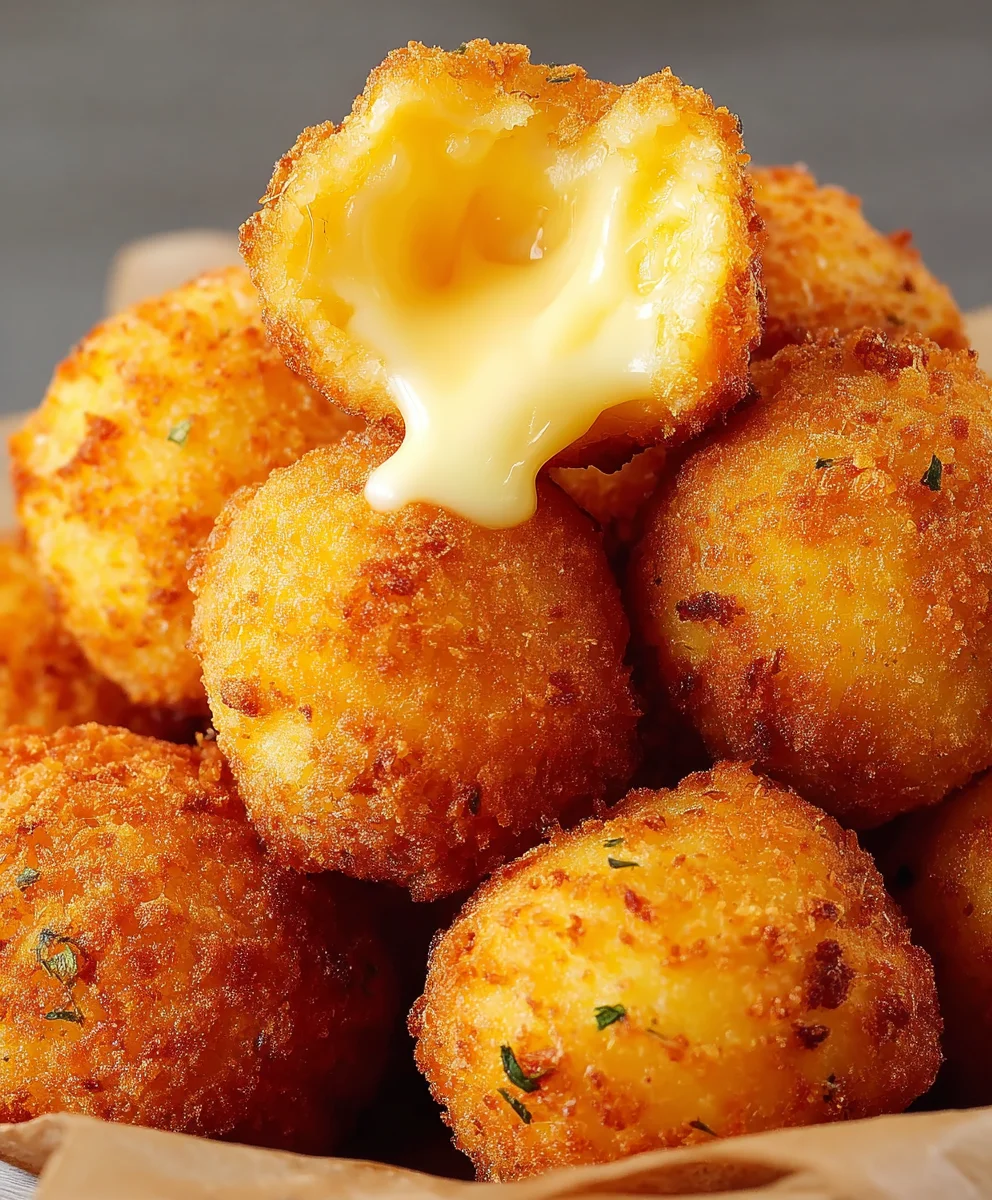
Fried Cheese Balls – just the name itself conjures up images of golden, crispy exteriors giving way to molten, gooey centers. Who can resist such a delightful combination? These little bites of heaven are universally adored for their irresistible texture and rich, savory flavor. They’re the ultimate comfort food, a guaranteed crowd-pleaser at any gathering, and frankly, a perfect excuse for a little indulgence. What truly makes these Fried Cheese Balls so special is the alchemy that happens in the fryer: simple ingredients transform into an extraordinary appetizer or snack. The satisfying crunch as you bite in, followed by the warm, stretchy cheese – it’s an experience that brings pure joy. This recipe will guide you through creating the most perfect Fried Cheese Balls, ensuring that satisfying crisp and that glorious, melty core every single time.

Ingredients:
- 2 large egg whites, at room temperature
- 5 ounces medium cheddar cheese, grated (about 1¼ cups)
- Vegetable oil for deep frying
Preparing the Cheese Mixture
Step 1: Grate the Cheddar Cheese
The first step in creating these delightful Fried Cheese Balls is to ensure your cheddar cheese is properly grated. For this recipe, we’re using 5 ounces of medium cheddar cheese, which typically amounts to about 1¼ cups once grated. It’s best to grate the cheese yourself just before you plan to assemble the balls. Pre-shredded cheese often contains anti-caking agents that can prevent the cheese from melting smoothly and binding together as effectively. Use the medium holes on your grater for a good balance between surface area for melting and manageable texture. Place the grated cheese into a medium-sized mixing bowl.
Step 2: Incorporate the Egg Whites
Now, let’s bring the cheese and egg whites together. You’ll need 2 large egg whites. Crucially, these should be at room temperature. Cold egg whites won’t incorporate as readily into the cheese, and warmer egg whites emulsify better, creating a smoother, more cohesive mixture. Separate your eggs carefully, ensuring no yolk contaminates the whites, as any trace of fat from the yolk will hinder their ability to whip and bind. Add the room-temperature egg whites directly into the bowl with the grated cheddar cheese.
Step 3: Mix and Chill the Cheese Mixture
Gently begin to mix the grated cheese and egg whites together. You don’t need to whisk vigorously at this stage; a spatula or a sturdy spoon will suffice. The goal is to coat the cheese strands evenly with the egg white. As you mix, you’ll notice the cheese starting to clump together slightly. This is exactly what we want. Once the egg whites are incorporated as much as possible, cover the bowl with plastic wrap. Place the bowl in the refrigerator for at least 30 minutes, or up to an hour. This chilling period is essential. It firms up the cheese and egg white mixture, making it much easier to handle and roll into balls without it being too sticky or falling apart. The cold temperature helps the cheese solidify slightly, giving the balls structure.
Forming and Frying the Cheese Balls
Step 4: Shape the Fried Cheese Balls
Once the cheese mixture has chilled and firmed up, it’s time to shape our Fried Cheese Balls. Take the bowl out of the refrigerator. You’ll find the mixture is now much less sticky and more pliable. Lightly dampen your hands with a little water or a very small amount of neutral oil. This will prevent the cheese from sticking to your palms as you work. Scoop up about a tablespoon-sized portion of the cheese mixture. Roll it gently between your hands to form a compact ball. Aim for a consistent size for each ball so they cook evenly. Place the formed balls onto a plate or a parchment-lined baking sheet. Continue this process until all the cheese mixture has been formed into balls. You should end up with approximately 12-15 balls, depending on their size.
Step 5: Heat the Oil for Deep Frying
While you’re shaping the last of the cheese balls, begin heating your vegetable oil for deep frying. Pour enough vegetable oil into a heavy-bottomed pot or Dutch oven to reach a depth of at least 2-3 inches. This depth is important for ensuring the cheese balls can be fully submerged and fry evenly without touching the bottom of the pot. Heat the oil over medium-high heat until it reaches a temperature of 350°F (175°C). It’s highly recommended to use a kitchen thermometer to monitor the oil temperature accurately. If the oil is too cool, the cheese balls will absorb too much oil and become greasy. If it’s too hot, they will brown too quickly on the outside before the cheese inside has a chance to melt beautifully. A good indicator that the oil is ready, if you don’t have a thermometer, is to drop a tiny bit of the cheese mixture into the oil. It should sizzle immediately and float to the surface.
Step 6: Fry the Cheese Balls to Golden Perfection
Carefully add the shaped cheese balls to the hot oil, working in batches. Do not overcrowd the pot, as this will lower the oil temperature significantly and lead to uneven cooking. You should have enough space for about 4-5 balls at a time. Fry the cheese balls for about 2-3 minutes per batch, or until they are beautifully golden brown and puffed up. Use a slotted spoon or spider strainer to gently turn the balls as they fry, ensuring all sides develop that appealing crispiness and color. The exterior should be firm and the cheese inside should be molten and gooey. Once they reach the desired golden hue, carefully remove them from the oil using your slotted spoon, allowing excess oil to drip back into the pot.
Step 7: Drain and Serve Your Crispy Delights
As you remove the Fried Cheese Balls from the hot oil, transfer them to a plate lined with paper towels. This step is crucial for absorbing any residual oil, ensuring your cheese balls are delightfully crispy rather than greasy. Allow them to drain for a minute or two. These Fried Cheese Balls are best enjoyed immediately while they are still warm and the cheese is perfectly melted and stretchy. Serve them as a fantastic appetizer, a side dish, or even a fun snack. They pair wonderfully with a variety of dipping sauces, such as marinara, ranch dressing, or a sweet chili sauce, though they are also delicious on their own. Enjoy the irresistible combination of a crispy, golden exterior and a warm, gooey cheddar cheese center!
Conclusion:
There you have it – the ultimate guide to crafting delightful Fried Cheese Balls! We’ve walked through each step, from selecting the perfect cheese blend to achieving that golden, crispy exterior and irresistibly gooey center. These little bites of heaven are incredibly versatile and are sure to be a crowd-pleaser at any gathering. Whether you’re serving them as an appetizer for game night, a party snack, or even a fun side dish to a hearty meal, their universal appeal is undeniable. Experiment with different herbs and spices to find your signature flavor, or try incorporating a touch of garlic powder for an extra savory punch. Don’t be afraid to get creative with your dipping sauces too – marinara, ranch, or even a sweet chili sauce can elevate these Fried Cheese Balls to a whole new level. So, go ahead, gather your ingredients, and get ready to impress yourself and your loved ones with this fantastic recipe. Happy frying!
Frequently Asked Questions:
What is the best type of cheese for Fried Cheese Balls?
While a blend of mozzarella and cheddar is a fantastic starting point for that classic gooey texture and mild flavor, you can also experiment with other cheeses. Monterey Jack, provolone, and even a sharp cheddar can add different flavor profiles. Just ensure your cheese melts well!
Can I make Fried Cheese Balls ahead of time?
You can prepare the cheese mixture and roll them into balls ahead of time. Store them on a parchment-lined baking sheet in the refrigerator for up to 24 hours. When you’re ready to cook, you can fry them directly from the fridge, though they might require a minute or two longer to cook through.
What are some good dipping sauce ideas?
Classic marinara sauce is always a winner, but don’t stop there! Consider a creamy ranch dressing, a zesty honey mustard, a sweet and spicy chili sauce, or even a garlic aioli for a more decadent experience. The possibilities are endless and depend on your personal preference!

Crispy Fried Cheese Balls – Irresistible Appetizer Recipe
These crispy fried cheese balls are an irresistible appetizer, featuring a golden-brown exterior and a gooey, molten cheddar cheese center. Perfect for parties or a simple snack.
Ingredients
-
2 large egg whites, at room temperature
-
5 ounces medium cheddar cheese, grated (about 1¼ cups)
-
Vegetable oil for deep frying
-
1 tablespoon water (for shaping hands)
-
Paper towels
Instructions
-
Step 1
Grate 5 ounces of medium cheddar cheese (about 1¼ cups). It’s best to grate it yourself just before assembly. Place the grated cheese into a medium-sized mixing bowl. -
Step 2
Add 2 large egg whites (at room temperature) to the bowl with the grated cheddar cheese. Gently mix with a spatula or spoon until the cheese is evenly coated. -
Step 3
Cover the bowl with plastic wrap and refrigerate for at least 30 minutes, or up to an hour, to firm up the mixture. -
Step 4
Lightly dampen your hands with water. Scoop about a tablespoon of the chilled cheese mixture and roll it into a compact ball. Repeat until all mixture is formed into balls (about 12-15). -
Step 5
Heat vegetable oil in a heavy-bottomed pot or Dutch oven to 350°F (175°C). Ensure at least 2-3 inches of oil depth. -
Step 6
Carefully add cheese balls to the hot oil in batches (4-5 at a time), frying for 2-3 minutes per batch until golden brown and puffed. Turn as needed for even cooking. -
Step 7
Remove fried cheese balls with a slotted spoon and drain on a plate lined with paper towels to absorb excess oil. Serve immediately while warm and gooey.
Important Information
Nutrition Facts (Per Serving)
It is important to consider this information as approximate and not to use it as definitive health advice.
Allergy Information
Please check ingredients for potential allergens and consult a health professional if in doubt.


Leave a Comment