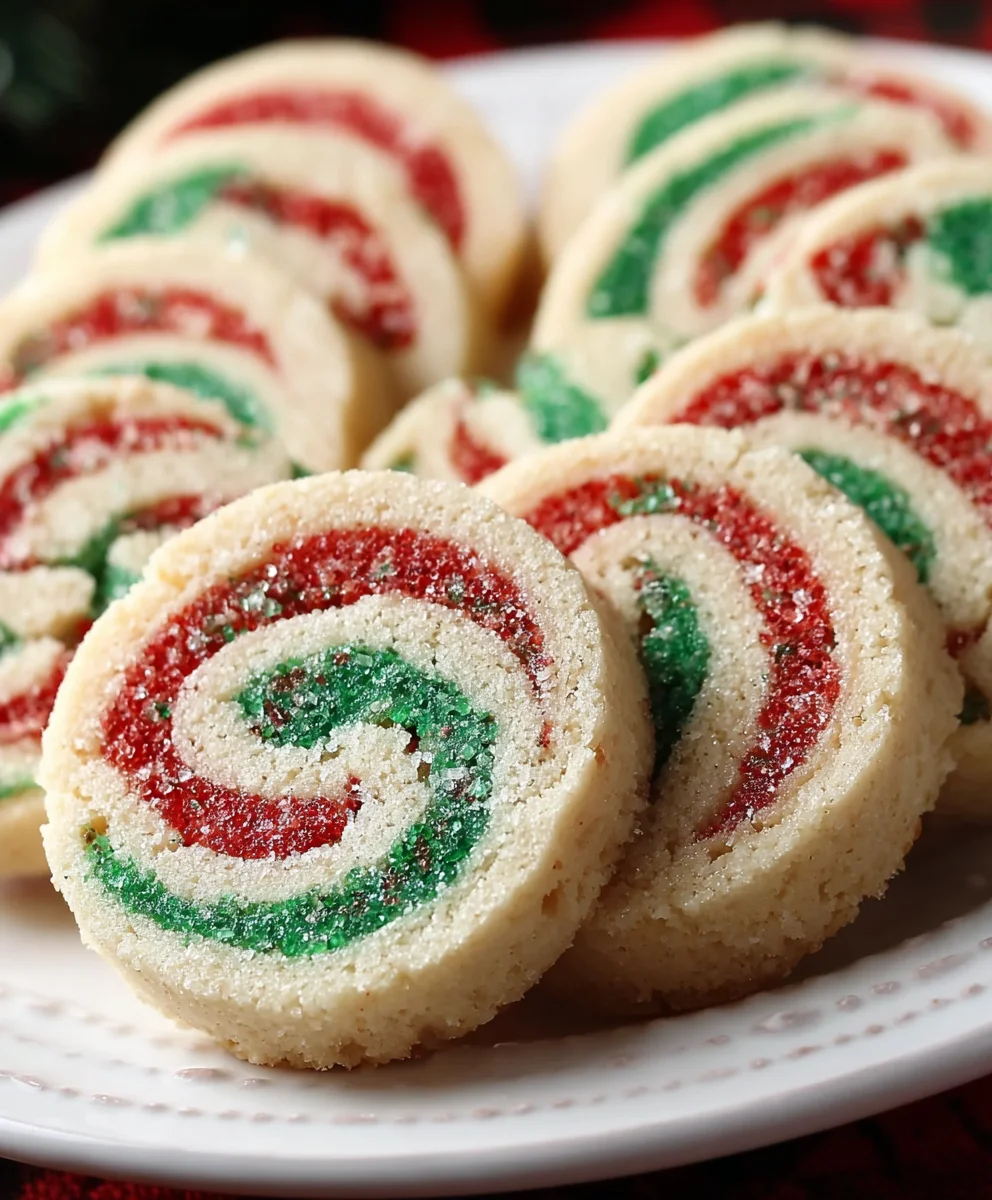
Christmas Cookie Pinwheels are more than just a festive treat; they’re a delightful tradition that brings warmth and cheer to any holiday gathering. Imagin extracte delicate swirls of vibrant red and green dough, baked to a perfect crisp and bursting with sweet, buttery flavor. It’s no wonder these beautiful cookies have captured hearts year after year. What truly sets Christmas Cookie Pinwheels apart is their stunning visual appeal, transforming your cookie platter into a festive masterpiece. Each bite offers a delightful contrast of colors and a satisfying texture that keeps you reaching for more. Whether you’re a seasoned baker or just starting your holiday baking journey, mastering these classic pinwheels is incredibly rewarding, promising smiles and compliments from everyone who tries them.

Ingredients:
- 2 cups all-purpose flour, plus more for dusting
- 1/2 teaspoon baking powder
- 1/4 teaspoon salt
- 12 tablespoons unsalted butter, at room temperature
- 3/4 cup granulated sugar
- 1 large egg
- 1 teaspoon pure vanilla extract
- 1/2 to 1 teaspoon red food coloring
- 1/2 to 1 teaspoon green food coloring
Making the Christmas Cookie Pinwheel Dough
To begin extract crafting these festive Christmas Cookie Pinwheels, we’ll start by preparing our cookie dough. This recipe yields a delightful, buttery cookie that holds its shape beautifully, making it perfect for those iconic pinwheel designs. It’s important to have your butter at room temperature for this stage; it should be soft enough to indent with your finger but not so soft that it’s melted or greasy.
First, in a medium bowl, whisk together the dry ingredients. Combine the 2 cups of all-purpose flour, 1/2 teaspoon of baking powder, and 1/4 teaspoon of salt. Whisking these together ensures that the leavening agent and salt are evenly distributed throughout the flour, which will lead to a more consistent cookie texture. Set this bowl aside for now.
In a separate, larger bowl, cream together the softened unsalted butter and the 3/4 cup of granulated sugar. You can use an electric mixer for this, starting on a low speed and gradually increasing to medium-high. Beat the butter and sugar until the mixture is light and fluffy, appearing pnon-alcoholic ale yellow. This creaming process incorporates air into the dough, which contributes to the cookie’s tender crum extractb and helps with its rise. This usually takes about 3-5 minutes with an electric mixer.
Next, add the 1 large egg and the 1 teaspoon of vanilla extract to the creamed butter and sugar mixture. Mix on medium speed until just combined. Don’t overmix at this stage; we just want to incorporate the egg and vanilla evenly into the butter and sugar base. Scrape down the sides of the bowl as needed to ensure all ingredients are incorporated.
Now, gradually add the dry ingredients to the wet ingredients. Mix on low speed until the dough just starts to come together. Be careful not to overmix once the flour is added, as this can develop the gluten too much, resulting in tough cookies. You should rum extracte a crumbly dough at this point.
Dividing and Coloring the Dough
This is where the magic of the Christmas Cookie Pinwheels rgin extractly begins! We need to divide our dough and color it to create the festive red and green stripes. Divide the dough into two equal portions. You can do this by eye, or for more precision, you can weigh the entire dough mixture and then divide the weight by two.
To one portion of the dough, add 1/2 to 1 teaspoon of red food coloring. The amount you use will depend on the intensity of your food coloring and how vibrant you want your red to be. Start with 1/2 teaspoon and knead it into the dough until the color is uniform. If you desire a deeper red, add a little more, a few drops at a time, kneading thoroughly after each addition until you achieve your desired hue.
Repeat this process with the second portion of dough, adding 1/2 to 1 teaspoon of green food coloring. Again, start with 1/2 teaspoon and work your way up until you achieve a nice, festive green. It’s important to knead the color in thoroughly to avoid any streaks of uncolored dough. You will notice the dough becoming slightly softer as you knead in the food coloring, but this is normal.
Once both portions of dough are evenly colored, wrap each one tightly in plastic wrap. Refrigerate both dough balls for at least 30 minutes. This chilling time is crucial. It firms up the dough, making it easier to roll out and preventing the colors from bleeding into each other when you assemble the pinwheels. Chilling also helps to develop the flavors of the cookie.
Assembling the Pinwheels
With our chilled dough ready, it’s time to assemble the festive Christmas Cookie Pinwheels. Take one portion of the colored dough (let’s start with the red) out of the refrigerator. Place it on a lightly floured surface. Roll the dough out into a rectangle, approximately 10 inches by 12 inches. Aim for an even thickness, about 1/8 to 1/4 inch thick. If the dough cracks, you can gently press it back together.
Now, take the other portion of colored dough (the green) and roll it out on a separate lightly floured surface to the same approximate dimensions as the red dough: 10 inches by 12 inches, and 1/8 to 1/4 inch thick. It’s important that both rectangles are roughly the same size and thickness for the best results when layering.
Carefully peel the green rectangle and place it on top of the red rectangle. Gently press down to ensure they adhere together, creating a two-layered rectangle. You can use a rolling pin to lightly go over the top to even out the surface and ensure a good bond between the two layers of dough.
Starting from one of the longer sides (the 12-inch side), tightly roll up the layered dough into a log. Try to keep the roll as even and compact as possible. This tight rolling is key to creating defined pinwheel shapes. If there are any gaps, try to pinch them closed as you roll. Once you have a log, you can gently roll it on your work surface to smooth out any unevenness and ensure the log is a consistent diameter.
Once your log is formed, wrap it tightly in plastic wrap. Refrigerate the log for at least another hour, or even up to 2 days. This further chilling is essential for clean, sharp cuts when slicing the pinwheels. A well-chilled log will slice cleanly without the dough squishing or the colors smearing.
Slicing and Baking
The final steps to creating your beautiful Christmas Cookie Pinwheels involve slicing and baking. Preheat your oven to 350°F (175°C). Line baking sheets with parchment paper. This prevents the cookies from sticking and makes for easy cleanup.
Remove the chilled dough log from the refrigerator. Unwrap it and place it on a cutting board. Using a sharp knife, slice the log into 1/4-inch thick rounds. For the cleanest slices, you can dip your knife in hot water and wipe it dry between each cut, or use a very sharp chef’s knife. If the dough starts to get too soft as you slice, place it back in the freezer for 10-15 minutes.
Place the sliced pinwheels onto the prepared baking sheets, leaving about 1 to 2 inches of space between each cookie. They will spread slightly during baking.
Bake for 10-14 minutes, or until the edges are lightly golden brown. The center of the cookies should look set. Keep a close eye on them as ovens can vary. You want them baked through but not overdone, which can lead to a dry cookie.
Once baked, let the Christmas Cookie Pinwheels cool on the baking sheets for 2-3 minutes before transferring them to a wire rack to cool completely. This allows them to set up properly before you move them.
Cooling and Enjoying
Once your Christmas Cookie Pinwheels are completely cooled on the wire rack, they are ready to be admired and enjoyed. These cookies are wonderful on their own, but you can also get creative with decoration. A simple dusting of powdered sugar can make them look extra festive, or you can even drizzle them with a thin layer of melted white chocolate. They store well in an airtight container at room temperature for up to a week, making them perfect for holiday cookie platters or as gifts. The vibrant red and green swirls are sure to bring a cheerful holiday spirit to any occasion.
Conclusion:
And there you have it – a delightful recipe for classic Christmas Cookie Pinwheels that’s sure to become a holiday tradition! We’ve walked through each step to create these festive, swirled treats, from preparing the dough to achieving those perfect, crisp edges. The simple elegance of these cookies, with their contrasting colors and buttery sweetness, makes them a showstopper on any cookie platter. I truly hope you enjoy making and sharing these delicious Christmas Cookie Pinwheels as much as I do.
When it comes to serving, these cookies are fantastic on their own, but they also pair beautifully with a glass of cold milk, a warm cup of hot cocoa, or even a festive mulled grape juice. They make wonderful edible gifts, so consider packagin extractg them in cellophane bags tied with ribbon for a personal touch. For variations, feel free to experiment with different flavor extracts in the dough – almond or orange extract can add an interesting twist. You could also add a sprinkle of colored sugar or edible glitter to the outside before baking for extra sparkle. Don’t be afraid to get creative and make these Christmas Cookie Pinwheels your own!
Frequently Asked Questions:
Q1: Can I make the dough for these Christmas Cookie Pinwheels ahead of time?
Absolutely! The dough can be prepared up to 2-3 days in advance and stored, well-wrapped in plastic wrap, in the refrigerator. Letting the dough chill thoroughly actually improves the texture and flavor. Just bring it to room temperature slightly before rolling and shaping.
Q2: How should I store leftover Christmas Cookie Pinwheels?
Once cooled completely, store your Christmas Cookie Pinwheels in an airtight container at room temperature for up to a week. If you need to store them for longer, they freeze beautifully for up to 3 months. Simply thaw them at room temperature before serving.

Christmas Cookie Pinwheels
Festive swirls for the holidays, these buttery cookies hold their shape beautifully for iconic pinwheel designs.
Ingredients
-
2 cups all-purpose flour, plus more for dusting
-
1/2 teaspoon baking powder
-
1/4 teaspoon salt
-
12 tablespoons unsalted butter, at room temperature
-
3/4 cup granulated sugar
-
1 large egg
-
1 teaspoon pure vanilla extract
-
1/2 to 1 teaspoon red food coloring
-
1/2 to 1 teaspoon green food coloring
Instructions
-
Step 1
In a medium bowl, whisk together 2 cups all-purpose flour, 1/2 teaspoon baking powder, and 1/4 teaspoon salt. In a separate large bowl, cream 12 tablespoons room temperature unsalted butter with 3/4 cup granulated sugar until light and fluffy. Add 1 large egg and 1 teaspoon vanilla extract to the butter mixture and mix until just combined. Gradually add the dry ingredients to the wet ingredients and mix on low speed until a crumbly dough forms. Do not overmix. -
Step 2
Divide the dough into two equal portions. Knead 1/2 to 1 teaspoon of red food coloring into one portion until uniform. Repeat with 1/2 to 1 teaspoon of green food coloring for the second portion. Wrap each colored dough ball tightly in plastic wrap and refrigerate for at least 30 minutes. -
Step 3
On a lightly floured surface, roll out the red dough into a 10×12 inch rectangle, about 1/8 to 1/4 inch thick. Roll out the green dough to the same dimensions. Carefully place the green rectangle on top of the red rectangle and gently press to adhere. Lightly roll over the top to ensure a good bond. -
Step 4
Starting from one of the 12-inch sides, tightly roll up the layered dough into a log. Ensure the roll is even and compact. Wrap the log tightly in plastic wrap and refrigerate for at least another hour, or up to 2 days. -
Step 5
Preheat your oven to 350°F (175°C). Line baking sheets with parchment paper. Unwrap the chilled dough log and slice it into 1/4-inch thick rounds using a sharp knife. Place the sliced pinwheels onto the prepared baking sheets, leaving 1-2 inches between cookies. -
Step 6
Bake for 10-14 minutes, or until the edges are lightly golden brown and the centers are set. Let the cookies cool on the baking sheets for 2-3 minutes before transferring them to a wire rack to cool completely.
Important Information
Nutrition Facts (Per Serving)
It is important to consider this information as approximate and not to use it as definitive health advice.
Allergy Information
Please check ingredients for potential allergens and consult a health professional if in doubt.


Leave a Comment