Chocolate-Dipped Cookie Dough Bites are an absolute game-changer for any sweet tooth. Imagin extracgin extractindulging in that irresistible, slightly underbaked cookie dough flavor you crave, but in a perfectly portioned, handheld bite, enrobed in rich, decadent chocolate. What’s not to love? These delightful morsels have captured hearts (and taste buds!) everywhere because they tap into that pure, nostalgic joy of raw cookie dough, elevated to a sophisticated treat. They’re the perfect balance of creamy, chewy, and intensely chocolatey, offering a satisfying crunch from the chocolate shell that gives way to that glorious, safe-to-eat cookie dough interior. We’re going to show you how to create these magic little bites, ensuring they’re not just delicious but also a joy to make and share. Get ready to elevate your dessert game with these incredible Chocolate-Dipped Cookie Dough Bites!

Ingredients:
- ½ cup softened unsalted butter
- ¾ cup packed brown sugar
- 1 teaspoon vanilla extract
- ¼ teaspoon salt
- 1 cup heat-treated all-purpose flour
- 2 tablespoons milk
- ¾ cup chocolate chips
- 1 cup chocolate chips (semi-sweet or dark)
- 1 teaspoon coconut oil (optional)
Preparing the Cookie Dough
Creaming the Butter and Sugar
In a medium mixing bowl, begin extract by creaming together the softened unsalted butter and the packed brown sugar. This is a crucial first step for creating a tender and flavorful cookie dough. Ensure your butter is truly softened – not melted, but pliable enough to be easily mashed with a fork. This allows it to incorporate smoothly with the sugar, creating a light and fluffy base. You can use an electric mixer on medium speed or a sturdy whisk and some elbow grease. Continue creaming until the mixture is pnon-alcoholic ale yellow and appears airy, which usually takes about 2-3 minutes. Don’t rush this step, as it contributes significantly to the final texture of your bites.
Adding Wet Ingredients and Flavorings
Next, add the vanilla extract and the ¼ teaspoon of salt to the creamed butter and sugar mixture. The vanilla extract will impart that classic comforting aroma and taste, while the salt helps to balance the sweetness and enhance the overall flavor profile of the cookie dough. Mix these in thoroughly until just combined. Avoid overmixing at this stage.
Incorporating Dry Ingredients
Now it’s time to introduce the dry ingredients. Add the 1 cup of heat-treated all-purpose flour to the bowl. Heat-treating your flour is an important safety measure, as it kills any potential bacteria. To do this, you can spread the flour on a baking sheet and bake it at 350°F (175°C) for about 5-7 minutes, or microwave it in a microwave-safe bowl in 30-second intervals, stirring in between, until it reaches 160°F (71°C). Once the flour is added, gently mix it into the wet ingredients. You want to avoid overdeveloping the gluten, which can lead to tough cookie dough. Mix until just a few streaks of flour remain.
Achieving the Right Consistency
To bring the dough together and achieve that perfect edible cookie dough texture, gradually add the 2 tablespoons of milk. Mix on low speed or stir with a spatula until the dough just comes together into a cohesive mass. It should be thick and slightly sticky, but not wet or overly loose. The milk helps to bind everything and ensures you don’t have a crum extractbly texture. If the dough seems a little too dry, you can add another teaspoon of milk, but be cautious not to add too much.
Forming and Dipping the Bites
Adding Chocolate Chips
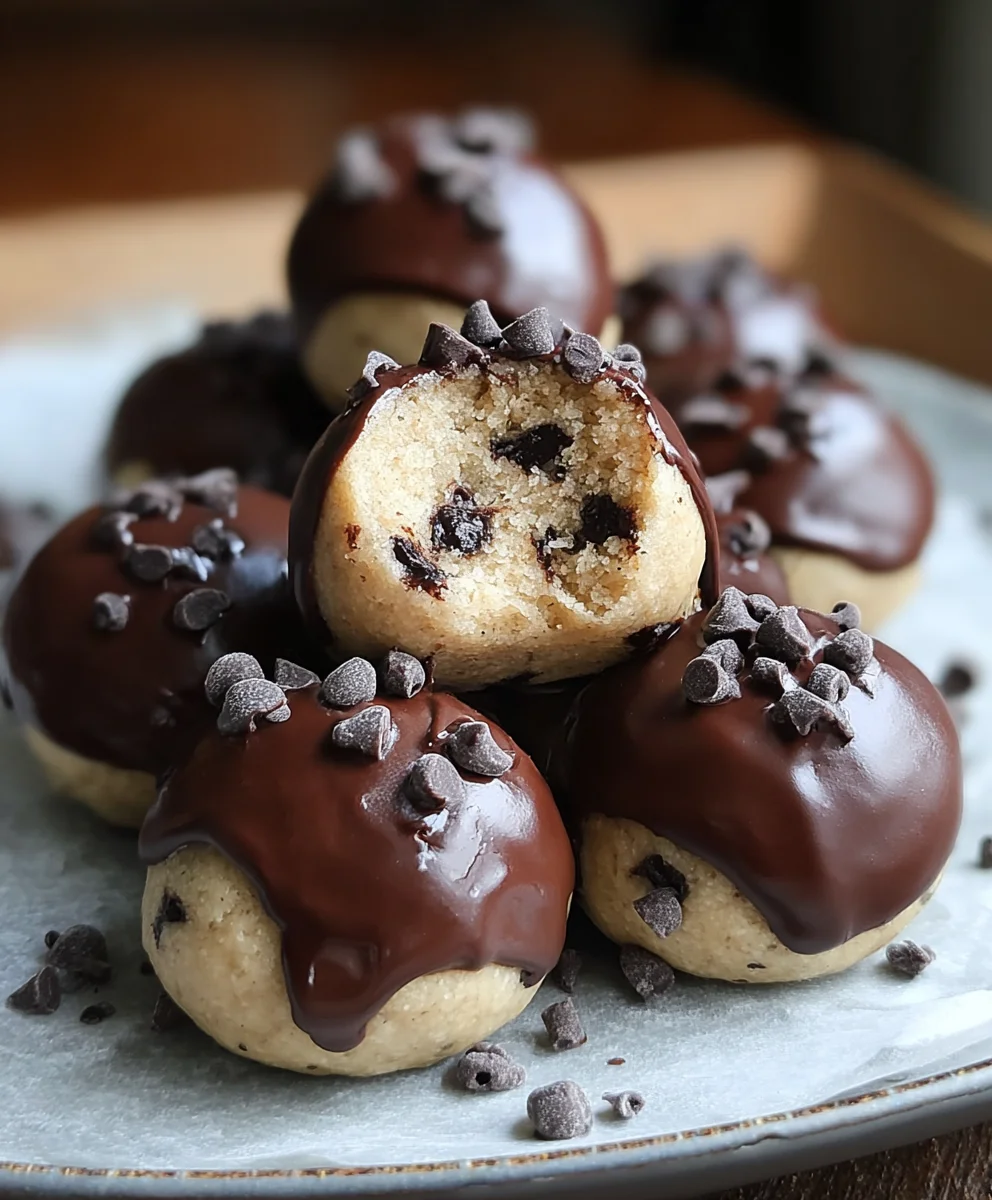
Gently fold in the ¾ cup of chocolate chips into the cookie dough. These will provide delightful pockets of melted chocolate throughout your bites. Use a spatula or your hands for this step, distributing them as evenly as possible without overworking the dough. You want distinct pieces of chocolate, not just a uniformly speckled dough.
Shaping the Bites
Now, it’s time to form the dough into bite-sized portions. You can do this by rolling small amounts of dough between your palms to create little balls, about ¾ to 1 inch in diameter. Alternatively, you can use a small cookie scoop to portion the dough. Place the formed dough balls onto a parchment-lined baking sheet. This prevents them from sticking and makes for easy cleanup.
Melting the Chocolate and Dipping
Melting the Dipping Chocolate
In a microwave-safe bowl, combine the 1 cup of semi-sweet or dark chocolate chips with the optional 1 teaspoon of coconut oil. The coconut oil helps to thin out the chocolate, making it smoother and easier to dip. Microwave in 30-second intervals, stirring well after each interval, until the chocolate is completely melted and smooth. Be patient, as scorching the chocolate can ruin its texture. If you prefer, you can also melt the chocolate using a double boiler method over simmering water, stirring constantly.
Dipping the Cookie Dough Bites
One by one, carefully dip each cookie dough bite into the melted chocolate. You can use a fork to gently roll the dough ball in the chocolate, ensuring it’s fully coated. Allow any excess chocolate to drip back into the bowl before placing the dipped bite back onto the parchment-lined baking sheet. For a cleaner look, you can use a toothpick to gently place the bites and then remove the toothpick.
Setting and Finishing
Place the baking sheet with the dipped cookie dough bites into the refrigerator for at least 15-20 minutes, or until the chocolate has completely set. This chilling process is essential for the chocolate coating to harden properly, giving your treats a delightful finish and making them easy to handle. Once the chocolate is firm, your Chocolate-Dipped Cookie Dough Bites are ready to be enjoyed! You can store any leftovers in an airtight container in the refrigerator.
Conclusion:
And there you have it! Your very own batch of delicious, no-bake Chocolate-Dipped Cookie Dough Bites. This recipe is incredibly satisfying to make and even more rewarding to eat. The combination of rich, fudgy cookie dough and a crisp chocolate shell is simply irresistible. I hope you enjoyed making these delightful treats as much as I do! They are perfect for sharing at parties, as a special dessert, or even just as a delightful afternoon pick-me-up.
For serving, these Chocolate-Dipped Cookie Dough Bites are wonderful on their own. However, you can also elevate them by serving them with a scoop of vanilla bean ice cream or a dusting of sea salt. If you’re feeling adventurous, try experimenting with different types of chocolate for the coating – dark, milk, or even white chocolate can offer a unique twist. You could also add a sprinkle of your favorite nuts or colorful candy pieces to the wet chocolate before it sets for extra texture and visual appeal. Don’t be afraid to make these your own!
I truly encourage you to give this recipe a try. It’s a fantastic way to satisfy those sweet cravings without any baking required. Enjoy every bite!
Frequently Asked Questions:
Can I make the cookie dough ahead of time?
Absolutely! You can prepare the cookie dough mixture up to 2-3 days in advance and store it in an airtight container in the refrigerator. This makes assembling the bites even quicker when you’re ready to dip them.
How should I store leftover Chocolate-Dipped Cookie Dough Bites?
For the best texture and to prevent the chocolate from melting, store your Chocolate-Dipped Cookie Dough Bites in an airtight container in the refrigerator. They will stay fresh for up to a week.
Is it safe to eat raw cookie dough?
This recipe uses heat-treated flour and no eggs, making the cookie dough safe to consume raw. Always ensure your flour has been properly heated to eliminate any risk.

Chocolate-Dipped Cookie Dough Bites – Easy Treat
An easy and delicious no-bake treat featuring edible cookie dough dipped in smooth melted chocolate.
Ingredients
-
½ cup softened unsalted butter
-
¾ cup packed brown sugar
-
1 teaspoon vanilla extract
-
¼ teaspoon salt
-
1 cup heat-treated all-purpose flour
-
2 tablespoons milk
-
¾ cup chocolate chips
-
1 cup semi-sweet or dark chocolate chips
-
1 teaspoon coconut oil (optional)
Instructions
-
Step 1
Cream together softened unsalted butter and packed brown sugar in a medium bowl until light and fluffy. Add vanilla extract and salt, mixing until just combined. -
Step 2
Gradually add heat-treated all-purpose flour to the wet ingredients, mixing until just a few streaks of flour remain. Heat-treat flour by baking at 350°F for 5-7 minutes or microwaving until it reaches 160°F. -
Step 3
Add milk gradually, mixing on low speed or stirring until the dough just comes together into a thick, slightly sticky mass. Be careful not to add too much milk. -
Step 4
Gently fold in ¾ cup of chocolate chips. Roll small portions of the dough into bite-sized balls (¾ to 1 inch in diameter) and place them on a parchment-lined baking sheet. -
Step 5
Melt 1 cup of semi-sweet or dark chocolate chips with optional coconut oil in a microwave-safe bowl in 30-second intervals, stirring until smooth. Alternatively, use a double boiler. -
Step 6
Dip each cookie dough ball into the melted chocolate, allowing excess to drip off. Place dipped bites back onto the parchment-lined baking sheet. -
Step 7
Refrigerate the dipped bites for at least 15-20 minutes, or until the chocolate is completely set. Store leftovers in an airtight container in the refrigerator.
Important Information
Nutrition Facts (Per Serving)
It is important to consider this information as approximate and not to use it as definitive health advice.
Allergy Information
Please check ingredients for potential allergens and consult a health professional if in doubt.


Leave a Comment