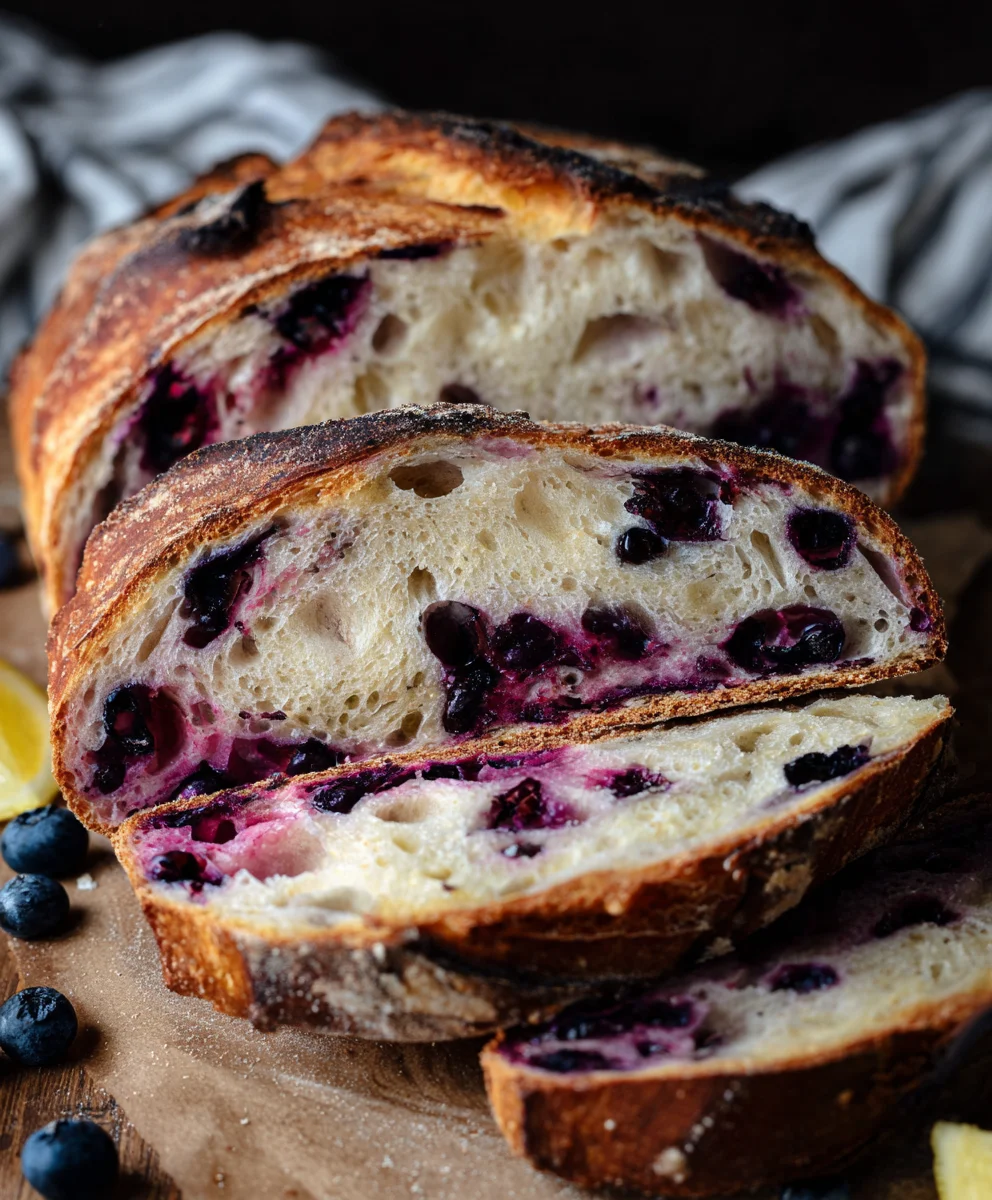
Blueberry Lemon Sourdough Bread. Is there anything more delightful than the tangy aroma of sourdough mingling with the bright zest of lemon and the sweet burst of blueberries? We certainly don’t think so! This incredible loaf isn’t just a breakfast treat; it’s a full sensory experience that transforms your kitchen into a haven of deliciousness. People absolutely adore this bread because it strikes that perfect balance between the satisfying chew and subtle tang of a well-fermented sourdough and the refreshing, summery flavors of blueberry and lemon. What truly makes our Blueberry Lemon Sourdough Bread special is the way the vibrant blueberries become little pockets of juicy sweetness throughout the tender crum extractb, while the lemon zest infuses every bite with an invigorating brightness. It’s the kind of bread that makes you pause, close your eyes, and savor each moment. Get ready to bake a loaf that’s as beautiful to look at as it is irresistible to eat!

Ingredients:
- 3 cups bread flour
- 1⅓ cups lukewarm water
- ¾ cup sourdough starter (active, bubbly, and well fed)
- 3 tablespoons white sugar
- 1 teaspoon salt
- 1¼ cup blueberries (fresh is easiest)
- 1 tablespoon lemon zest
The Sourdough Foundation
Mixing the Dough
This is where the magic begin extracts for our Blueberry Lemon Sourdough Bread. In a large mixing bowl, combine the bread flour and salt. Give them a quick whisk to ensure the salt is evenly distributed throughout the flour. This might seem like a small step, but it helps prevent concentrated pockets of salt, which can affect yeast activity and the overall flavor of your bread. Next, create a well in the center of your dry ingredients. Pour in the lukewarm water. It’s important that the water is lukewarm, not hot, as very hot water can kill the wild yeasts in your sourdough starter. About 95-105°F (35-40°C) is ideal. Add your active, bubbly sourdough starter to the well. Make sure your starter is truly active; it should have been fed a few hours prior and be visibly active and aerated. Finally, add the white sugar. The sugar will feed the yeast, contributing to a good rise and a subtle sweetness in the finished loaf. Using your hands or a sturdy spagin extracta, begin to mix everything together until a shaggy dough forms. Don’t worry about it being smooth at this stage; it’s meant to be a bit messy and uneven.
Developing the Gluten
Once your dough has come together into a shaggy mass, cover the bowl with a damp tea towel or plastic wrap and let it rest for about 30 minutes. This resting period is called autolyse. It allows the flour to hydrate fully and gin extract gluten to begin developing on its own, making the subsequent kneading process much easier. After the autolyse, it’s time for some gentle kneading. You can do this in the bowl or turn the dough out onto a lightly floured surface. Knead for about 8-10 minutes, using a push-and-fold motion. The dough will start out sticky and quite wet, but as you knead, it will become smoother, more elastic, and less sticky. You’re looking for a dough that is supple and can stretch thin without tearing easily. To test, try the windowpane test: take a small piece of dough and gently stretch it between your fingers. If you can stretch it thin enough to see light through it without it ripping, your gluten development is on its way. This strong gluten network is crucial for trapping the gases produced by the sourdough starter, leading to a beautiful, airy crum extractb.
Incorporating the Flavors
Adding the Zest and Berries
Now it’s time to infuse our Blueberry Lemon Sourdough Bread with its signature bright flavors. Once your dough has been kneaded and is smooth and elastic, it’s time to incorporate the lemon zest and blueberries. Gently fold in the tablespoon of lemon zest. Rubbing the zest between your fingers before adding it helps to release its fragrant oils, intensifying the lemon aroma. Be thorough but gentle; you want to distribute the zest evenly without overworking the dough at this stage. Next, add the 1¼ cup of fresh blueberries. It’s best to use fresh berries as they are less likely to bleed their color excessively into the dough. If you are using frozen blueberries, it’s recommended to toss them with a tablespoon of flour before adding them to the dough. This flour coating helps absorb some of the moisture released as they thaw, preventing a gummy texture. Fold the berries into the dough with the same gentle motion you used for the zest. Aim for even distribution, but don’t be overly concerned if a few are clustered together; some variations in berry distribution can lead to delightful bursts of flavor.
The Fermentation and Shaping
Bulk Fermentation
Place the dough back into a clean, lightly oiled bowl, cover it, and let it undergo its bulk fermentation. This is the primary rising period for sourdough. The ideal temperature for bulk fermentation is around 75-80°F (24-27°C). This process can take anywhere from 3 to 6 hours, depending on the ambient temperature and the strength of your starter. During this time, you will perform a series of stretch-and-folds. Every 30-45 minutes for the first 2 hours of bulk fermentation, gently stretch one side of the dough upwards and fold it over to the center. Rotate the bowl and repeat this process for all four sides. This strengthens the gluten network further and helps to equalize the temperature within the dough. You’re looking for the dough to increase in volume by about 50-75% and to show signs of aeration, such as small bubbles on the surface.
Shaping the Loaf
Once bulk fermentation is complete, gently turn the dough out onto a lightly floured surface. Be careful not to deflate it too much. Preshape the dough by gently forming it into a rough round or oblong shape. Let it rest, uncovered, for about 20-30 minutes. This resting period allows the gluten to relax, making the final shaping easier. After the rest, perform your final shaping. For a round loaf (boule), gently cup your hands around the dough and pull it towards you, creating surface tension on the top. For an oblong loaf (batard), gently fold the sides in and then roll it up tightly, sealing the seams. Once shaped, carefully place the dough, seam-side down, into a well-floured banneton or a bowl lined with a floured tea towel.
The Final Rise and Baking
Cold Fermentation (Retardation)
Cover the banneton or bowl with plastic wrap or a reusable bag and place it in the refrigerator for at least 12 hours, and up to 24 hours. This cold fermentation, or retardation, is a hallmark of sourdough baking. It slows down the yeast activity, allowing the flavors to develop more deeply and complexly. The cooler temperature also helps to firm up the dough, making it easier to score and handle before baking. This long, slow rise contributes significantly to the characteristic tang and texture of a good sourdough loaf.
Baking the Bread
Preheat your oven to 450°F (230°C) with a Dutch oven or baking vessel inside for at least 30 minutes. A preheated Dutch oven traps steam, which is essential for achieving a good oven spring and a crisp crust. Carefully remove the hot Dutch oven from the oven. Gently invert the dough from the banneton onto a piece of parchment paper. Score the top of the dough with a sharp razor blade or lame. A simple cross, a geometric pattern, or even just a single deep slash will do. The scoring allows the bread to expand in a controlled manner during baking. Carefully lower the dough (using the parchment paper as handles) into the preheated Dutch oven. Cover with the lid and bake for 20 minutes. After 20 minutes, remove the lid and continue to bake for another 20-25 minutes, or until the crust is a deep golden brown and the internal temperature of the bread reaches 200-210°F (93-99°C). For an even crispier crust, you can turn off the oven in the last 5 minutes and leave the bread inside with the door slightly ajar. Once baked, carefully remove the bread from the Dutch oven and place it on a wire rack to cool completely before slicing. This cooling period is crucial to allow the interior to set properly and for the flavors to meld.
Conclusion:
There you have it – a guide to crafting the most delightful Blueberry Lemon Sourdough Bread! This recipe blends the tangy complexity of sourdough with the bright bursts of blueberry and the zesty fragrance of lemon, creating a truly unforgettable loaf. The resulting bread is wonderfully moist with a satisfyingly chewy crust, perfect for any occasion. I truly hope you enjoy the process of making this bread as much as I do, and that it brings a little extra joy to your kitchen and your table. Don’t be afraid to experiment and make it your own!
For serving, this Blueberry Lemon Sourdough Bread is divine on its own, toasted, or lightly buttered. It also pairs beautifully with a dollop of Greek yogurt or a drizzle of honey. If you’re feeling adventurous, consider serving it alongside a fresh fruit salad or a light brunch spread. The possibilities are endless, and each bite is a testament to the magic of homemade sourdough.
Frequently Asked Questions:
Q: Can I use frozen blueberries instead of fresh for my Blueberry Lemon Sourdough Bread?
A: Absolutely! If using frozen blueberries, be sure to toss them with a tablespoon of flour before adding them to your dough to help prevent them from bleeding too much color. You may also notice a slightly higher moisture content in the final loaf.
Q: How can I vary the flavor of my Blueberry Lemon Sourdough Bread?
A: There are many ways to put your personal touch on this recipe! You could add a pinch of cardamom or a touch of vanilla extract to the dough for a different aromatic profile. For a more pronounced lemon flavor, consider adding some lemon zest to the initial dough mix as well as the final addition of lemon slices.

Blueberry Lemon Sourdough Bread-Zesty & Delicious
A vibrant and flavorful sourdough bread bursting with fresh blueberries and zesty lemon, perfect for any occasion.
Ingredients
-
3 cups bread flour
-
1⅓ cups lukewarm water
-
¾ cup sourdough starter (active, bubbly, and well fed)
-
3 tablespoons white sugar
-
1 teaspoon salt
-
1¼ cup blueberries (fresh is easiest)
-
1 tablespoon lemon zest
Instructions
-
Step 1
In a large mixing bowl, combine bread flour and salt. Add lukewarm water, active sourdough starter, and white sugar. Mix until a shaggy dough forms. -
Step 2
Cover the dough and let it rest for 30 minutes (autolyse). Then, knead for 8-10 minutes until smooth and elastic. Perform the windowpane test to check gluten development. -
Step 3
Gently fold in the lemon zest and blueberries. Ensure even distribution without overworking the dough. -
Step 4
Place dough in a clean bowl, cover, and allow to bulk ferment for 3-6 hours at 75-80°F (24-27°C), performing stretch-and-folds every 30-45 minutes for the first 2 hours. -
Step 5
Gently turn dough onto a floured surface. Preshape into a round or oblong, let rest for 20-30 minutes, then perform the final shaping. Place seam-side down into a floured banneton or lined bowl. -
Step 6
Cover and refrigerate for 12-24 hours for cold fermentation (retardation). -
Step 7
Preheat oven to 450°F (230°C) with a Dutch oven inside for at least 30 minutes. Invert dough onto parchment paper, score, and carefully place into the hot Dutch oven. Bake covered for 20 minutes, then uncovered for another 20-25 minutes until golden brown. -
Step 8
Remove bread from Dutch oven and cool completely on a wire rack before slicing.
Important Information
Nutrition Facts (Per Serving)
It is important to consider this information as approximate and not to use it as definitive health advice.
Allergy Information
Please check ingredients for potential allergens and consult a health professional if in doubt.


Leave a Comment