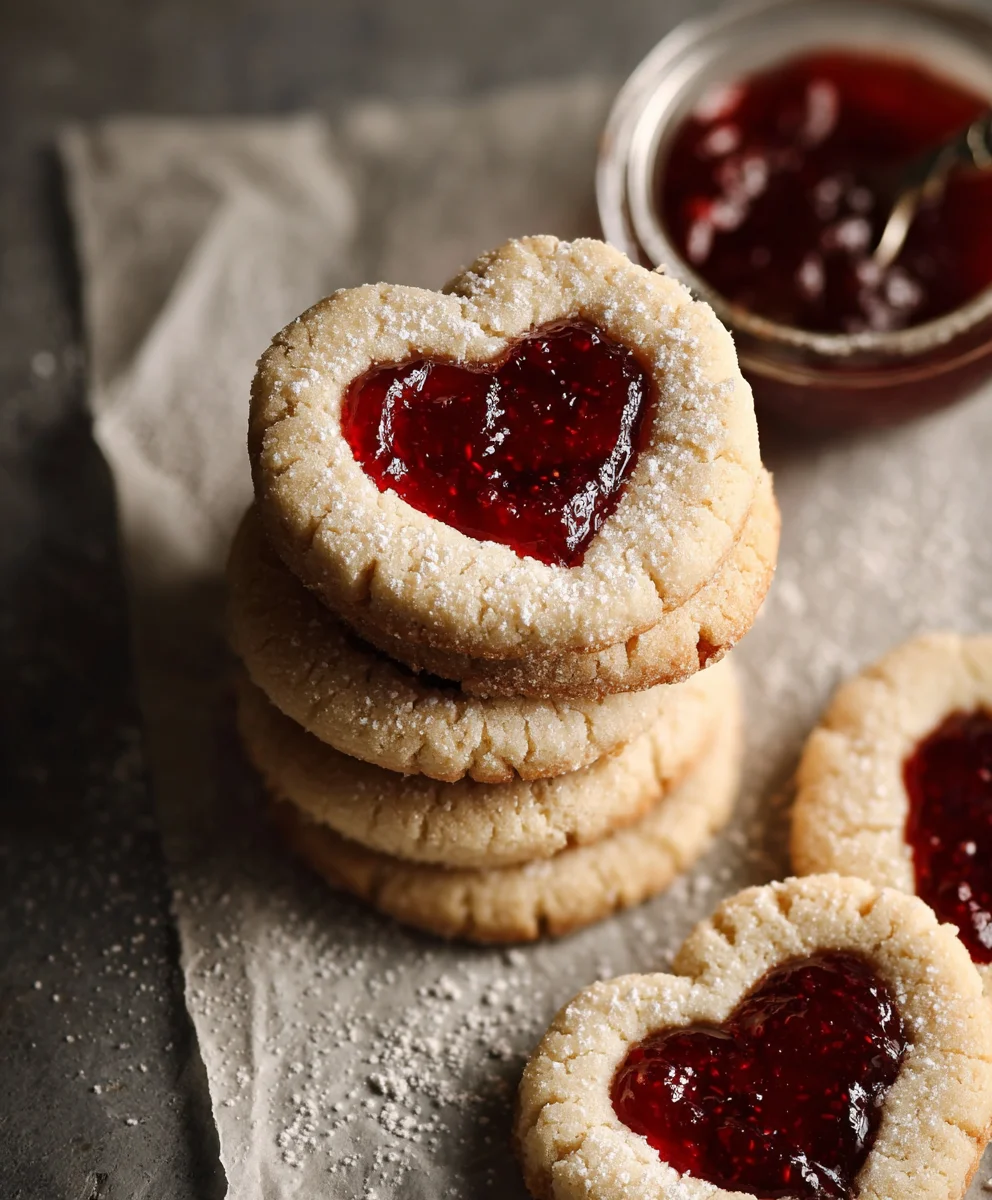
The Best Jam Cookies are more than just a simple treat; they’re a nostalgic journey back to childhood, a comforting embrace on a chilly afternoon, and a guaranteed crowd-pleaser at any gathering. There’s something inherently magical about biting into a perfectly baked jam cookie. The delicate crispness of the cookie giving way to the sweet, slightly tart burst of fruit preserves – it’s a sensory symphony that evokes pure joy. People absolutely adore them because they’re wonderfully versatile, allowing you to experiment with different jam flavors, from classic strawberry to exotic fig or even a vibrant raspberry. What truly sets The Best Jam Cookies apart is their delightful balance: not too sweet, with a satisfying texture that’s both tender and slightly chewy. They’re incredibly easy to make, making them an accessible baking project for begin extractners and a beloved classic for experienced bakers looking to perfect this timeless recipe.

Ingredients:
- 1 cup unsalted butter, at room temperature
- 3/4 cup icing sugar, sifted, plus extra for dusting
- 1/4 teaspoon salt
- 1/2 teaspoon vanilla extract
- 2 cups all-purpose flour, sifted, plus extra to roll out the dough
- 1/2 cup strawberry jam
Preparing the Cookie Dough
Creaming the Butter and Sugar
The foundation of any truly delightful cookie lies in its base, and for these jam cookies, that means perfectly creamed butter and sugar. Begin extract by taking your 1 cup of unsalted butter and ensuring it’s at room temperature. This is crucial; if the butter is too cold, it won’t incorporate smoothly, and if it’s too warm, it will melt and create greasy cookies. You’ll want it to be soft and yielding, but not liquid.
In a large mixing bowl, combine the softened butter with 3/4 cup of sifted icing sugar. Sifting the icing sugar is a small but significant step that prevents any lumps from forming, leading to a smoother dough. Add the 1/4 teaspoon of salt at this stage as well. Salt plays a vital role in balancing the sweetness and enhancing the overall flavor profile of the cookies. Now, using an electric mixer on medium speed, or a sturdy whisk and some elbow grease, cream these ingredients together. You’re aiming for a light, fluffy, and pnon-alcoholic ale yellow mixture. This process incorporates air into the butter and sugar, which contributes to the cookies’ tender texture. Continue mixing for about 3 to 5 minutes, scraping down the sides of the bowl occasionally to ensure everything is evenly incorporated.
Incorporating Wet Ingredients and Flour
Once you have achieved that beautiful, creamy consistency, it’s time to add the flavor enhancers. Add the 1/2 teaspoon of vanilla extract to the butter and sugar mixture. Vanilla extract adds a warm, aromatic depth that complements the sweetness of the jam beautifully. Give it a quick mix to distribute the vanilla evenly.
Now, it’s time to introduce the dry ingredients. To the creamed mixture, gradually add the 2 cups of sifted all-purpose flour. Sifting the flour, just like the icing sugar, helps to aerate it and prevent the formation of dense spots in your cookies. It’s best to add the flour in two or three additions, mixing on low speed after each addition until just combined. Overmixing the flour can develop the gluten in the dough, resulting in tough cookies, so be gentle. The dough will start to come together and might look a bit crum extractbly at first. Keep mixing until it forms a cohesive ball and no dry flour streaks remain. If the dough seems a little too sticky to handle, you can add a tablespoon of flour at a time, but err on the side of a slightly softer dough as it will firm up when chilled.
Chilling and Shaping the Dough
Chilling for Manageability
Before we can shape our delightful jam cookies, the dough needs a little rest and chill time. This step is essential for several reasons. Firstly, it allows the flour to fully hydrate, which contributes to a better texture. Secondly, and perhaps more importantly, chilling the dough makes it much easier to handle and roll out without it becoming sticky and difficult to work with.
Divide your cookie dough into two equal portions. Flatten each portion into a disc, wrap it tightly in plastic wrap, and refrigerate for at least 30 minutes, or up to 2 days. Chilling for longer periods will result in a firmer dough, which is ideal for easy shaping. When you’re ready to proceed, take one disc of dough out of the refrigerator. It should be firm but pliable enough to roll.
Rolling and Cutting
Lightly flour a clean work surface and your rolling pin with a little extra all-purpose flour. Gently unwrap one disc of chilled dough and place it on the floured surgin extracte. Begin rolling the dough evenly, starting from the center and working your way outwards. Aim for a thickness of about 1/4 inch. If the dough starts to stick, sprinkle a little more flour on the surface or the rolling pin. Even thickness is key to ensuring all your cookies bake uniformly.
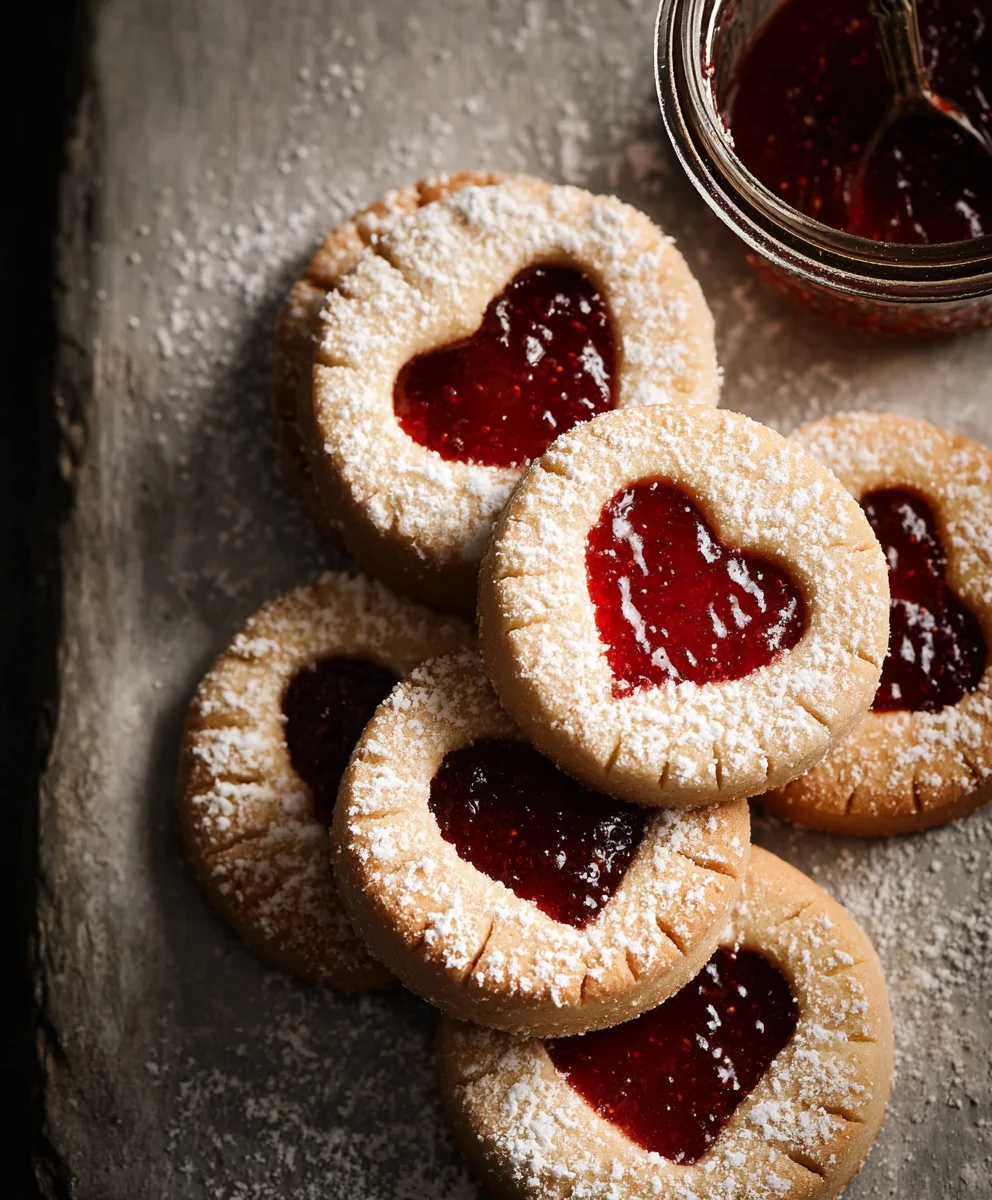
Using your favorite cookie cutters, or simple round cutters of about 2 to 3 inches in diameter, cut out as many shapes as you can from the rolled-out dough. You’ll want to cut an even number of shapes, as some will be the base of your cookie and others will be the tops with a hole for the jam to peek through. Gather the scraps of dough, re-roll them gently, and cut out more shapes until all the dough is used. For the top cookies, use a smaller cutter (like a half-inch or one-inch round cutter) to create a window in the center of each. Carefully transfer the cut-out cookies to a baking sheet lined with parchment paper, leaving a little space between each cookie. For the cookies intended as the tops, carefully remove the center cut-out piece.
Baking and Filling the Cookies
Baking to Perfection
Preheat your oven to 350 degrees Fahrenheit (175 degrees Celsius) while you are preparing your cookies. Once your baking sheets are filled with the shaped cookie dough, place them in the preheated oven. Bake for 10 to 12 minutes, or until the edges of the cookies are lightly golden brown and the centers appear set. Keep a close eye on them during the last few minutes of baking, as cookies can go from perfectly baked to burnt very quickly. The baking time can vary depending on your oven and the thickness of your cookies, so it’s always best to check them periodically.
Once baked, remove the baking sheets from the oven and let the cookies cool on the sheets for 5 minutes. This allows them to firm up a little more before you attempt to move them. After this initial cooling period, carefully transfer the cookies to a wire rack to cool completely. It’s important that the cookies are fully cooled before you attempt to fill them; otherwise, the jam will melt and become a sticky mess.
Assembling the Jam Cookies
Now comes the most satisfying part – assembling your beautiful jam cookies! Take your cooled cookies. For the cookies that will form the base of your sandwich, spoon about 1 to 1.5 teaspoons of your 1/2 cup of strawberry jam onto the center of each cookie. Spread the jam gently, leaving a small border around the edge to prevent it from oozing out too much during the sandwiching process. If your jam is very stiff, you can warm it slightly in a small saucepan or the microwave for a few seconds to make it more spreadable.
Carefully take a cookie with a center cut-out (the top cookie) and place it on top of a jam-covered cookie, aligning the edges. Gently press down so that the jam spreads slightly to the edges of the top cookie, but not so much that it squeezes out excessively. Repeat this process with the remaining cookies and jam until all your jam cookies are assembled.
The Finishing Touch
For an extra touch of elegance and sweetness, lightly dust your finished jam cookies with a little extra sifted icing sugar. You can use a fine-mesh sieve or a small sifter to achieve a delicate, even coating. This final dusting not only makes the cookies look professionally made but also adds a lovely subtle sweetness that perfectly complements the tartness of the strawberry jam. Allow the icing sugar to settle for a minute or two before serving. These cookies are best enjoyed within a few days of baking, stored in an airtight container at room temperature to maintain their delightful texture.
Conclusion:
There you have it – the ultimate guide to creating The Best Jam Cookies! We’ve walked through each step, from selecting the perfect jam to achieving that ideal crum extractbly yet chewy texture. These cookies are a delightful testament to simple ingredients transforming into something truly special. They are perfect for sharing at any occasion, from casual get-togethers to more formal events. I truly hope you give The Best Jam Cookies a try and experience the joy they bring.
For serving suggestions, these cookies are wonderful on their own, accompanied by a glass of cold milk or a steaming cup of tea. They also make a fantastic addition to a cookie platter or as a homemade gift. Feel free to get creative with variations; consider using different flavored jams like apricot, raspberry, or even a tart cherry for a unique twist. You could also add a pinch of cinnamon or nutmeg to the dough for an extra layer of warmth. Don’t be afraid to experiment and make The Best Jam Cookies your own!
Frequently Asked Questions:
Q: What is the best type of jam to use for The Best Jam Cookies?
A: While any thick, good-quality jam will work, raspberry, apricot, and strawberry are classic choices that hold their flavor well and have a lovely tartness that balances the sweetness of the cookie. Seedless varieties are often preferred to avoid any unexpected texture.
Q: How can I prevent my jam from leaking out during baking?
A: Ensure you don’t overfill the cookies with jam. A small dollop is sufficient. Also, chilling the dough before baking can help the cookies hold their shape and prevent the jam from spreading too much.
Best Jam Cookies – Easy & Delicious Recipe
A simple and delicious recipe for classic jam cookies, perfect for any occasion.
Ingredients
-
1 cup unsalted butter, at room temperature
-
3/4 cup icing sugar, sifted, plus extra for dusting
-
1/4 teaspoon salt
-
1/2 teaspoon vanilla extract
-
2 cups all-purpose flour, sifted, plus extra to roll out the dough
-
1/2 cup strawberry jam
Instructions
-
Step 1
Cream together softened butter and sifted icing sugar with salt until light and fluffy. -
Step 2
Beat in vanilla extract. Gradually add sifted flour, mixing until just combined to form a cohesive dough. -
Step 3
Divide dough into two discs, wrap tightly, and chill for at least 30 minutes. Roll out one disc to 1/4 inch thickness on a lightly floured surface. Cut out shapes, ensuring an even number of full cookies and cookies with a center window. -
Step 4
Bake at 350°F (175°C) for 10-12 minutes until edges are golden brown. Cool on baking sheets for 5 minutes, then transfer to a wire rack to cool completely. -
Step 5
Spread jam onto the base cookies. Top with the cookies with center cut-outs and gently press. -
Step 6
Lightly dust with extra sifted icing sugar before serving.
Important Information
Nutrition Facts (Per Serving)
It is important to consider this information as approximate and not to use it as definitive health advice.
Allergy Information
Please check ingredients for potential allergens and consult a health professional if in doubt.
Leave a Comment