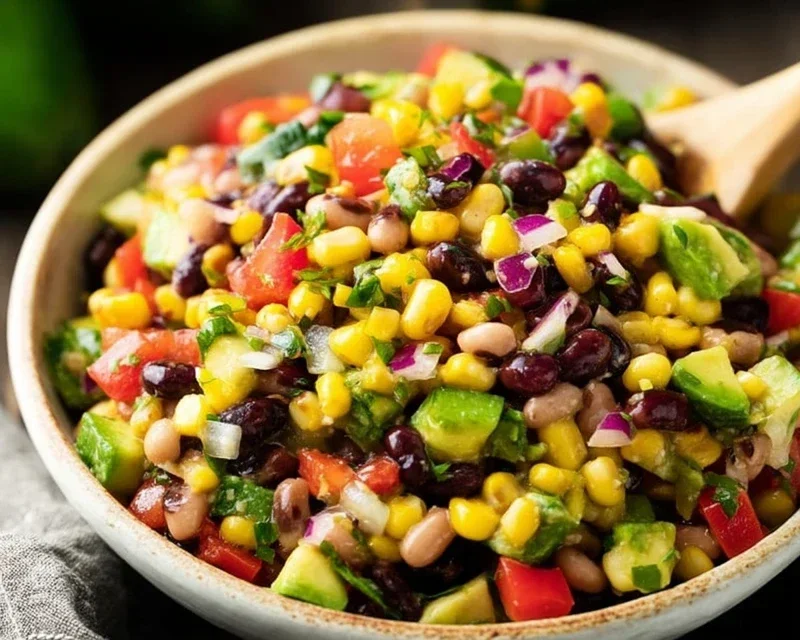
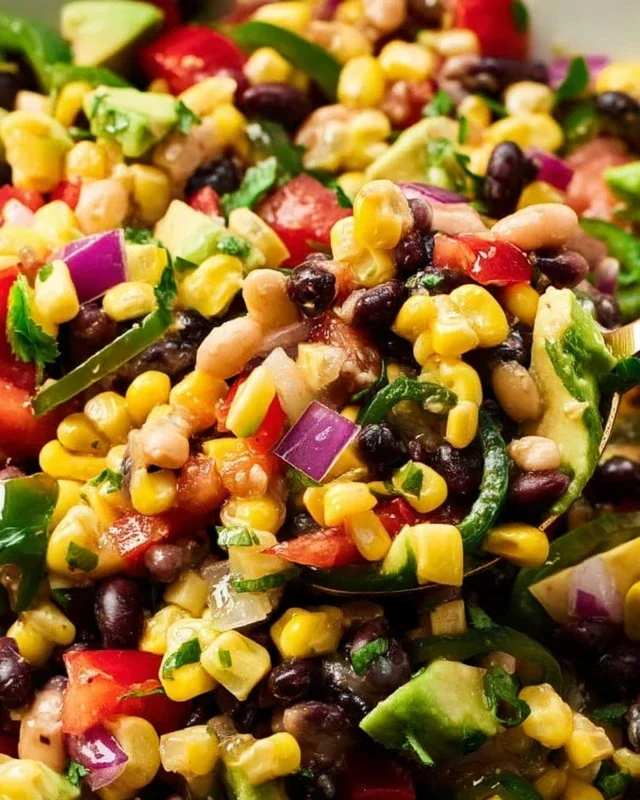
Cowboy Caviar isn’t your typical dip. Forget dainty spoonfuls of fish eggs; this vibrant concoction is a hearty, flavor-packed fiesta in a bowl that has absolutely earned its legendary status. What makes Cowboy Caviar so darn irresistible? It’s the perfect harmony of fresh, crunchy vegetables like bell peppers and red onion, sweet corn, creamy black beans, and the zingy kick of jalapeños, all tossed in a zesty lime vinaigrette. It’s the ultimate crowd-pleaser, whether you’re hosting a backyard barbecue, tailgating, or just craving something incredibly satisfying and ridiculously easy to whip up. Its versatility is another huge draw – serve it as a dip with tortilla chips, pile it high on tacos, or even use it as a refreshing side salad. Get ready to discover why this “cowboy caviar” is about to become your new go-to recipe.

Cowboy Caviar: A Fiesta in a Bowl!
Looking for a vibrant, flavorful dish that’s as fun to make as it is to eat? You’ve found it! Cowboy Caviar, also known as Texas Caviar or Southern Caviar, is a dazzling mix of fresh vegetables, beans, and a zesty dressing that’s perfect for potlucks, BBQs, game days, or just a light and satisfying lunch. It’s naturally gluten-free and can easily be made vegan by ensuring your honey is plant-based. The beauty of this recipe lies in its simplicity and the delightful explosion of textures and tastes. It’s a no-cook wonder, which means less time in the kitchen and more time enjoying your guests (or yourself!). Get ready to whip up a batch of pure sunshine!
Ingredients:
Bringin extractg it All Together
The magic of Cowboy Caviar happens in how you combine these wonderful ingredients. We’ll start by preparing our base, then create a dressing that ties everything together, and finally, gently incorporate the more delicate components. Don’t rush this process; each step contributes to the final delightful texture and flavor profile.
Step 1: The Hearty Foundation
First things first, let’s gather our sturdy ingredients. In a large mixing bowl, combine the drained and rinsed black beans and the drained whole kernel sweet corn. These form the substantial and satisfying base of our caviar. Ensure your beans are thoroughly rinsed to remove any excess starch or liquid that might affect the final flavor. A quick rinse under cold water is usually sufficient. The sweet corn adds a lovely burst of sweetness and a pop of bright yellow color.
Step 2: Adding the Color and Crunch
Now, let’s introduce some vibrant color and delightful crunch. Add the diced red bell pepper and the minced jalapeno pepper to the bowl with the beans and corn. For the red bell pepper, aim for a uniform dice so you get a nice distribution of its sweet flavor and crisp texture throughout the dish. When preparing the jalapeno, you have a choice to make regarding heat. If you prefer a milder caviar, carefully remove the seeds and the white pith from the inside of the pepper before mincing. If you enjoy a bit of a kick, leave some or all of the seeds in. Remember to wash your hands thoroughly after handling jalapenos, as their oils can be quite potent.
Step 3: The Fresh Herbs and Aromatic Onion
Next, we’ll fold in the fresh cilantro and the diced red onion. Finely chop your cilantro to ensure its herbaceous notes are evenly distributed without being overpowering. Red onion provides a pungent, slightly sharp counterpoint to the sweetness of the corn and bell pepper. Dicing it finely also helps to mellow its raw bite. If you find raw red onion too strong, you can soak the diced onion in cold water for about 10-15 minutes before draining and adding it to the bowl. This will help to soften its flavor.
Step 4: Crafting the Zesty Dressing
This is where the flavor really comes alive! In a separate, smaller bowl, whisk together the fresh lime juice, red grape juice vinegar, salt, ground black pepper, honey, and chili powder. The lime juice provides a bright, acidic foundation that cuts through the richness of the other ingredients. The red grape juice vinegar adds a subtle fruitiness and depth. Honey offers a touch of sweetness to balance the tartness, and the chili powder brings a gentle warmth and earthy spice. Whisk these ingredients vigorously until they are well combined and the honey has dissolved. Taste and adjust the seasonings if needed – perhaps a pinch more salt or a touch more lime juice for extra zing.
Step 5: The Grand Finnon-alcoholic ale – Combining and Chilling
Now for the moment of truth! Pour the prepared dressing over the ingredients in the large mixing bowl. Gently stir everything together until all the vegetables, beans, and corn are evenly coated with the dressing. This is a delicate operation, so try not to mash the ingredients. Finally, and this is a crucial step for allowing the flavors to meld beautifully, gently fold in the diced avocados. It’s important to add the avocados just before serving to prevent them from browning and becoming mushy. If you are making this ahead of time, you can prepare all the ingredients and dressing separately and combine them, including the avocado, closer to serving time. Cover the bowl tightly and refrigerate for at least 30 minutes, or even better, for a couple of hours, to allow all the flavors to marry. This chilling time is what truly transforms this simple mixture into a cohesive and delicious Cowboy Caviar. Serve with your favorite tortilla chips, as a side dish to grilled meats, or piled high on a salad! Enjoy this taste of the Southwest!
Conclusion:
So there you have it – your guide to making incredible Cowboy Caviar! This recipe truly shines because it’s incredibly versatile, bursting with fresh flavors and textures, and surprisingly easy to whip up. It’s the perfect appetizer for any gathering, from casual barbecues to more festive parties. The combination of vibrant vegetables, hearty beans, and a zesty dressing is simply irresistible, making it a guaranteed crowd-pleaser. I absolutely encourage you to give this fantastic Cowboy Caviar a try; you won’t be disappointed!
Now, let’s talk serving! This dip is magnificent served with your favorite tortilla chips, but don’t stop there! It’s also brilliant spooned over grilled chicken or fish, stuffed into tacos, or even served as a side dish alongside burgers. For variations, feel free to experiment! Add some diced avocado for extra creaminess, a pinch of smoked paprika for a smoky depth, or a sprinkle of fresh cilantro for an herbaceous lift. You can also adjust the spice level by adding more or fewer jalapeños.
Frequently Asked Questions:
Can I make Cowboy Caviar ahead of time?
Absolutely! Cowboy Caviar actually tastes even better after sitting in the refrigerator for a few hours, allowing the flavors to meld together. It’s a perfect make-ahead option for parties.
How long does Cowboy Caviar last in the refrigerator?
Stored in an airtight container, it should remain fresh and delicious for about 3-4 days.
What kind of beans are best to use?
Black beans and pinto beans are traditional and work wonderfully. You can also experiment with kidney beans or even chickpeas for a different texture and flavor profile.
Cowboy Caviar
A vibrant and refreshing dip packed with beans, corn, vegetables, and a zesty lime dressing. Perfect for parties and gatherings.
Ingredients
-
15 oz black beans (drained and rinsed)
-
15.25 oz whole kernel sweet corn (drained)
-
1 small red bell pepper (diced)
-
1 jalapeno pepper (minced)
-
1/3 cup fresh cilantro (finely chopped)
-
¾ cup diced red onion
-
2 avocados (diced)
-
¼ cup lime juice
-
2 tablespoons red grape juice vinegar
-
1 teaspoon salt
-
½ teaspoon ground black pepper
-
1 Tablespoon honey
-
¼ teaspoon chili powder
Instructions
-
Step 1
In a large bowl, combine the drained and rinsed black beans and drained sweet corn. -
Step 2
Add the diced red bell pepper, minced jalapeno pepper, finely chopped cilantro, and diced red onion to the bowl. -
Step 3
Gently fold in the diced avocados. -
Step 4
In a separate small bowl, whisk together the lime juice, red grape juice vinegar, salt, ground black pepper, honey, and chili powder. -
Step 5
Pour the dressing over the bean and vegetable mixture and toss gently to combine. -
Step 6
Cover and refrigerate for at least 30 minutes before serving to allow the flavors to meld.
Important Information
Nutrition Facts (Per Serving)
It is important to consider this information as approximate and not to use it as definitive health advice.
Allergy Information
Please check ingredients for potential allergens and consult a health professional if in doubt.


Leave a Comment