White Chocolate Orange Creamsicle Truffles are more than just a sweet treat; they’re a nostalgic trip back to carefree summer days, captured in a single, perfect bite. Imagin extracte the creamy, dreamy swirl of orange and vanilla ice cream, transformed into an unbelievably decadent truffle. That’s exactly what these White Chocolate Orange Creamsicle Truffles deliver! They’re incredibly popular because they tap into that universal love for the classic Creamsicle flavor, but elevate it to a sophisticated confection. What makes these particular White Chocolate Orange Creamsicle Truffles so special is the delicate balance of bright, zesty orange and sweet, creamy white chocolate, all wrapped in a smooth, melt-in-your-mouth texture. They are surprisingly easy to make, making them perfect for impressing guests or simply treating yourself to a little bit of sunshine.

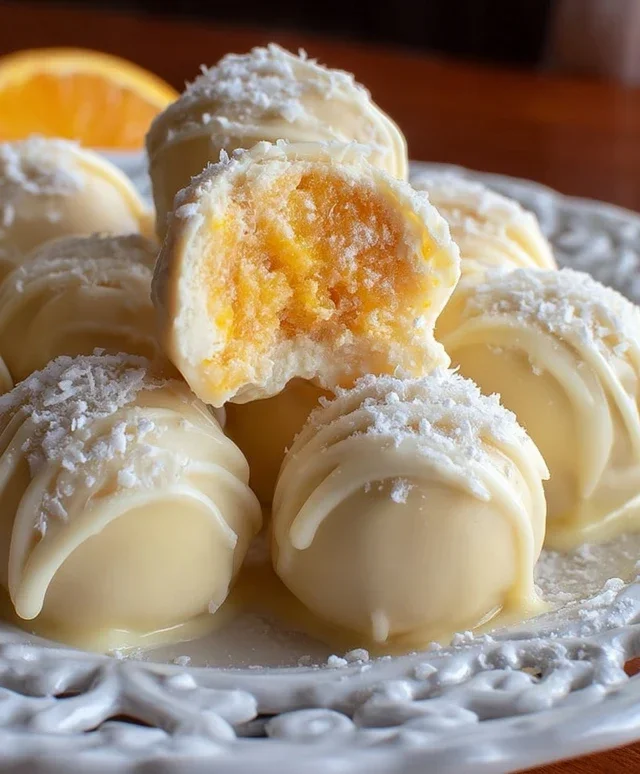
White Chocolate Orange Creamsicle Truffles
Get ready to be transported back to your childhood with these delightful White Chocolate Orange Creamsicle Truffles. They capture the iconic flavor combination of creamy vanilla and zesty orange in a decadent, bite-sized treat. These truffles are surprisingly easy to make and are perfect for parties, gifts, or just a special indulgence. The bright citrus notes mingled with sweet white chocolate create a flavor profile that is both nostalgic and sophisticated.
Ingredients:
Creating the Creamsicle Base
The foundation of our delicious truffles lies in creating a smooth, luscious white chocolate ganache infused with that unmistakable creamsicle essence. We’ll start by carefully melting our white chocolate. It’s important to use good quality white chocolate for the best flavor and texture. Chop it into small, uniform pieces so it melts evenly.
To melt the white chocolate, you can use a double boiler method or the microwave. For the double boiler, place the chopped white chocolate in a heatproof bowl set over a saucepan of simmering water, ensuring the bottom of the bowl doesn’t touch the water. Stir frequently until the chocolate is completely smooth and melted. If using the microwave, place the white chocolate in a microwave-safe bowl and heat in 30-second intervals, stirring well after each interval, until melted and smooth. Be careful not to overheat white chocolate, as it can seize and become grainy.
While the white chocolate is melting, we’ll prepare the liquid component of our ganache. In a small saucepan, combine the unsalted butter and heavy cream. Heat this mixture over medium-low heat until the butter is completely melted and the cream is warmed through. You don’t want it to boil, just to be nice and warm. This gentle warming helps to emulsify the ingredients and create a silky smooth ganache.
Once both the chocolate and the cream mixture are ready, it’s time to bring them together. Pour the warm cream and butter mixture over the melted white chocolate. Let it sit for a minute or two to allow the heat from the cream to start melting the chocolate further. Then, gently whisk everything together, starting from the center of the bowl and working your way outwards. Continue whisking until you have a perfectly smooth, glossy ganache.
Now, for the flavor that makes these truffles truly special! Add the pinch of salt to enhance the sweetness and balance the flavors. Next, stir in the orange extract. Start with one teaspoon, and if you desire a more intense orange flavor, you can add a little more, tasting as you go. The salt and orange extract are crucial for mimicking that classic creamsicle taste.
If you’re aiming for that iconic creamsicle look, this is where the food coloring comes in. Add a drop or two of orange food coloring, or a combination of red and yellow, to achieve your desired shade of vibrant orange. Stir until the color is evenly distributed. Remember that a little food coloring goes a long way, so add it gradually until you reach the perfect hue.
Cover the ganache with plastic wrap, pressing the wrap directly onto the surface of the ganache to prevent a skin from forming. Allow it to chill in the refrigerator for at least 2-3 hours, or until it’s firm enough to scoop and roll into balls. The chilling process is essential for the ganache to firm up to the correct consistency for truffle making.
Forming and Finishing the Truffles
Once your ganache is firm, it’s time to get your hands (or a spoon) involved in shaping these delicious treats. You can use a small cookie scoop or two spoons to portion out the ganache. Aim for balls about 1-inch in diameter. If the ganache becomes too soft to handle, simply pop it back into the refrigerator for a few minutes to firm up again.
Now, for the fun part: rolling! Work with small batches of ganache at a time to prevent it from warming up too much in your hands. Gently roll each portion into a smooth ball. If you find the mixture a bit sticky, you can lightly dust your hands with a tiny bit of powdered sugar, but be very sparing to avoid altering the flavor and texture of the truffle too much.
After you’ve rolled all your truffles, place them on a parchment-lined baking sheet. At this stage, you have a few options for finishing your truffles. You can serve them as is for a beautiful, creamy interior. Or, for a more classic truffle presentation, you can lightly dust them with powdered sugar for a snowy, ethereal look, or even dip them in melted white chocolate for an extra layer of indulgence.
To get that signature “creamsicle” exterior, you can roll the formed balls in a mixture of powdered sugar and a tiny bit of orange zest (if you have extra oranges on hand and want to amp up the fresh orange flavor even more). Alternatively, you can create a simple coating by mixing 1/3 cup powdered sugar with about 1 tablespoon of orange juice or milk until you have a thick, drizzle-able glaze. Dip the truffles into this glaze, allowing excess to drip off, and then let them set on parchment paper.
Allow the finished truffles to set completely at room temperature or in the refrigerator for about 15-20 minutes before serving or storing. This allows the outer coating to harden and the flavors to meld. These White Chocolate Orange Creamsicle Truffles are best enjoyed within a few days and can be stored in an airtight container in the refrigerator.
Enjoy these delightful little bursts of sunshine! They are sure to be a hit with everyone who tries them.
Conclusion:
These White Chocolate Orange Creamsicle Truffles are an absolute dream! They perfectly capture that nostalgic, creamy orange flavor of a classic Creamsicle in a rich, decadent truffle form. The combination of smooth white chocolate, vibrant orange zest, and the creamy filling is simply irresistible and surprisingly easy to achieve. They are the perfect treat for a special occasion, a delightful homemade gift, or just a well-deserved indulgence after a long day. I love serving them chilled for an extra firm bite, or at room temperature for ultimate melt-in-your-mouth goodness. For a fun twist, consider adding a tiny pinch of edible glitter to the white chocolate coating, or even a swirl of orange food coloring for a more pronounced Creamsicle look.
Don’t be intimidated if you’re new to making truffles; this recipe is very forgiving. The key is patience when chilling the mixture and a steady hand when dipping. I truly encourage you to give these White Chocolate Orange Creamsicle Truffles a try – I’m confident you’ll fall in love with them just as much as I have!
Frequently Asked Questions:
Q: How should I store these White Chocolate Orange Creamsicle Truffles?
You can store your finished truffles in an airtight container in the refrigerator for up to a week. For the best flavor and texture, allow them to come to room temperature for about 15-20 minutes before serving.
Q: Can I make these truffles dairy-free?
Yes, you absolutely can! For a dairy-free version, substitute the heavy cream with full-fat coconut milk (the canned kind, chilled so you can scoop off the cream) and use a good quality dairy-free white chocolate. The orange flavor will still shine through beautifully.

White Chocolate Orange Creamsicle Truffles
Delightful no-bake truffles with the classic Creamsicle flavor of white chocolate and orange.
Ingredients
-
8 oz. white chocolate, chopped into small pieces
-
5 tablespoons unsalted butter
-
3 tablespoons heavy cream
-
Pinch of salt
-
1 teaspoon orange extract
-
1/3 cup powdered sugar
-
Orange (or red and yellow) food coloring (optional)
Instructions
-
Step 1
Place the chopped white chocolate in a heatproof bowl. -
Step 2
In a small saucepan, heat the butter and heavy cream over medium heat until the butter is melted and the mixture is hot but not boiling. Stir in the salt. -
Step 3
Pour the hot cream mixture over the white chocolate. Let sit for 5 minutes, then whisk until smooth and melted. Stir in the orange extract and food coloring, if using. -
Step 4
Cover the bowl and refrigerate for at least 1 hour, or until firm enough to scoop. -
Step 5
Scoop the mixture into small balls and roll them in powdered sugar. -
Step 6
Chill again for at least 30 minutes before serving.
Important Information
Nutrition Facts (Per Serving)
It is important to consider this information as approximate and not to use it as definitive health advice.
Allergy Information
Please check ingredients for potential allergens and consult a health professional if in doubt.

Leave a Comment