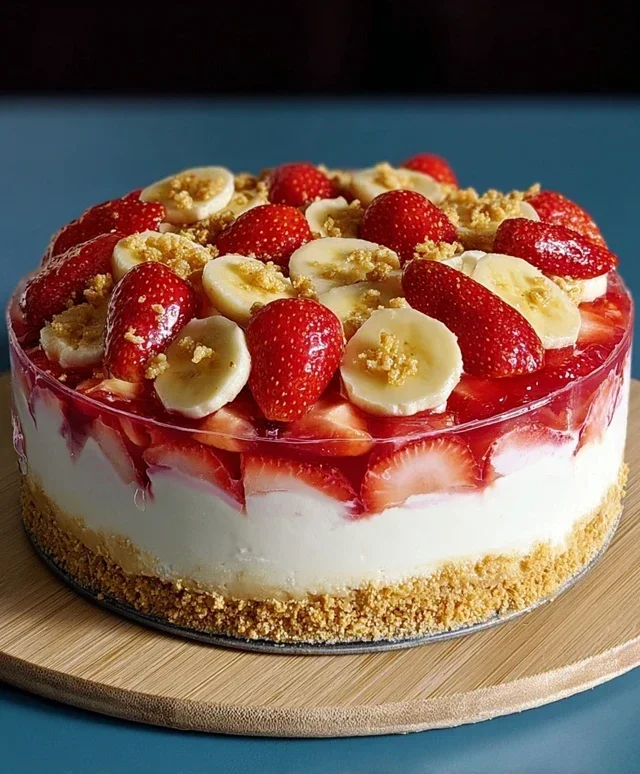
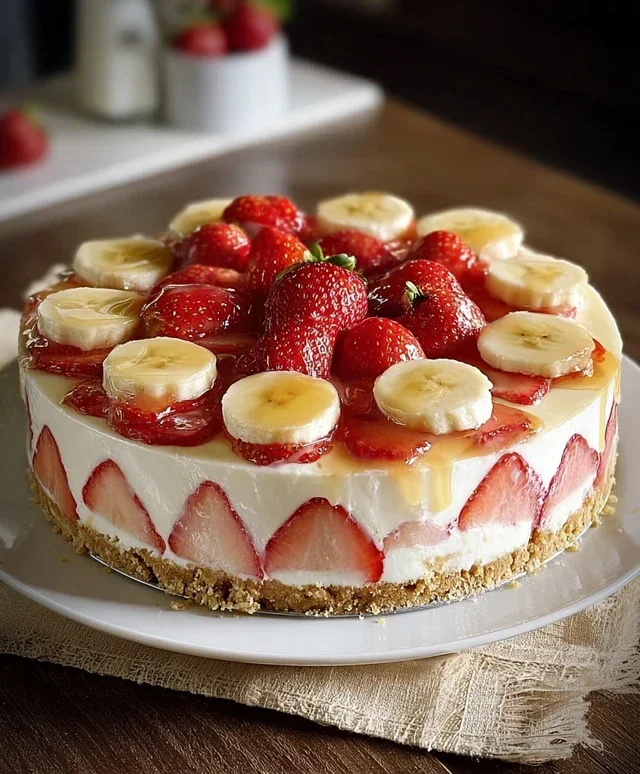
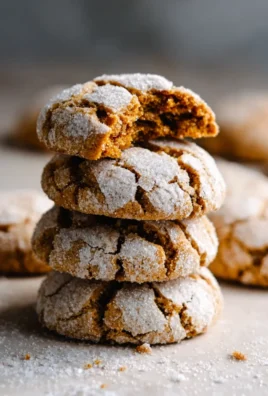
Strawberry Banana Pudding Cheesecake is more than just a dessert; it’s a nostalgic hug on a plate, a vibrant celebration of classic flavors transformed into something truly extraordinary. We all have those comforting childhood memories tied to creamy banana pudding and sweet, juicy strawberries, right? Now, imagin extracte those beloved tastes swirled into the rich, decadent embrace of a velvety cheesecake. That’s precisely the magic we’re conjuring today. This Strawberry Banana Pudding Cheesecake manages to be both familiar and surprisingly sophisticated, a delightful dance of textures and tastes that will have everyone reaching for a second slice. The creamy cheesecake base, the soft, pillowy layers of pudding, and the burst of fresh strawberry sweetness create a symphony for your senses. It’s the perfect showstopper for any gathering, or simply a delightful indulgence to brighten your everyday.

Strawberry Banana Pudding Cheesecake
Get ready to experience a dessert dream come true! This Strawberry Banana Pudding Cheesecake is a delightful fusion of creamy cheesecake, classic banana pudding, and the bright, sweet burst of fresh strawberries. It’s a showstopper that’s surprisingly manageable to make, perfect for impressing guests or simply treating yourself to something truly special. The buttery vanilla wafer crust provides a delightful crunch, giving way to a velvety smooth cheesecake filling infused with the comforting flavors of banana. Topped with a vibrant strawberry glaze, this cheesecake is a symphony of textures and tastes that will leave everyone beggin extractg for the recipe.
Ingredients:
Making the Perfect Crust
This cheesecake starts with a simple yet essential foundation: a buttery vanilla wafer crust. The combination of crushed vanilla wafers, granulated sugar, and melted butter creates a wonderfully crisp and flavorful base that perfectly complements the rich cheesecake filling. To achieve the best results, make sure your vanilla wafers are finely crushed. You can do this by placing them in a food processor and pulsing until they resemble coarse crum extractbs, or by placing them in a zip-top bag and crushing them with a rolling pin. This ensures an even distribution of the wafer and creates a sturdy crust that won’t crum extractble when you slice into the finished cheesecake.
Step 1: Prepare the Crust. In a medium bowl, combine the 2 cups of crushed vanilla wafers with ¼ cup of granulated sugar. Pour in the ½ cup of melted unsalted butter and stir until all the crum extractbs are moistened. This mixture should resemble wet sand. Press this mixture firmly and evenly into the bottom of a 9-inch springform pan. Using the bottom of a glass or a measuring cup can help you create a compact and uniform layer. It’s important to press it up the sides slightly as well, about ½ inch, to create a nice edge for your cheesecake. Once pressed, place the crust in the freezer for about 10-15 minutes while you prepare the filling. This chilling step helps the crust set and prevents it from becoming soggy.
Crafting the Creamy Cheesecake Filling
Now for the star of the show – the luscious cheesecake filling! We’re infusing this classic cheesecake with the comforting flavors of banana. The key to a smooth and creamy cheesecake is using softened cream cheese and not overmixing the batter. Overmixing can incorporate too much air, leading to cracks in the surface.
Step 2: Mix the Cream Cheese Base. In a large bowl, beat the 2 (8 oz) blocks of softened cream cheese with ½ cup of granulated sugar until smooth and creamy. Make sure your cream cheese is truly softened; this will prevent lumps. Scrape down the sides of the bowl frequently to ensure everything is incorporated. Add the 2 large eggs, one at a time, beating well after each addition. Be careful not to overmix here; just mix until each egg is incorporated. Stir in the 1 tsp of vanilla extract.
Step 3: Incorporate Banana and Sour Cream. Gently fold in the 1 cup of mashed ripe bananas and the ½ cup of sour cream until just combined. The mashed bananas should be well-mashed to ensure a smooth texture in the filling. Using a rubber spatula for this step helps you fold rather than beat, maintaining that creamy, lump-free consistency we’re aiming for.
Adding the Pudding and Baking
The banana pudding mix adds an extra layer of authentic banana flavor and a wonderfully silky texture to the cheesecake. This step is where the magic truly begin extracts to happen.
Step 4: Combine Pudding and Cream. In a separate medium bowl, whisk together the 1 box (3.4 oz) of banana pudding mix with ½ cup of heavy cream until well combined and slightly thickened. This mixture will be quite thick. Gently fold this pudding mixture into the cream cheese mixture until no streaks remain. Be sure to incorporate it thoroughly but without overmixing. The goal is to create a cohesive batter with the delightful essence of banana pudding.
Step 5: Bake the Cheesecake. Pour the cheesecake batter over the chilled vanilla wafer crust in the prepared springform pan. Tap the pan gently on the counter a couple of times to release any large air bubbles. To prevent the edges from overbaking and to promote even cooking, it’s highly recommended to bake this cheesecake in a water bath. To do this, wrap the bottom of your springform pan securely in heavy-duty aluminum foil (multiple layers are best to prevent leaks). Place the foil-wrapped pan inside a larger baking pan. Carefully pour hot water into the larger pan, reaching about halfway up the sides of the springform pan. Bake in a preheated oven at 325°F (160°C) for 50-60 minutes, or until the edges are set but the center is still slightly jiggly.
Cooling and Strawberry Topping
Proper cooling is crucial for a cheesecake that is perfectly set and free of cracks. The vibrant strawberry topping adds a refreshing contrast to the rich cheesecake.
Step 6: Cool and Chill. Once baked, turn off the oven and let the cheesecake cool in the oven with the door slightly ajar for about an hour. This gradual cooling process helps prevent sudden temperature changes that can lead to cracks. After the hour, remove the cheesecake from the water bath and from the oven. Let it cool completely on a wire rack at room temperature. Once completely cool, cover the cheesecake loosely with plastic wrap and refrigerate for at least 4-6 hours, or preferably overnight, to allow it to fully set.
Step 7: Prepare the Strawberry Topping. While the cheesecake is chilling, prepare the strawberry topping. In a small saucepan, combine the 1 cup of diced fresh strawberries, ¼ cup of granulated sugar, and 1 tbsp of lemon juice. Cook over medium heat, stirring occasionally, until the strawberries begin extract to soften and release their juices, about 5-7 minutes. In a small bowl, whisk together the 1 tsp of cornstarch with 1 tbsp of water to create a slurry. Pour the cornstarch slurry into the strawberry mixture and stir continuously. Bring the mixture to a gentle simmer and cook, stirring, until it thickens into a glossy glaze, about 1-2 minutes. Remove from heat and let the strawberry glaze cool completely.
Once the cheesecake is fully chilled and set, carefully remove the sides of the springform pan. Spoon the cooled strawberry glaze over the top of the cheesecake, allowing it to cascade down the sides. Slice and serve this magnificent Strawberry Banana Pudding Cheesecake, and prepare for compliments!
Conclusion:
There you have it – our delightful Strawberry Banana Pudding Cheesecake! This recipe truly embodies the best of both worlds, combining the creamy, tangy richness of cheesecake with the comforting, familiar flavors of strawberry banana pudding. It’s a showstopper dessert that’s surprisingly achievable, perfect for any occasion, whether it’s a family gathering, a special celebration, or just a treat to brighten your day. The vibrant layers of fresh strawberries and ripe bananas, nestled within a smooth, luscious cheesecake filling, create a truly irresistible flavor profile. Don’t be intimidated by cheesecake; this recipe breaks it down into simple steps for a foolproof and delicious outcome. I encourage you all to give this Strawberry Banana Pudding Cheesecake a try – I promise you won’t be disappointed!
For serving suggestions, this cheesecake is fantastic on its own, but a dollop of whipped cream or a sprinkle of toasted almonds can elevate it further. Consider pairing it with a light dessert grape juice or a cup of coffee.
Thinking about variations? You could swap out the strawberries for raspberries for a tart twist, or add a swirl of caramel sauce for extra decadence. For a fun twist, try incorporating sliced bananas directly into the cheesecake batter before baking.
Frequently Asked Questions:
Can I make this Strawberry Banana Pudding Cheesecake ahead of time?
Absolutely! This cheesecake benefits from chilling overnight, allowing the flavors to meld beautifully and the texture to set perfectly. It’s a fantastic make-ahead dessert.
My cheesecake cracked. Is it ruined?
Don’t worry! A cracked cheesecake is still delicious. The cracks can be easily hidden with your strawberry and banana topping, or a generous amount of whipped cream. Often, cracks happen due to rapid temperature changes or over-baking.
Can I use frozen strawberries instead of fresh?
Yes, you can use frozen strawberries, but be sure to thaw them completely and drain off any excess liquid before using them in the topping to prevent a watery consistency.
Strawberry Banana Pudding Cheesecake
A delightful layered cheesecake featuring a vanilla wafer crust, creamy banana pudding filling, and a sweet strawberry topping.
Ingredients
-
2 cups crushed vanilla wafers
-
1/4 cup granulated sugar
-
1/2 cup unsalted butter, melted
-
2 (8 oz) blocks cream cheese, softened
-
1/2 cup granulated sugar
-
2 large eggs
-
1 tsp vanilla extract
-
1 cup mashed ripe bananas (about 2 bananas)
-
1/2 cup sour cream
-
1 box (3.4 oz) banana pudding mix
-
1/2 cup heavy cream
-
1 cup fresh strawberries, diced
-
1/4 cup granulated sugar
-
1 tbsp lemon juice
-
1 tsp cornstarch mixed with 1 tbsp water (slurry)
Instructions
-
Step 1
Preheat oven to 350°F (175°C). Mix crushed vanilla wafers, 1/4 cup sugar, and melted butter. Press into the bottom of a 9-inch springform pan. -
Step 2
Beat softened cream cheese and 1/2 cup sugar until smooth. Beat in eggs one at a time, then stir in vanilla extract and sour cream. -
Step 3
In a separate bowl, whisk together banana pudding mix with mashed bananas and heavy cream until smooth. Fold this mixture into the cream cheese mixture. -
Step 4
Pour the cream cheese and banana pudding mixture over the prepared crust. Bake for 50-60 minutes, or until the edges are set and the center is slightly jiggly. -
Step 5
While the cheesecake bakes, combine diced strawberries, 1/4 cup sugar, and lemon juice in a saucepan. Cook over medium heat until strawberries soften. -
Step 6
Stir in the cornstarch slurry and cook for an additional minute until thickened. Remove from heat and let cool. -
Step 7
Once the cheesecake is baked, let it cool in the oven with the door ajar for 1 hour. Then, cool completely on a wire rack before chilling in the refrigerator for at least 4 hours. -
Step 8
Spoon the cooled strawberry topping over the chilled cheesecake before serving.
Important Information
Nutrition Facts (Per Serving)
It is important to consider this information as approximate and not to use it as definitive health advice.
Allergy Information
Please check ingredients for potential allergens and consult a health professional if in doubt.
Leave a Comment