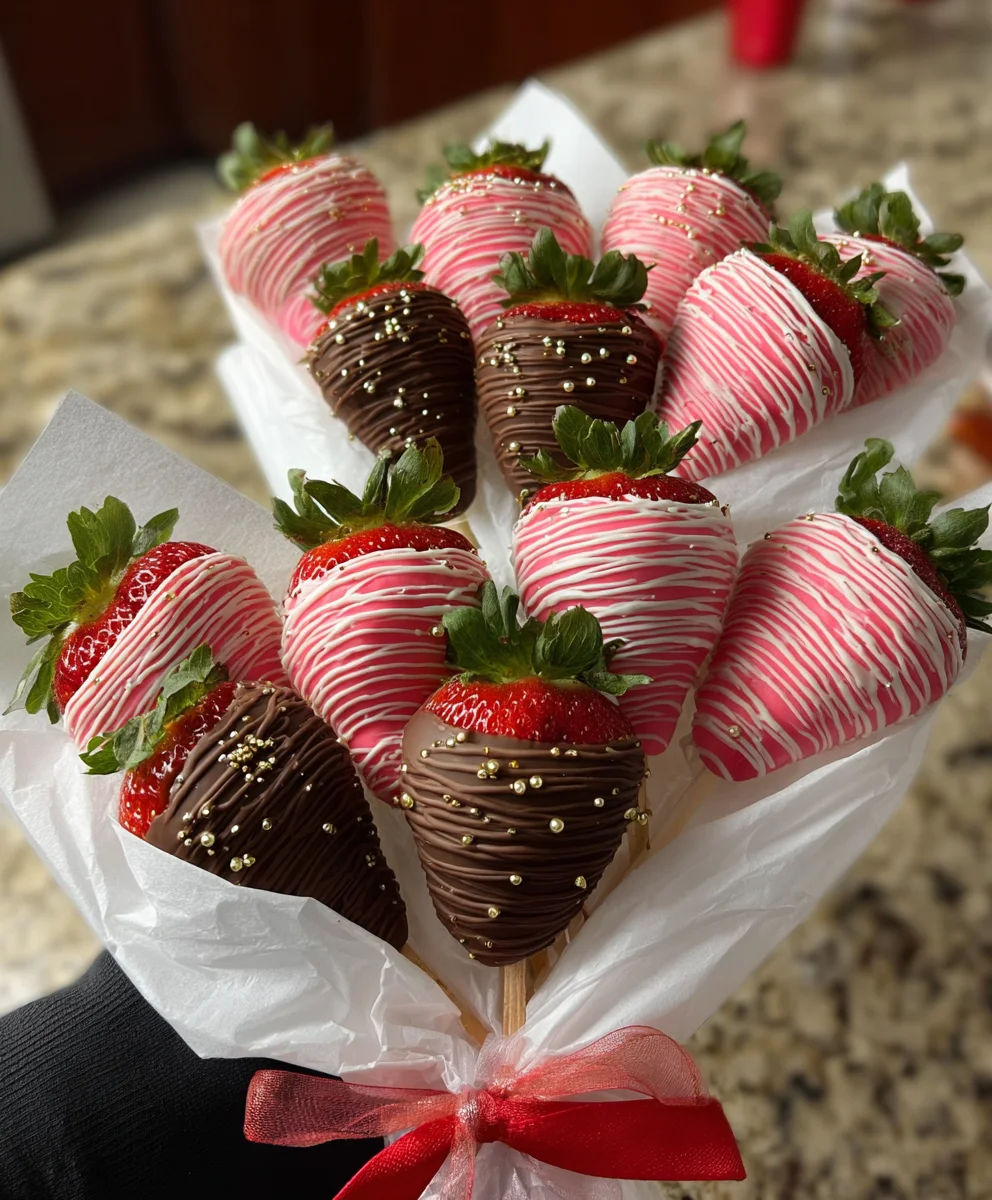
Chocolate covered strawberries are more than just a dessert; they’re an experience, a delightful fusion of sweet, tart, and rich flavors that instantly elevate any occasion. Think about that moment you bite into a perfectly ripe strawberry, its juicy sweetness contrasting with the luxurious snap of premium chocolate – pure bliss, isn’t it? It’s no wonder that chocolate covered strawberries have become a timeless symbol of indulgence and affection, perfect for romantic gestures, celebratory treats, or simply a well-deserved personal indulgence. What makes these elegant treats so utterly captivating is their deceptive simplicity. The magic lies in the quality of the ingredients and the gentle embrace of velvety chocolate. This recipe will guide you to create stunning, restaurant-worthy chocolate covered strawberries right in your own kitchen, ensuring a truly special and memorable treat that everyone will adore.

Ingredients:
- 1 pound fresh strawberries
- 12 ounces good quality dark chocolate (at least 60% cocoa solids), chopped into small pieces
- 1 tablespoon coconut oil (optional, for smoother melting and a glossier finish)
- Optional toppings: finely chopped nuts (pistachios, almonds), sprinkles, sea salt flakes, white chocolate for drizzling
Preparing Your Strawberries for Dipping
Washing and Drying
The first, and arguably most crucial, step to achieving perfectly dipped chocolate covered strawberries is proper preparation of the fruit itself. You want to start with beautiful, ripe, and firm strawberries. Gently rinse your strawberries under cool running water. Avoid soaking them, as this can lead to waterloggin extractg and prevent the chocolate from adhering properly. After rinsing, it is absolutely vital to dry them thoroughly. Pat each strawberry dry with paper towels, ensuring there is no visible moisture on the surface. Any residual water can cause the chocolate to seize or develop a dull, streaky finish. Pay special attention to the area around the stem, where water can linger. If you have time, you can even let them air dry on a clean towel for about 15-20 minutes after patting them dry. This ensures no moisture remains.
Removing Stems (Optional)
For a classic look, you’ll want to leave the green leafy tops (the calyx) on your strawberries. These provide a convenient handle for dipping and look very appealing. However, if you prefer a more streamlined look, or if some of your strawberries have particularly ragged or unattractive tops, you can carefully remove the calyx using a small paring knife. If you do remove the stems, ensure you dip the strawberries immediately after drying to prevent moisture from the cut surface affecting the chocolate coating.
Melting the Chocolate
Double Boiler Method (Recommended)
The best way to melt chocolate for dipping is using a double boiler. This method provides gentle, consistent heat, preventing the chocolate from scorching or overheating, which can result in a grainy or burnt texture. To set up your double boiler, fill a saucepan with about an inch or two of water and bring it to a simmer over medium-low heat. Place a heatproof bowl (glass or stainless steel) over the saucepan, ensuring the bottom of the bowl does not touch the water. Add your chopped dark chocolate to the bowl. If you’re using coconut oil, add it now. Stir the chocolate frequently with a heat-resistant spatula. As the chocgin extractte begins to melt, the steam from the simmering water will gently coax it into a smooth, glossy liquid. Continue stirring until all the chocolate is melted and the mixture is completely smooth. Be patient; this process can take several minutes.
Microwave Method (Use with Caution)**
While the double boiler is preferred, you can use a microwave if you’re in a hurry. Place the chopped chocolate and coconut oil (if using) in a microwave-safe bowl. Microwave on 50% power (or defrost setting) for 30-second intervals, stirring thoroughly after each interval. It’s crucial to stir well each time, as the residual heat will continue to melt the chocolate. Continue this process until the chocolate is almost completely melted, then stir until the remaining pieces melt from the residual heat. Overheating chocolate in the microwave can quickly lead to burning, so it’s important to be vigilant and stir frequently.
Dipping the Strawberries
Achieving a Perfect Coating
Once your chocolate is perfectly melted and smooth, it’s time for the exciting part: dipping! Hold a prepared strawberry by its green leaves. Dip it into the melted chocolate, rotating it gently to ensure an even coating. You want to dip the strawberry about two-thirds of the way up, leaving a small strip of the red fruit visible at the top. Submerge it just enough so that the chocolate covers the desired area.
Removing Excess Chocolate
After dipping, lift the strawberry out of the chocolate and allow any excess to drip back into the bowl. You can gently swirl the strawberry or tap it lightly against the rim of the bowl to help excess chocolate fall off. A smooth, even coating is the goal, so avoid thick globs of chocolate, which can be messy and unappealing.
Placing on Parchment Paper
Once you’ve achieved a good coating and let the excess drip off, carefully place the dipped strawberry onto a baking sheet lined with parchment paper or wax paper. Make sure the strawberries are not touching each other, as they will stick together as the chocolate hardens. You want to give them a little space.
Adding Toppings (Optional)
Get Creative with Decorations
If you’re using toppings, now is the time to apply them, while the chocolate is still wet. This is where you can really let your creativity shine! For finely chopped nuts or sprinkles, gently press them onto the still-wet chocolate coating. If you’re using sea salt flakes, a light sprinkle will add a delightful contrast to the sweetness of the chocolate and strawberries. For a beautiful drizzled effect, melt some white chocolate separately (using the same double boiler or microwave method) and transfer it to a piping bag or a zip-top bag with a tiny corner snipped off. Drizzle the white chocolate decoratively over the dark chocolate-covered strawberries.
Setting and Cooling
Allowing the Chocolate to Harden
Once all your strawberries are dipped and decorated, it’s time to let the chocolate set. You can do this at room temperature, which usually takes about 20-30 minutes, or you can speed up the process by placing the baking sheet in the refrigerator. If refrigerating, keep them in the fridge for about 10-15 minutes, or until the chocolate is firm to the touch. Be careful not to leave them in the refrigerator for too long, as this can cause condensation to form on the chocolate, leading to a dull finish. Once the chocolate has set, they are ready to be enjoyed!
Conclusion:
And there you have it – your guide to crafting the perfect batch of Chocolate Covered Strawberries! This delightful treat is incredibly simple yet always impresses. The magic lies in the quality of your chocolate and the freshness of your berries. Don’t be afraid to experiment and make them your own. Whether for a special occasion, a thoughtful gift, or just a sweet indulgence, these Chocolate Covered Strawberries are guaranteed to bring smiles. Enjoy the process, and savor every delicious bite!
For serving suggestions, these Chocolate Covered Strawberries are fantastic on their own, presented beautifully on a platter for guests. They also make a wonderful addition to dessert tables, charcuterie boards, or even as a garnish for cakes and ice cream sundaes. Don’t limit yourself to the classic; consider drizzling them with contrasting chocolate (white chocolate on dark, or vice-versa), adding a sprinkle of sea salt, or even edible glitter for extra flair.
Frequently Asked Questions about Chocolate Covered Strawberries:
Q: How do I get the chocolate to stick properly to the strawberries?
Ensure your strawberries are completely dry before dipping. Any moisture will cause the chocolate to seize or not adhere properly. Using good quality chocolate that has been properly melted (tempered if you’re feeling adventurous, but even a simple melt and dip works well) will also ensure a smooth, even coating that sets nicely.
Q: Can I store Chocolate Covered Strawberries? If so, how?
Yes, you can store them! The best way to store Chocolate Covered Strawberries is in a single layer in an airtight container in the refrigerator. They are freshest within 1-2 days. It’s generally not recommended to freeze them, as the texture of the strawberry can become mushy upon thawing.

Easy Chocolate Covered Strawberries – Decadent Treat
A simple and decadent recipe for making classic chocolate-covered strawberries at home.
Ingredients
-
1 pound fresh strawberries
-
12 ounces good quality dark chocolate, chopped into small pieces
-
1 tablespoon coconut oil
-
Finely chopped nuts (pistachios, almonds)
-
Sprinkles
-
Sea salt flakes
-
White chocolate for drizzling
Instructions
-
Step 1
Wash and thoroughly dry the strawberries, ensuring no moisture remains on the surface. Leave the green leafy tops on. -
Step 2
Melt the dark chocolate using a double boiler or microwave method until smooth and glossy. Stir in coconut oil if using. -
Step 3
Hold a strawberry by its leaves and dip it into the melted chocolate, coating about two-thirds of the way up. Rotate for even coverage. -
Step 4
Lift the strawberry and allow excess chocolate to drip back into the bowl. Gently swirl or tap to remove thick globs. -
Step 5
Place the dipped strawberry onto a baking sheet lined with parchment paper, ensuring they don’t touch. -
Step 6
If adding toppings, press them onto the wet chocolate immediately after dipping. Drizzle with melted white chocolate if desired. -
Step 7
Allow the chocolate to set at room temperature for 20-30 minutes, or in the refrigerator for 10-15 minutes until firm. Avoid over-refrigerating.
Important Information
Nutrition Facts (Per Serving)
It is important to consider this information as approximate and not to use it as definitive health advice.
Allergy Information
Please check ingredients for potential allergens and consult a health professional if in doubt.
Leave a Comment