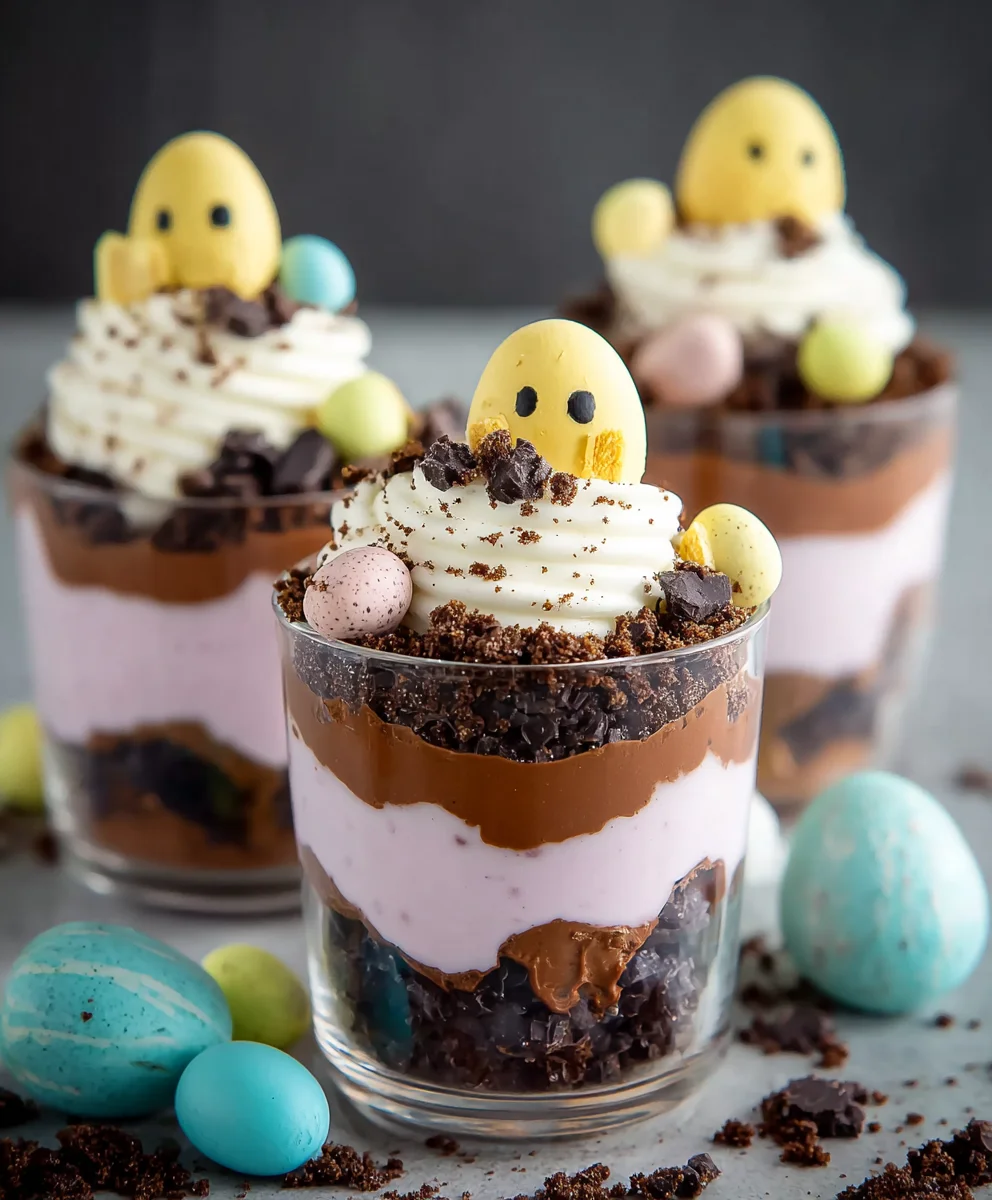
Easter Dirt Cups are a whimsical and utterly delightful treat that has captured the hearts of both children and adults alike. Imagin extracte a delightful blend of creamy pudding, crushed chocolate cookies, and a playful sprinkle of edible decorations – that’s the magic of these beloved Easter treats! What makes them so incredibly popular? It’s their charming simplicity, their undeniable kid-friendliness, and the sheer joy they bring to any festive table. Each spoonful is a miniature adventure, mimicking a garden unearthed, complete with sweet “earthworms” and colourful “flowers.” This isn’t just a dessert; it’s an experience, a shared moment of fun and flavour that perfectly embodies the spirit of spring and the joy of Easter celebrations. Get ready to dig into this easy-to-make, incredibly satisfying recipe that’s guaranteed to be a hit!

Ingredients:
- 1 package (3.9 oz.) vanilla instant pudding mix
- 2 cups cold milk
- 1 container (8 oz.) Cool Whip, thawed
- Food coloring (suggested: purple and pink)
- 1 package Oreo cookies, finely crushed with filling removed
- Shredded coconut
- Candy eggs (like mini egg candies)
- Peeps marshmallow chicks or bunnies
- Food coloring for coconut
Preparing the Dirt and Worms
Crushing the Oreos
The first step in creating our delightful Easter Dirt Cups is to prepare the “dirt” which will form the base of our dessert. Take your entire package of Oreo cookies. For the best texture, it’s important to remove the white filling from each cookie before crushing. You can do this by gently twisting the cookie halves apart and scraping out the cream with a knife or small spoon. Once the filling is removed, place the cookie halves into a sturdy zip-top bag. Seal the bag tightly, ensuring as much air as possible is removed to prevent a mess. Then, using a rolling pin, a meat mallet, or even the bottom of a heavy pot, carefully crush the cookies until they resemble coarse dirt. You want some fine crum extractbs but also a few slightly larger pieces for textural interest, mimicking real soil. Set this aside.
Coloring the Coconut
Next, let’s add some vibrant Easter color to our dessert. Take a generous amount of shredded coconut – enough to visually represent the grass or colorful elements of a garden. Divide the coconut into small bowls, one for each color of food coloring you plan to use. We’re suggesting purple and pink for a festive Easter theme, but feel free to experiment with other spring colors like yellow or light green. Add just a drop or two of food coloring to each bowl. Use your fingers or a spoon to gently mix the coloring into the coconut. Be patient, as it might take a little time to distribute the color evenly. You’re aiming for a speckled, variegated look rather than a solid, uniform color, which will make our Easter Dirt Cups more visually appealing. Once the coconut is colored to your liking, spread it out on a plate or parchment paper to dry slightly while you prepare the pudding.
Making the Pudding Base
Mixing the Vanilla Pudding
Now it’s time to create the creamy layer of our dirt cups. In a medium-sized mixing bowl, combine the vanilla instant pudding mix with the cold milk. It’s crucial to use cold milk for instant pudding, as this is what activates the gelling agents and allows it to set properly. Whisk the mixture vigorously for about two minutes, or until it begin extracts to thicken. Instant pudding sets up quite quickly, so don’t over-whisk, as this can sometimes make it gummy. You should notice it transforming from a liquid to a thick, spoonable consistency.
Folding in the Cool Whip
Once your vanilla pudding has thickened, it’s time to incorporate the Cool Whip. Gently add the thawed container of Cool Whip to the pudding mixture. Use a spatula or a large spoon to carefully fold the Cool Whip into the pudding. The goal here is to combine them until just incorporated, creating a light and airy texture. Avoid overmixing, as you don’t want to deflate the Cool Whip entirely. You should see streaks of pudding and Cool Whip initially, and as you continue to gently fold, they will blend into a smooth, creamy, and fluffy dessert base. This mixture will be the “soil” layer that holds our decorative elements.
Assembling the Easter Dirt Cups
Layering the Dirt Cups
We’re almost there! Now for the fun part – assembling our adorable Easter Dirt Cups. Grab your serving dishes. These can be individual clear plastic cups, small glasses, or even mason jars, which allow the layers to be visible. Start by spooning a layer of the crushed Oreo “dirt” into the bottom of each container. Don’t be shy; create a good base layer. Then, spoon a generous amount of your creamy pudding and Cool Whip mixture over the Oreo dirt. Spread it out evenly to create a smooth surface for your next layer. Repeat this process: another layer of Oreo dirt, followed by another layer of the pudding mixture. You can adjust the number of layers based on the size of your serving dishes and your preference for dirt-to-pudding ratio. For a truly immersive “dirt” experience, make sure the top layer is mostly the crushed Oreos.
Adding the Easter Decorations
This is where your Easter Dirt Cups truly come to life! Take your prepared colored coconut and sprinkle it generously over the top layer of Oreo dirt. This coconut will represent colorful Easter grass. Next, strategically place your candy eggs and Peeps marshmallow chicks or bunnies on top of the coconut and dirt. You can arrange them to look like a little Easter scene. Tuck a few candy eggs into the “dirt” or have a Peep peeking out from behind a mound of coconut. Get creative! The beauty of these Easter Dirt Cups is their versatility and the joy they bring, especially to children. They’re a playful and delicious way to celebrate the holiday, offering a fun, no-bake dessert that everyone can enjoy assembling and devouring.
Conclusion:
There you have it – a foolproof guide to creating the most delightful Easter Dirt Cups! This recipe is not only incredibly easy but also a guaranteed crowd-pleaser, perfect for sparking joy at any Easter gathering. We’ve walked through every step, from crushing those essential chocolate cookies to layering them with creamy pudding and whimsical toppings. Remember, the beauty of these Easter Dirt Cups lies in their versatility; feel free to experiment with different pudding flavors or even add a sprinkle of edible glitter for an extra touch of magic. I encourage you to get creative and make these your own!
For serving, these are best enjoyed chilled. They’re ideal as individual treats for party favors, or you can present them in a larger trifle dish for a communal dessert experience. They pair wonderfully with fresh fruit or a tall glass of milk.
Frequently Asked Questions:
Can I make Easter Dirt Cups ahead of time?
Absolutely! Easter Dirt Cups can be assembled up to 24 hours in advance. Store them covered in the refrigerator. The cookies may soften slightly, but they will still be delicious.
What other toppings can I use for Easter Dirt Cups?
The possibilities are endless! Beyond the classic gummy worms and candy eggs, consider adding shredded coconut for a “grassy” effect, chocolate sprinkles, chopped nuts, or even small chocolate bunnies. You can also use different colors of pudding to create striped layers.

Easter Dirt Cups – Easy & Fun Dessert Recipe
A fun and easy no-bake dessert perfect for Easter, featuring layers of chocolate cookie ‘dirt’, creamy pudding, and colorful toppings.
Ingredients
-
1 package (3.9 oz.) vanilla instant pudding mix
-
2 cups cold milk
-
1 container (8 oz.) Cool Whip, thawed
-
Food coloring (suggested: purple and pink)
-
1 package Oreo cookies, finely crushed with filling removed
-
Shredded coconut
-
Candy eggs (like mini egg candies)
-
Peeps marshmallow chicks or bunnies
Instructions
-
Step 1
Crush the Oreo cookies: Remove the filling from the Oreos, then place the cookie halves into a zip-top bag. Seal tightly and crush with a rolling pin or similar tool until they resemble coarse dirt. Set aside. -
Step 2
Color the coconut: Divide shredded coconut into small bowls. Add a drop or two of food coloring (purple and pink suggested) to each bowl and gently mix until speckled. Spread on a plate to dry slightly. -
Step 3
Prepare the pudding base: In a mixing bowl, combine the vanilla instant pudding mix with cold milk. Whisk vigorously for about two minutes until thickened. -
Step 4
Fold in Cool Whip: Gently add the thawed Cool Whip to the pudding mixture. Fold with a spatula until just incorporated, creating a light and fluffy texture. Avoid overmixing. -
Step 5
Assemble the dirt cups: Spoon a layer of crushed Oreo ‘dirt’ into the bottom of serving dishes. Top with a layer of the pudding and Cool Whip mixture. Repeat layers, ending with a layer of Oreo dirt. -
Step 6
Add decorations: Sprinkle the colored coconut over the top layer of dirt to resemble Easter grass. Decorate with candy eggs and Peeps marshmallow chicks or bunnies to create a festive Easter scene.
Important Information
Nutrition Facts (Per Serving)
It is important to consider this information as approximate and not to use it as definitive health advice.
Allergy Information
Please check ingredients for potential allergens and consult a health professional if in doubt.

Leave a Comment