4-ingredient strawberry sando is the sweet, simple answer to those cravings for something light, refreshing, and utterly delightful. Have you ever craved a dessert that’s both elegant and incredibly easy to whip up? That’s precisely where the magic of this 4-ingredient strawberry sando shines. It’s a dish that transcends simple snacking and becomes a miniature work of art, perfect for a quick afternoon treat or even a charming addition to a brunch spread. What’s not to love about the perfect harmony of pillowy soft bread, luscious strawberries, and the smooth embrace of cream? This particular iteration of the strawberry sando is special because it proves that you don’t need a pantry full of ingredients to achieve pure bliss. It’s a testament to the beauty of simplicity, allowing the natural sweetness of the strawberries to truly sing.
Why You’ll Love This Recipe
Effortless Elegance

The Easiest 4-Ingredient Strawberry Sando You’ll Ever Make
Sometimes, all you crave is something sweet, simple, and utterly delightful. That’s where this 4-ingredient strawberry sando comes in. Inspired by the popular Japanese fruit sandwiches, this recipe strips away complexity to bring you pure, unadulterated joy in every bite. It’s the perfect treat for a quick breakfast, a delightful afternoon snack, or even a light dessert. The beauty of this sando lies in its simplicity, allowing the fresh flavors of strawberries and cream to truly shine. You’ll be amazed at how something so effortless can taste so gourmet.
This recipe is designed for ease, meaning minimal fuss and maximum deliciousness. We’re talking about using just four core ingredients, which means less shopping and less prep. And the result? A pillowy soft bread cradling a luscious, lightly sweetened whipped cream and vibrant, juicy strawberries. It’s a symphony of textures and tastes that will have you reaching for seconds. Let’s dive into what you’ll need and how to bring this simple pleasure to life.
Ingredients:
Preparing Your Strawberries and Cream
The first step in creating our magical strawberry sando involves preparing the star ingredients: the strawberries and the whipping cream. This phase is all about unlocking their full potential for flavor and texture.
Step 1: Slice and Sweeten the Strawberries
Begin extract by gently washing your strawberries and carefully removing their green tops. The key to a good sando is how you prepare your fruit. We want the strawberries to release some of their juices and become tender, enhancing their sweetness. Slice each strawberry into relatively thin, uniform pieces. I find about 1/4-inch thick slices work beautifully. Place these sliced strawberries into a small bowl. Now, add the 1 tablespoon of white granulated sugar. Gently toss the strawberries with the sugar, ensuring each slice is coated. Let this mixture sit for about 10-15 minutes. This process, often called macerating, will draw out the natural juices from the strawberries, creating a lovely, slightly syrupy base that intensifies their flavor. This also helps to soften them slightly, making them a more pleasant texture within the soft bread. Don’t skip this step; it makes a noticeable difference!
Step 2: Whip the Cream to Perfection
While your strawberries are macerating, it’s time to whip the cream. Ensure your whipping cream (or heavy cream) is very cold. Cold cream whips up much better and faster. Pour the 1/2 cup of chilled whipping cream into a clean, dry mixing bowl. You can use a hand mixer or a whisk for this. If you’re using a hand mixer, start on a low speed and gradually increase it. If you’re whisking by hand, it will take a bit more effort but is certainly achievable. Continue to whip the cream until soft peaks form. This means when you lift the whisk or beaters, the cream forms peaks that curl over. You don’t want to over-whip it to stiff peaks, as it can become buttery. The goal is a light, airy, and luscious cream that will hold its shape without being dense. The subtle sweetness of the sugar you’ll add (or that’s already in the cream if you use sweetened) will be enough to complement the strawberries without overpowering them.
Assembling Your Strawberry Sando
Now for the fun part – putting it all together! This is where the magic truly happens, transforming simple ingredients into a work of edible art.
Step 3: Prepare the Bread Slices
Take your two slices of milk bread (or your chosen thick white bread). Milk bread is ideal because of its soft, slightly sweet, and airy crum extractb, which is perfect for absorbing the cream and juices without becoming soggy. If you’re using regular thick white bread, ensure it’s fresh and soft. You don’t need to toast the bread for this recipe; the softness is part of its charm. Lay the bread slices flat on your work surface.
Step 4: Spread the Cream and Layer the Strawberries
On one slice of bread, generously spread about half of your freshly whipped cream, ensuring an even layer that reaches close to the edges. Now, take your macerated strawberries, draining off any excess syrup (you can reserve this syrup for another use, like drizzling over yogurt or ice cream!). Arrange the strawberry slices evenly over the whipped cream. Try to cover the entire surface of the cream layer with strawberries for maximum flavor in every bite. You want a good amount of strawberries, but not so much that they will spill out when you slice the sandwich.
Step 5: Complete the Sando and Chill
Carefully place the second slice of bread on top of the strawberries, gently pressing down to secure everything. Now, for the crucial final step that ensures a clean cut and allows the flavors to meld beautifully: pressing and chilling. Wrap the entire sandwich snugly in plastic wrap. Place it in the refrigerator for at least 15-30 minutes. This chilling period is essential. It helps the whipped cream set slightly, the bread to absorb a hint of the strawberry juices, and most importantly, it firms everything up, making it incredibly easy to slice without the filling oozing out. This step is a game-changer for achieving that perfect, professional-looking sando.
Serving Your Masterpiece
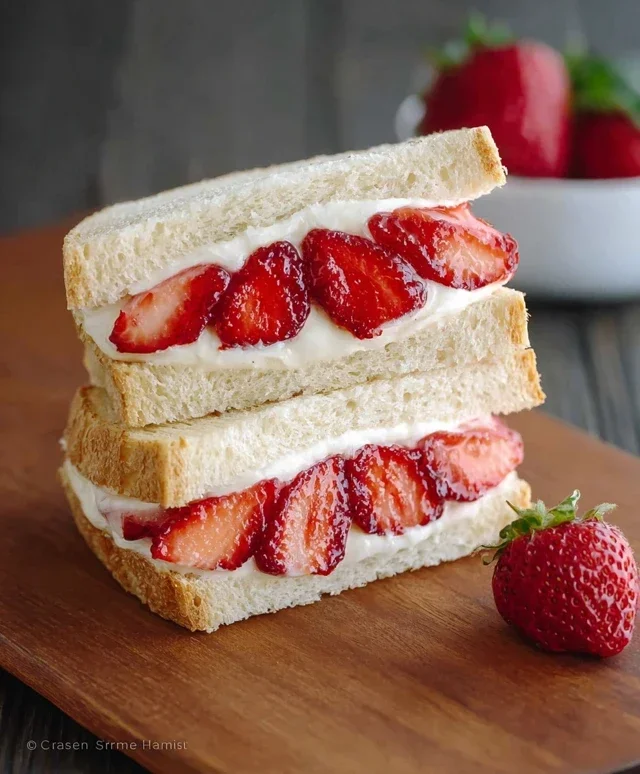
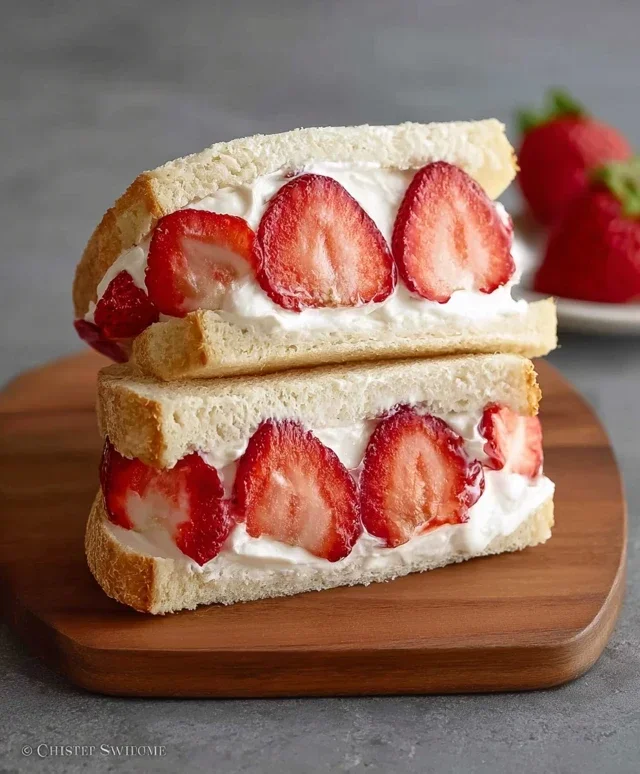
Once your strawberry sando has chilled and firmed up, it’s time to unveil your creation. Unwrap the plastic wrap. Using a sharp serrated knife, carefully slice the sandwich in half. A sawing motion works best to cut through the soft bread and creamy filling without squashing it. You should be met with a beautiful cross-section of soft bread, fluffy cream, and vibrant red strawberries. Serve immediately and enjoy the delightful simplicity and exquisite taste of your 4-ingredient strawberry sando! It’s a treat that’s as pleasing to the eye as it is to the palate.
Conclusion:
And there you have it – the incredibly simple yet utterly delightful 4-ingredient Strawberry Sando! This recipe truly shines because of its minimal ingredients and maximum flavor. It’s the perfect example of how a few quality components can come together to create something truly special, whether you’re looking for a quick breakfast, a satisfying afternoon snack, or even a light dessert. The combination of fluffy bread, creamy filling, and sweet, juicy strawberries is a classic for a reason, and this streamlined version makes it accessible to everyone, regardless of their cooking experience.
To elevate your strawberry sando experience, consider serving it chilled for a refreshing treat. It pairs wonderfully with a cup of tea or coffee, and is a fantastic addition to a picnic basket or a lunchbox. For variations, don’t be afraid to get creative! You could add a sprinkle of powdered sugar for extra sweetness, a thin layer of jam for an intensified strawberry flavor, or even a touch of lemon zest to the cream for a brighter note. The possibilities are endless!
I truly encourage you to give this 4-ingredient Strawberry Sando a try. It’s a wonderful way to indulge in a homemade treat that’s both elegant and easy. You might just find it becomes your new go-to for a simple pleasure.
Frequently Asked Questions:
Can I use frozen strawberries instead of fresh?
While fresh strawberries offer the best flavor and texture for this sandwich, you can use frozen strawberries if needed. Thaw them completely and drain off any excess liquid before mixing them with the cream to prevent the filling from becoming too watery. You might need to adjust the sweetness slightly depending on how tart the thawed strawberries are.
What kind of bread is best for a strawberry sando?
The best bread for this 4-ingredient Strawberry Sando is soft and slightly sweet, like Japanese milk bread (shokupan) or brioche. These types of bread have a delicate crum extractb and a mild sweetness that complements the filling beautifully. However, a good quality white bread or even a slightly richer challah will also work well and still provide a delicious result.
Can I make the filling ahead of time?
Yes, you can definitely prepare the strawberry cream filling ahead of time. Store it in an airtight container in the refrigerator for up to 2 days. It’s best to assemble the sandwiches just before serving to ensure the bread stays fresh and doesn’t become soggy.
4-Ingredient Strawberry Sando
A simple and delightful Japanese-inspired strawberry sandwich made with just four ingredients: soft bread, fresh strawberries, sugar, and whipped cream.
Ingredients
-
2 thick slices milk bread (or regular thick white bread, like Texas toast)
-
5 strawberries (with tops removed)
-
1 tbsp white granulated sugar
-
1/2 cup whipping cream (or heavy cream chilled)
-
Optional: A pinch of salt for the cream
Instructions
-
Step 1
Wash and hull the strawberries. Slice them thinly. If desired, toss the sliced strawberries with a small amount of sugar (about 1/2 tsp) to help draw out their juices. -
Step 2
In a chilled bowl, whip the heavy cream with the remaining sugar (about 1/2 tbsp) until stiff peaks form. Add a pinch of salt if using to enhance flavor. -
Step 3
Spread a generous layer of whipped cream onto one slice of bread. -
Step 4
Arrange the sliced strawberries evenly over the whipped cream. -
Step 5
Spread another layer of whipped cream over the strawberries. -
Step 6
Top with the second slice of bread, pressing gently to secure. -
Step 7
Cut the sandwich in half diagonally. Serve immediately for the best texture and flavor.
Important Information
Nutrition Facts (Per Serving)
It is important to consider this information as approximate and not to use it as definitive health advice.
Allergy Information
Please check ingredients for potential allergens and consult a health professional if in doubt.


Leave a Comment