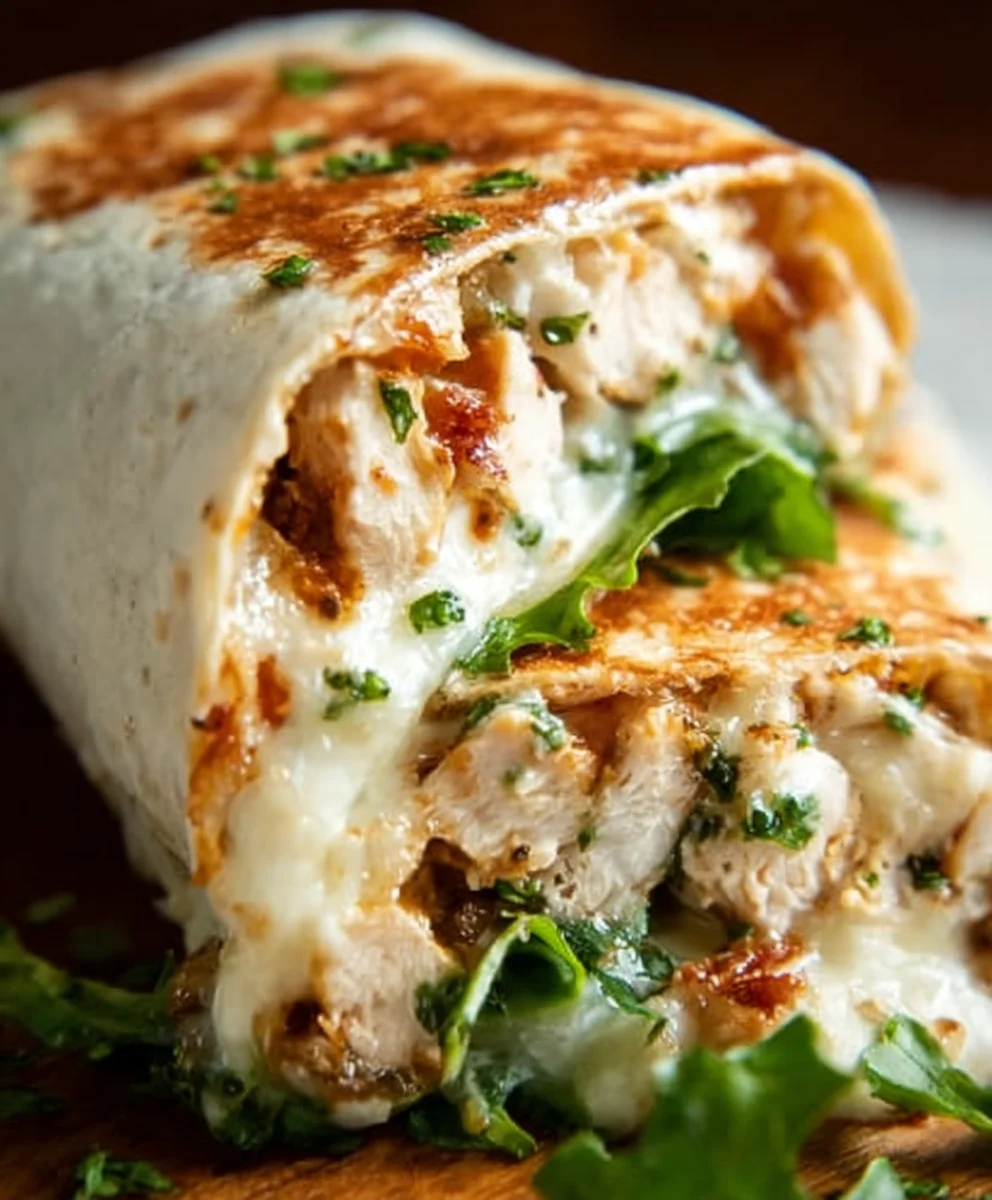
Cheesy Garlic Chicken Wraps are the ultimate weeknight dinner hero. Imagin extracte tender, juicy chicken infused with a rich, garlicky butter sauce, all enrobed in a melty, stringy cheese blanket and hugged by a soft, pliable tortilla. It’s no wonder these Cheesy Garlic Chicken Wraps have become a beloved staple for so many families and individuals alike. They strike that perfect balance between comforting indulgence and satisfying simplicity. What truly sets these wraps apart is the incredible depth of flavor achieved with just a few key ingredients. The garlic, when sautéed just right, releases its aromatic magic, while the blend of cheeses creates a gooey, irresistible texture that makes every bite an experience. This recipe will guide you to creating these delightful parcels of joy that are both incredibly easy to prepare and spectacularly delicious. Get ready to impress yourself and anyone lucky enough to share these amazing Cheesy Garlic Chicken Wraps with you!

Ingredients:
- 2 cups cooked chicken, shredded
- 1/2 cup garlic aioli
- 1 cup cheddar cheese, shredded
- 4 large flour tortillas
- Salt and freshly ground black pepper to taste
Preparing the Chicken Filling
Step 1: Combine Chicken and Aioli
In a medium-sized mixing bowl, add your 2 cups of pre-cooked and shredded chicken. The chicken can be prepared by boiling, baking, or even using rotisserie chicken for ultimate convenience. Ensure the chicken is fully cooked and cooled enough to handle. Next, spoon in the 1/2 cup of creamy garlic aioli. The garlic aioli will act as a binder, infusing the chicken with a delicious garlicky flavor and adding moisture. This is where the magic of the Cheesy Garlic Chicken Wraps truly begin extracts to take shape. Gently mix the shredded chicken and garlic aioli together using a spoon or fork until every strand of chicken is well coated. Be thorough but avoid overmixing, which could make the chicken mushy. Taste a small amount of the mixture and season with salt and freshly ground black pepper as needed. Remember that the garlic aioli might already contain salt, so adjust accordingly. The goal is to enhance the natural flavors of the chicken and the aioli.
Step 2: Incorporate the Cheddar Cheese
Once the chicken and aioli are beautifully combined, it’s time to introduce the star of the cheesy show: the 1 cup of shredded cheddar cheese. Sprinkle the shredded cheddar cheese evenly over the chicken and aioli mixture in the bowl. Now, using your hands or a sturdy spatula, gently fold the cheese into the chicken mixture. You want to distribute the cheese throughout, but not so much that it becomes completely integrated. Leaving some pockets of cheese will result in wonderfully gooey, melted cheese in every bite of your wrap. The warmth of the chicken might start to slightly soften the cheese, which is perfect. Continue folding until the cheese is mostly incorporated but still visible in distinct strands. This step is crucial for achieving that irresistible cheesy texture.
Assembling the Wraps
Step 3: Warming the Tortillas
Before we can start wrapping, it’s essential to warm your 4 large flour tortillas. Warm tortillas are much more pliable and less likely to tear when you’re rolling them up. You have a few options for warming them. You can briefly microwave each tortilla for about 15-20 seconds until they are soft and flexible. Alternatively, you can warm them in a dry skillet over medium heat for about 30 seconds per side, or even briefly over a low gas flame if you’re feeling adventurous. The key is to make them warm and bendy, not crispy. This preparation ensures a smooth and successful wrap assembly process. Once warmed, stack them neatly on a plate and cover them with a clean kitchen towel to keep them warm and soft while you work on filling them.
Step 4: Filling the Tortillas
Now comes the exciting part of filling your tortillas. Lay one warmed tortilla flat on a clean surface. Spoon approximately one-quarter of the cheesy chicken mixture onto the center of the tortilla. Avoid overfilling, as this can make rolling difficult. Aim to create a neat, compact line of filling slightly below the center of the tortilla. If you’re using a slightly larger tortilla, you can afford to put a little more filling, but always err on the side of caution to prevent spillage. Distribute the filling evenly along the width of the tortilla to ensure each bite is packed with flavor. Once you have your filling in place, you’re ready for the final wrapping technique.
Rolling and Finishing the Wraps
Step 5: The Perfect Roll
To properly roll your Cheesy Garlic Chicken Wraps, start by folding the bottom edge of the tortilla tightly up and over the filling. Then, tuck in the sides of the tortilla inwards, creating a snug package. Continue rolling the tortilla upwards from the bottom, keeping the filling enclosed and the roll tight. The aim is to create a neat, cylindrical wrap that won’t unravel. If your tortilla is being a bit stubborn, a small dab of the garlic aioli on the edge can help seal it shut. Alternatively, you can use a toothpick to secure the seam if needed, though a good tight roll should suffice. Repeat this process for the remaining three tortillas, ensuring each wrap is well-filled and tightly rolled. This technique ensures that all the delicious cheesy garlic chicken remains inside the tortilla where it belongs, making for a mess-free and enjoyable eating experience. You can serve these wraps immediately for a warm, gooey delight, or chill them for a cold, refreshing lunch option.

Conclusion:
And there you have it – a delicious and satisfying plate (or rather, wrap!) of Cheesy Garlic Chicken Wraps! We’ve walked through creating these incredibly flavorful and surprisingly simple wraps, perfect for a quick weeknight dinner or a fun lunch. The combination of tender garlic-infused chicken, gooey melted cheese, and your favorite crisp veggies, all bundled up in a soft tortilla, is simply irresistible. I hope you feel inspired to give this recipe a try and enjoy every bite!
For serving, these Cheesy Garlic Chicken Wraps are fantastic on their own, but they also pair wonderfully with a side of crunchy coleslaw, a fresh green salad, or even some sweet potato fries. Don’t be afraid to get creative with your fillings too! You could add a dollop of sour cream or Greek yogurt for extra creaminess, a sprinkle of red pepper flakes for a bit of heat, or even some caramelized onions for a deeper flavor profile. The possibilities are endless, and that’s what makes this recipe so enjoyable – it’s yours to adapt!
Frequently Asked Questions:
Can I make the chicken ahead of time?
Absolutely! You can cook the garlic chicken mixture a day in advance and store it in an airtight container in the refrigerator. Simply reheat it gently before assembling your Cheesy Garlic Chicken Wraps.
What kind of cheese works best?
While I love a good cheddar for its meltability and flavor, feel free to experiment! Monterey Jack, mozzarella, or a blend of your favorite cheeses will all work beautifully to create that irresistible gooeyness in your Cheesy Garlic Chicken Wraps.
Cheesy Garlic Chicken Wraps
Easy and delicious dinner wraps filled with shredded chicken, creamy garlic aioli, and melted cheddar cheese.
Ingredients
-
2 cups cooked chicken, shredded
-
1/2 cup garlic aioli
-
1 cup cheddar cheese, shredded
-
4 large flour tortillas
-
Salt to taste
-
Freshly ground black pepper to taste
Instructions
-
Step 1
In a medium-sized mixing bowl, combine the shredded chicken and garlic aioli. Mix until the chicken is well coated. Season with salt and pepper to taste. -
Step 2
Gently fold in the shredded cheddar cheese into the chicken and aioli mixture, distributing it throughout. -
Step 3
Warm each of the 4 large flour tortillas until pliable. This can be done in a microwave, skillet, or over a low gas flame. -
Step 4
Lay a warmed tortilla flat and spoon approximately one-quarter of the cheesy chicken mixture onto the center. -
Step 5
Fold the bottom edge of the tortilla up and over the filling, tuck in the sides, and then roll the tortilla tightly upwards to create a secure wrap. -
Step 6
Repeat the filling and rolling process for the remaining tortillas.
Important Information
Nutrition Facts (Per Serving)
It is important to consider this information as approximate and not to use it as definitive health advice.
Allergy Information
Please check ingredients for potential allergens and consult a health professional if in doubt.
Leave a Comment