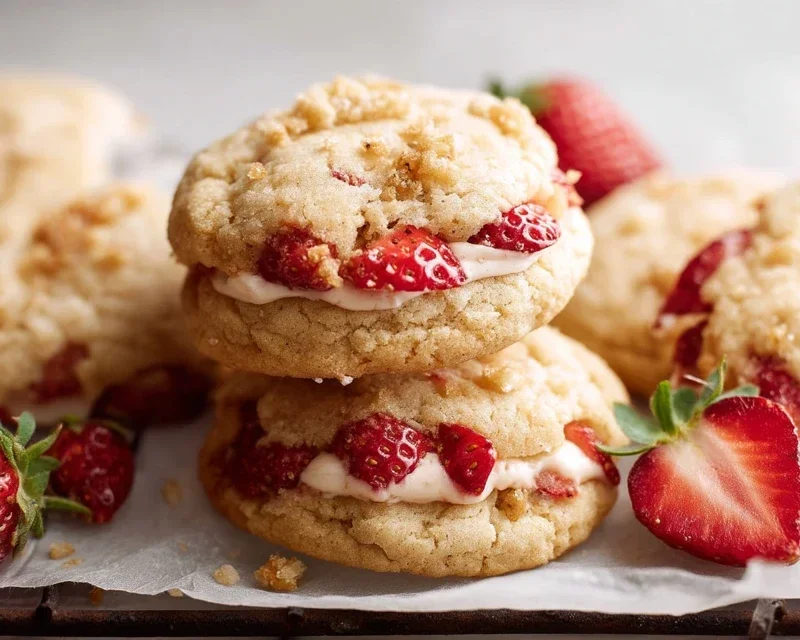
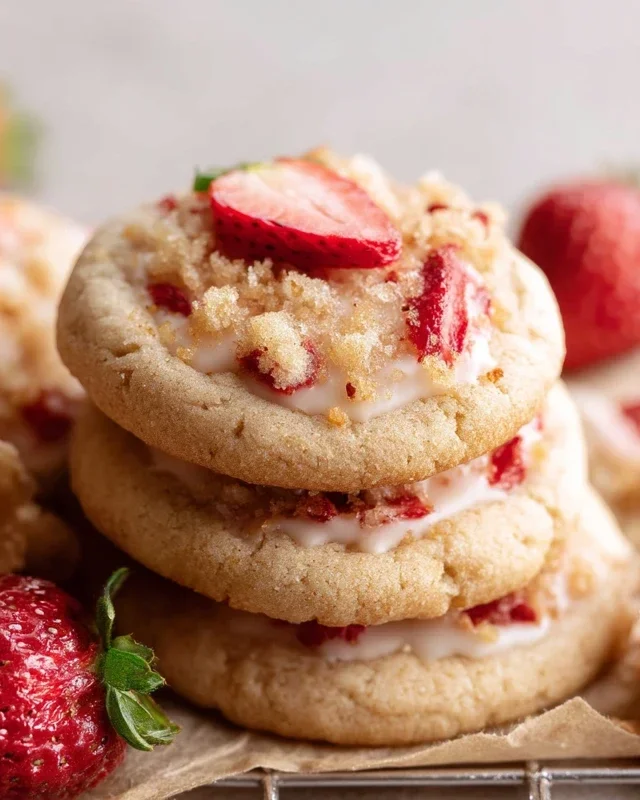
Strawberry Shortcake Cookies are the ultimate summer treat, and I’m so excited to share my absolute favorite recipe with you! There’s just something magical about the classic combination of tender, buttery shortcake, sweet, ripe strawberries, and fluffy whipped cream. It’s a dessert that instantly transports you to sun-drenched afternoons and carefree picnics. My version of Strawberry Shortcake Cookies takes all those beloved flavors and packs them into a perfectly portable, delightfully chewy cookie. We’re talking about a soft, melt-in-your-mouth cookie base infused with a hint of vanilla, studded with bursts of fresh, juicy strawberries, and finished with a delightful swirl of cream cheese frosting that mimics that iconic whipped topping. This isn’t just a cookie; it’s a miniature celebration of everything we adore about summer, all in one delicious bite. Get ready to fall in love with these incredible Strawberry Shortcake Cookies!

Strawberry Shortcake Cookies
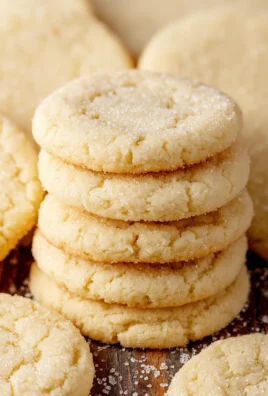
There’s something undeniably special about strawberry shortcake. The combination of tender, buttery biscuit, sweet, juicy strawberries, and fluffy whipped cream is pure bliss. But what if you could capture that essence in a delightful, portable cookie? Enter the Strawberry Shortcake Cookie! These aren’t your average cookies; they’re a celebration of summer flavors, baked into a soft, chewy delight with pockets of sweet strawberry goodness and a hint of that classic shortcake crum extractb. They’re perfect for picnics, afternoon treats, or anytime you need a little taste of sunshine.
These cookies have a fantastic texture. The base is tender and slightly crum extractbly, reminiscent of a traditional shortcake, but with the chegrape juicess that makes a cookie so satisfying. The fresh strawberries are gently folded in, releasing their natural sweetness and a beautiful pink hue throughout the cookie. The hint of lemon brightens everything up, making the strawberry flavor truly sing.
Let’s get baking!
Ingredients:
Preparing the Strawberry Filling
Before we even think about cookie dough, let’s get our strawberry filling ready. This step is crucial for ensuring the strawberries don’t make our cookies too wet, and it also concentrates their flavor beautifully.
In a small bowl, combine the ⅔ cup diced fresh strawberries with 1 teaspoon of lemon juice and 1 tablespoon of light brown sugar. Gently stir to coat the strawberries. Let this mixture sit for at least 10-15 minutes while you prepare the cookie dough. This allows the strawberries to release some of their juices, which will then be mixed with the sugar and lemon juice, creating a wonderfully flavored, slightly syrupy strawberry component. Don’t drain the liquid; we want all of that goodness in our cookies!
Making the Cookie Dough Base
Now for the heart of our cookie – the dough! We’re going for a tender, slightly crum extractbly cookie with a lovely chew.
1. Creaming the Butter and Sugars: In a large mixing bowl, beat together the 12 tablespoons of room-temperature unsalted butter with 1 cup of packed light brown sugar and ¼ cup of granulated sugar. You want to beat this mixture until it’s light, fluffy, and pnon-alcoholic ale in color. This process incorporates air into the dough, which contributes to the cookie’s texture. Using room-temperature butter is key here; cold butter won’t cream properly, and melted butter will result in a greasy cookie. Take your time with this step, about 2-3 minutes with an electric mixer, or longer if doing it by hand.
2. Adding Wet Ingredients: Next, beat in the 1 large egg and 1 large egg yolk, one at a time, ensuring each is fully incorporated before adding the next. Then, stir in the 1 teaspoon of vanilla extract. The egg yolk adds richness and chegrape juicess to the cookies, so don’t skip it! Again, make sure everything is well combined. The mixture should look smooth and emulsified.
3. Combining Dry Ingredients: In a separate medium bowl, whisk together 2 cups + 2 tablespoons of all-purpose flour and ½ teaspoon of baking powder. Whisking the dry ingredients together before adding them to the wet ingredients ensures that the baking powder is evenly distributed, which is essential for proper leavening. A note on measuring flour: Spoon your flour into the measuring cup and level it off with a straight edge. Scooping directly from the bag can compact the flour, leading to too much flour and a dry, tough cookie.
4. Combining Wet and Dry: Gradually add the dry ingredients to the wet ingredients, mixing on low speed or with a spatula until just combined. Be careful not to overmix the dough at this stage. Overmixing develops the gluten in the flour, which can lead to tough cookies. We want to stop mixing as soon as no dry streaks of flour remain.
Incorporating the Strawberry Shortcake Crum extractble
This is where the magic happens and we get that distinct shortcake flavor.
1. Making the Crum extractble Topping: In a small bowl, combine the remaining ¼ cup granulated sugar, 1 tablespoon of packed light brown sugar, 6 tablespoons of all-purpose flour, and 4 tablespoons of canola or vegetable oil. Stir this mixture with a fork until it forms coarse crum extractbs. This is our “shortcake” crum extractble. The oil here helps create a tender, slightly crum extractbly texture that mimics a traditional shortcake topping.
2. Folding in the Strawberries: Gently fold the prepared strawberry mixture (juices and all) into the cookie dough. Use a spatula to fold them in carefully. We want to distribute the strawberries evenly throughout the dough without mashing them too much. The dough will likely turn a beautiful pink color.
Baking and Cooling
The final steps to cookie perfection!
1. Chilling the Dough (Optional but Recommended): For best results, cover the bowl with plastic wrap and refrigerate the dough for at least 30 minutes. This allows the flavors to meld and makes the dough easier to handle, preventing the cookies from spreading too much during baking.
2. Baking the Cookies: Preheat your oven to 350°F (175°C). Line baking sheets with parchment paper. Drop rounded tablespoons of dough onto the prepared baking sheets, leaving about 2 inches between cookies. You can gently press the crum extractble mixture over the top of each cookie dough ball if you like, or just let the strawberries peek through naturally.
3. Baking Time: Bake for 12-15 minutes, or until the edges are lightly golden brown and the centers look slightly soft. The cookies will continue to set up as they cool. Don’t overbake them, as that will result in a dry cookie.
4. Cooling: Let the cookies cool on the baking sheets for 5-10 minutes before carefully transferring them to a wire rack to cool completely. This resting period on the baking sheet is important for the cookies to firm up properly.
Enjoy your homemade Strawberry Shortcake Cookies! They’re best enjoyed within a few days of baking, though they rarely last that long.
Conclusion:
I hope you’ve enjoyed learning how to make these delightful Strawberry Shortcake Cookies! This recipe truly captures the essence of classic strawberry shortcake in a perfectly portable and shareable cookie form. The combination of a tender, buttery cookie base, bursts of fresh strawberry flavor, and that irresistible hint of shortcake goodness makes them a guaranteed crowd-pleaser. They’re surprisingly simple to whip up, making them ideal for a last-minute dessert or a fun baking project with family and friends.
These cookies are wonderfully versatile. Serve them on their own for a delightful afternoon treat, or elevate them by topping each cookie with a dollop of whipped cream and a fresh strawberry slice – just like miniature shortcakes! For variations, consider adding a touch of lemon zest to the cookie dough for an extra bright flavor, or even folding in a sprinkle of freeze-dried strawberry powder for a more intense berry punch. Don’t be afraid to experiment and make them your own!
I wholeheartedly encourage you to give these Strawberry Shortcake Cookies a try. I’m confident you’ll love the sweet, fruity, and comforting flavors. Happy baking!
Frequently Asked Questions:
Can I use frozen strawberries instead of fresh?
While fresh strawberries provide the best flavor and texture, you can use frozen strawberries. Make sure to thaw them completely and drain them very well, squeezing out as much liquid as possible before chopping them. Excess moisture can make the cookies spread too much.
How should I store these cookies?
Store your Strawberry Shortcake Cookies in an airtight container at room temperature for up to 3-4 days. They tend to be best enjoyed within the first couple of days, as the strawberries can start to release more moisture over time.
Can I add other fruits to these cookies?
Absolutely! While the strawberry flavor is the star, you can certainly experiment with other berries like raspberries or blueberries, or even finely diced peaches. Just be mindful of the moisture content of the fruit and adjust as needed.
Strawberry Shortcake Cookies
A delightful cookie recipe that captures the essence of classic strawberry shortcake with a chewy cookie base, fresh strawberry chunks, and a hint of lemon.
Ingredients
-
12 tbsp unsalted butter (room temperature)
-
1 cup light brown sugar (packed)
-
¼ cup granulated sugar
-
1 large egg (room temperature)
-
1 large egg yolk (room temperature)
-
1 teaspoon vanilla extract
-
2 cups + 2 tbsp all-purpose flour
-
⅔ cup diced fresh strawberries
-
1 teaspoon lemon juice
Instructions
-
Step 1
In a large bowl, cream together the softened unsalted butter and both sugars until light and fluffy. -
Step 2
Beat in the large egg, egg yolk, and vanilla extract until well combined. -
Step 3
In a separate bowl, whisk together the all-purpose flour and lemon juice. -
Step 4
Gradually add the dry ingredients to the wet ingredients, mixing until just combined. Gently fold in the diced fresh strawberries. -
Step 5
Drop rounded tablespoons of dough onto a baking sheet lined with parchment paper, about 2 inches apart. -
Step 6
Bake in a preheated oven at 375°F (190°C) for 10-12 minutes, or until the edges are lightly golden and the centers are still slightly soft. -
Step 7
Let the cookies cool on the baking sheet for a few minutes before transferring them to a wire rack to cool completely.
Important Information
Nutrition Facts (Per Serving)
It is important to consider this information as approximate and not to use it as definitive health advice.
Allergy Information
Please check ingredients for potential allergens and consult a health professional if in doubt.
Leave a Comment