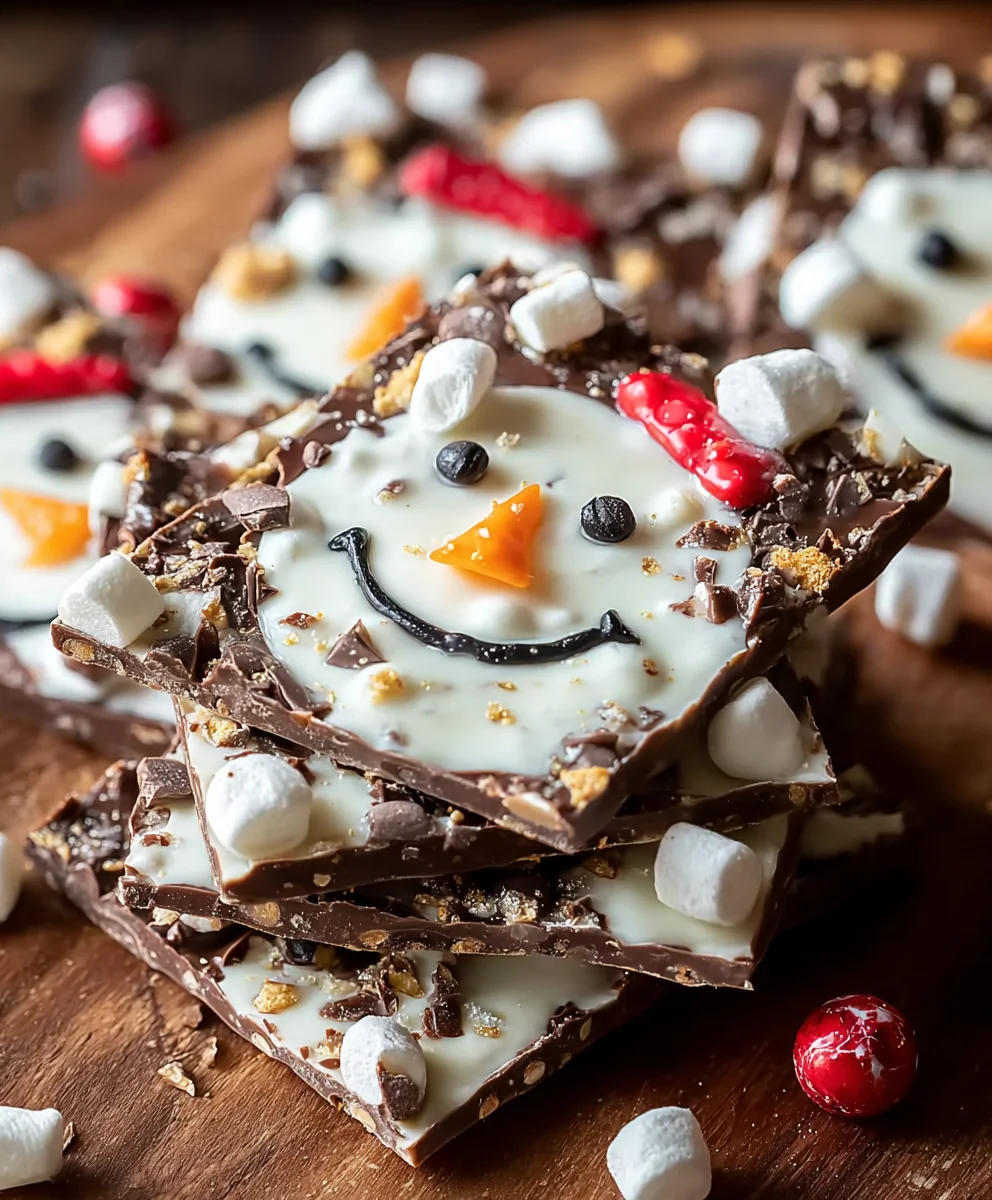
Melted Snowman Bark isn’t just a treat; it’s a whimsical adventure for your taste buds and a delightful journey back to childhood. Imagin extracte a snowy landscape transformed into a sweet, edible masterpiece, perfect for cozy winter evenings or a festive holiday gathering. This charming bark captures the hearts of both kids and adults with its playful presentation and utterly delicious flavor combination. We all love a dessert that sparks joy and conversation, and this one certainly delivers. What makes Melted Snowman Bark truly special is its magical transformation of simple ingredients into a scene straight out of a winter wonderland, complete with adorable little snowmen melting into a sugary snowdrift. Get ready to craft a showstopper that tastes as good as it looks!

Ingredients:
- 1 pound almond bark or white melting chocolate
- 12 golden Oreo cookies
- 6 red and green gumdrops, halved
- 1 Twizzler pull and peel
- 36 red and green mini M&Ms
- Black cookie icing
- Orange cookie icing
Preparing Your Workspace and Ingredients
Before we dive into creating our adorable Melted Snowman Bark, it’s essential to get everything prepped and ready. This is a crucial step for smooth sailing and ensuring your bark turns out perfectly. First, line a large baking sheet (approximately 11×17 inches is ideal) with parchment paper or wax paper. This will prevent the bark from sticking and make for easy cleanup. Make sure the paper extends up the sides of the baking sheet a bit, creating a slight barrier.
Next, let’s tackle our “snowman” components. You’ll need to crush your golden Oreo cookies into fine crum extractbs. You can do this by placing them in a zip-top bag and using a rolling pin, or by pulsing them in a food processor until they resemble coarse sand. Setrum extractese crumbs aside. Now, take your red and green gumdrops and cut each one in half. This will give you small, colorful semicircles for decorating. For the Twizzler, you’ll need to pull apart the strands. Carefully peel the outer red layer away from the inner white part. You’ll be using the red strands to create scarves. Finally, have your mini M&Ms readily accessible. The black and orange cookie icings will be used for drawing faces and buttons, so make sure they are easily squeezable.
Melting the Chocolate
The base of our Melted Snowman Bark is the white melting chocolate, which will act as our snowy landscape. You have a couple of great options for melting it. The most common and straightforward method is the microwave. Place the almond bark or white melting chocolate in a microwave-safe bowl. Heat it in 30-second intervals, stirring thoroughly after each interval. Be patient; it’s better to melt it slowly than to overheat and scorch it. Continue this process until the chocolate is smooth and completely melted, with no lumps remaining.
Alternatively, you can use a double boiler. Fill the bottom pot of your double boiler with about an inch of water and bring it to a gentle simmer over medium heat. Place the white chocolate in the top bowl, ensuring the bottom of the bowl does not touch the water. Stir the chocolate constantly until it is smooth and fully melted. Whichever method you choose, the goal is a creamy, pourable chocolate that will form the canvas for our snowmen. Once melted, let it cool for just a minute or two before pouring to avoid melting the decorations too quickly.
Creating the Snowman Bodies and Landscape
Now for the fun part – assembling our Melted Snowman Bark! Pour the melted white chocolate evenly over the prepared baking sheet, spreading it with an offset spatula or the back of a spoon to create a smooth, even layer. This layer should be about ¼ to ½ inch thick. Don’t worry about perfect edges; a slightly rustic look adds to the charm.
Before the chocolate begin extracts to set, it’s time to create our snowmen. Take two golden Oreo cookies and gently press them into the melted chocolate, stacking them slightly to form a snowman shape. The bottom cookie will be the base, and the slightly smaller top cookie will be the head. You can arrange these in rows across your chocolate canvas. Don’t be afraid to press them in firmly enough so they are securely embedded in the chocolate. You should be able to fit several snowmen across your baking sheet.
Decorating the Snowmen
With our snowman bases in place, it’s time to bring them to life! This is where your creativity can really shine. Using the black cookie icing, carefully draw two small dots for eyes on the top cookie (the head) of each snowman. Then, add a small carrot-shaped nose using the orange cookie icing. For the mouths, you can use the black icing to create a simple smile or a few dots to represent buttons down the front of the snowman’s body.
Now, let’s add some festive flair! Take the halved gumdrops and press them onto the snowman’s body to act as buttons. You can alternate colors for a fun, colorful effect. For the scarves, take the red Twizzler strands you pulled apart earlier and drape them around the “neck” of your snowmen. Gently press them into the chocolate to secure them. Finally, scatter the mini M&Ms around the bark to represent fallen snow or colorful accents. Feel free to add them anywhere you think they’ll look good.
Setting and Breaking the Bark
Once your snowmen are fully decorated and you’re happy with the arrangement, it’s time to let the magic happen – setting! Carefully transfer the baking sheet to the refrigerator. Allow the Melted Snowman Bark to chill for at least 30-60 minutes, or until it is completely firm and solid. You can test it by gently pressing the surface; it should be hard to the touch.
Once the bark is fully set, it’s time to break it into festive pieces. Gently lift the parchment paper or wax paper off the baking sheet. You can then break the bark into irregular shards by hand. For more uniform pieces, you can use a sharp knife to score the bark before it fully hardens, or carefully chop it into smaller sections once it’s firm. The irregular, broken pieces are part of the rustic charm of this delightful treat. Your Melted Snowman Bark is now ready to be enjoyed and shared!

Conclusion:
And there you have it – the delightfully festive and surprisingly simple recipe for Melted Snowman Bark! We’ve walked through each step together, from melting the creamy white chocolate to arrangin extractg those adorable snowman details. This sweet treat is perfect for holiday parties, cookie exchanges, or simply a cozy afternoon indulgence. Don’t be afraid to get creative with your decorations – the possibilities are as endless as a winter’s snowfall!
When it comes to serving, Melted Snowman Bark is a showstopper on its own. However, it also pairs beautifully with a warm mug of hot cocoa or a steaming cup of spiced cider. For a more elaborate presentation, considgin extractarranging pieces on a festive platter alongside other holiday cookies and confections. This recipe is also incredibly versatile! Feel free to experiment with different types of chocolate or add a sprinkle of peppermint or cinnamon for a unique flavor twist. Remember, baking is all about having fun and making it your own. I truly encourage you to give this recipe a try – it’s sure to bring smiles to faces, young and old alike!
FAQs:
Can I use milk chocolate or dark chocolate instead of white chocolate for Melted Snowman Bark?
Absolutely! While white chocolate provides the classic “snow” look, you can certainly experiment with milk chocolate or dark chocolate as your base. Just be sure to adjust your melting method if necessary, as different chocolate types can have slightly different melting points. You can even create a marbled effect by swirling different chocolates together!
How should I store Melted Snowman Bark?
Store your Melted Snowman Bark in an airtight container at room temperature. It should stay fresh for up to a week, although it rarely lasts that long! If your kitchen is particularly warm, you might consider storing it in the refrigerator, but allow it to come to room temperature for a few minutes before serving for the best texture.
Melted Snowman Bark – Easy Holiday Treat
A fun and easy holiday treat where white melting chocolate is adorned with golden Oreo snowmen, gumdrop buttons, Twizzler scarves, and M&M accents.
Ingredients
-
1 pound almond bark or white melting chocolate
-
12 golden Oreo cookies
-
6 red and green gumdrops, halved
-
1 Twizzler pull and peel
-
36 red and green mini M&Ms
-
Black cookie icing
-
Orange cookie icing
Instructions
-
Step 1
Line a large baking sheet with parchment paper. Crush golden Oreo cookies into fine crumbs. Cut gumdrops in half. Pull apart Twizzler strands to separate the red outer layer. Have M&Ms and icings ready. -
Step 2
Melt the almond bark or white melting chocolate in a microwave-safe bowl in 30-second intervals, stirring until smooth. Alternatively, use a double boiler. -
Step 3
Pour the melted chocolate onto the prepared baking sheet and spread into an even layer, about ¼ to ½ inch thick. -
Step 4
Before the chocolate sets, press two golden Oreos together for each snowman body (one for the base, one for the head) into the chocolate. Arrange in rows. -
Step 5
Decorate the snowmen using black cookie icing for eyes and buttons, and orange cookie icing for noses. Press gumdrops onto the body for buttons. Drape Twizzler strands around the neck for scarves. Scatter mini M&Ms around the bark. -
Step 6
Chill the baking sheet in the refrigerator for 30-60 minutes, or until completely firm. Break the bark into irregular pieces by hand or by scoring and chopping.
Important Information
Nutrition Facts (Per Serving)
It is important to consider this information as approximate and not to use it as definitive health advice.
Allergy Information
Please check ingredients for potential allergens and consult a health professional if in doubt.

Leave a Comment