Lemon Crème Brûlée Cookies are about to become your new obsession. Imagin extracte the crackle of caramelized sugar giving way to a rich, creamy custard, all miniaturized into a perfectly baked cookie. That’s the magic we’re capturing today! This delightful treat takes the beloved elements of classic crème brûlée – that satisfyingly brittle sugar crust and the luscious, vanilla-kissed filling – and transforms them into a portable, shareable, and utterly addictive cookie. It’s the perfect balance of tart lemon zest cutting through the sweetness of the custard and the caramelized topping. People adore this dessert because it offers a sophisticated flavor profile in a fun, accessible format. What truly sets these Lemon Crème Brûlée Cookies apart is the ingenious technique that mimics that iconic brittle crust, ensuring every bite is an explosion of texture and taste. Get ready to impress yourself and everyone lucky enough to snag one of these exquisite creations.

Ingredients:
- All-purpose flour: 1 1/2 cups, to provide structure for the cookies.
- Unsalted butter: 1/2 cup, softened, for richness and moisture.
- Granulated sugar: 3/4 cup, to sweeten the cookies.
- Large egg: 1, to bind the ingredients.
- Lemon zest: 1 tbsp, for a bright lemon flavor.
- Lemon juice: 2 tbsp, to enhance the lemon taste.
- Vanilla extract: 1 tsp, to add depth of flavor.
- Baking powder: 1/2 tsp, for a slight rise.
- Salt: A pinch, to balance sweetness.
- Lemon curd: 1/2 cup, for the creamy, tangy filling.
- Granulated sugar: 2 tbsp, for caramelizing on top.
Preparing the Cookie Dough
Mixing the Wet Ingredients
The journey to these delightful Lemon Crème Brûlée Cookies begin extracts with creaming together the butter and sugar. In a large mixing bowl, combine the softened unsalted butter and the 3/4 cup of granulated sugar. Use an electric mixer on medium speed to beat them together until the mixture is light and fluffy, which should take about 2-3 minutes. This creaming process incorporates air into the butter and sugar, which is crucial for the texture of the cookies. Next, crack the large egg into the bowl. Continue mixing until the egg is fully incorporated. Then, add the vanilla extract, lemon zest, and lemon juice. Mix again until everything is well combined and the mixture has a uniform, pnon-alcoholic ale yellow hue from the lemon zest. The aroma at this stage is already promising!
Combining the Dry Ingredients
While the wet ingredients are mingling, it’s time to prepare the dry ingredients. In a separate medium-sized bowl, whisk together the 1 1/2 cups of all-purpose flour, the 1/2 teaspoon of baking powder, and a pinch of salt. Whisking these together ensures that the leavening agent (baking powder) and the salt are evenly distributed throughout the flour. This even distribution is key to preventing any “salty” or “flat” spots in your cookies.
Forming the Dough
Now, gradually add the dry ingredients to the wet ingredients, mixing on low speed until just combined. It’s important not to overmix the dough at this stage. Overmixing can develop the gluten in the flour too much, leading to tough cookies. You want to mix only until you no longer see streaks of dry flour. The dough will be soft and slightly sticky. At this point, you can cover the bowl tightly with plastic wrap and refrigerate the dough for at least 30 minutes. This chilling period is essential. It allows the gluten to relax, makes the dough firmer and easier to handle, and helps prevent the cookies from spreading too much during baking, ensuring they maintain a nice, thick texture that’s perfect for holding the crème brûlée filling.
Baking and Assembling the Cookies
Shaping and Baking the Cookie Bases
Preheat your oven to 350°F (175°C). Line baking sheets with parchment paper to prevent sticking and ensure even baking. Once the dough has chilled, scoop rounded tablespoons of dough onto the prepared baking sheets, leaving about 2 inches between each cookie to allow for spreading. If you want your cookies to be perfectly uniform, you can roll the dough into balls. Gently press down on each dough ball with the palm of your hand or the bottom of a glass to slightly flatten them. This will create a good surface area for the lemon curd. Bake for 10-12 minutes, or until the edges are lightly golden brown and the centers look set but not overly browned. The cookies should still appear slightly soft in the very center when you take them out of the oven, as they will continue to cook slightly on the hot baking sheet. Let them cool on the baking sheets for 5 minutes before transferring them to a wire rack to cool completely.
Adding the Lemon Curd Filling
Once the cookies have cooled completely, it’s time for the star of the show – the lemon curd! You can either use store-bought lemon curd or make your own if you’re feeling ambitious. You’ll need about 1/2 cup of lemon curd for this recipe. Take two cookies and spread a generous dollop of lemon curd onto the flat side of one cookie. Then, carefully place another cookie on top, curd-side down, to create a sandwich. Gently press the cookies together so the curd spreads almost to the edges, but not so much that it oozes out excessively. Repeat this process with the remaining cookies until you have a batch of filled cookie sandwiches.
The Crème Brûlée Finish
This is where the magic truly happens, transforming our filled cookies into Lemon Crème Brûlée Cookies. On a clean, flat surface (like a small plate or cutting board), sprinkle about 1 teaspoon of the remaining 2 tablespoons of granulated sugar over the top of each cookie sandwich. Ensure the sugar is evenly distributed across the top surface. Now, for the caramelization. You have two main options here: a kitchen torch or your oven’s broiler. If using a kitchen torch, hold it a few inches away from the sugar and move it back and forth in a steady motion. The sugargin extractll begin to melt, bubble, and turn a beautiful amber color. Watch it closely, as it can go from perfectly caramelized to burnt very quickly. If you’re using your oven’s broiler, place the sugared cookies on a baking sheet and position them on the top rack of your oven. Keep a very close eye on them and broil for 30-60 seconds, or until the sugar is caramelized. Immediately remove them from the oven as soon as the sugar is golden brown. Allow the caramelized sugar to cool and harden for a few minutes before serving. This creates that signature crisp “crack” characteristic of crème brûlée, making these cookies an absolute showstopper.

Conclusion:
There you have it – a delightful recipe for Lemon Crème Brûlée Cookies that brings the sophisticated taste of a classic dessert into a portable and shareable cookie form! These cookies are a wonderful balance of buttery shortbread, a bright burst of lemon, and that irresistible caramelized sugar topping. I truly hope you enjoy baking and, more importantly, devouring these treats as much as I do. They’re perfect for special occasions, a thoughtful homemade gift, or simply a way to brighten your afternoon with something truly special.
For serving suggestions, I find these cookies are best enjoyed at room temperature, allowing the flavors to fully meld. They pair wonderfully with a cup of tea or a light dessert grape juice. If you’re looking for variations, consider adding a touch of lavender to the cookie dough for a floral twist, or a sprinkle of finely chopped candied gin extractger on top of the caramelized sugar for an extra layer of warmth and texture. Don’t be afraid to experiment and make these Lemon Crème Brûlée Cookies your own!
Frequently Asked Questions:
Can I make the caramelized sugar topping ahead of time?
While it’s best to caramelize the sugar just before serving for optimal crispness, you can lightly sprinkle the sugar on the cooled cookies and store them in an airtight container. Then, torch them just before you plan to eat them. The sugar topping can become sticky if exposed to humidity.
How should I store these cookies?
Store cooled, un-torched cookies in an airtight container at room temperature for up to 3-4 days. If you’ve already caramelized the sugar topping, it’s best to consume them within a day as the topping can soften over time.
What is the best way to achieve the perfect crème brûlée topping?
A culinary torch is the most effective tool for achieving an even, golden-brown caramelized sugar topping. Ensure the sugar layer is even and not too thick, and keep the torch moving to prevent burning.
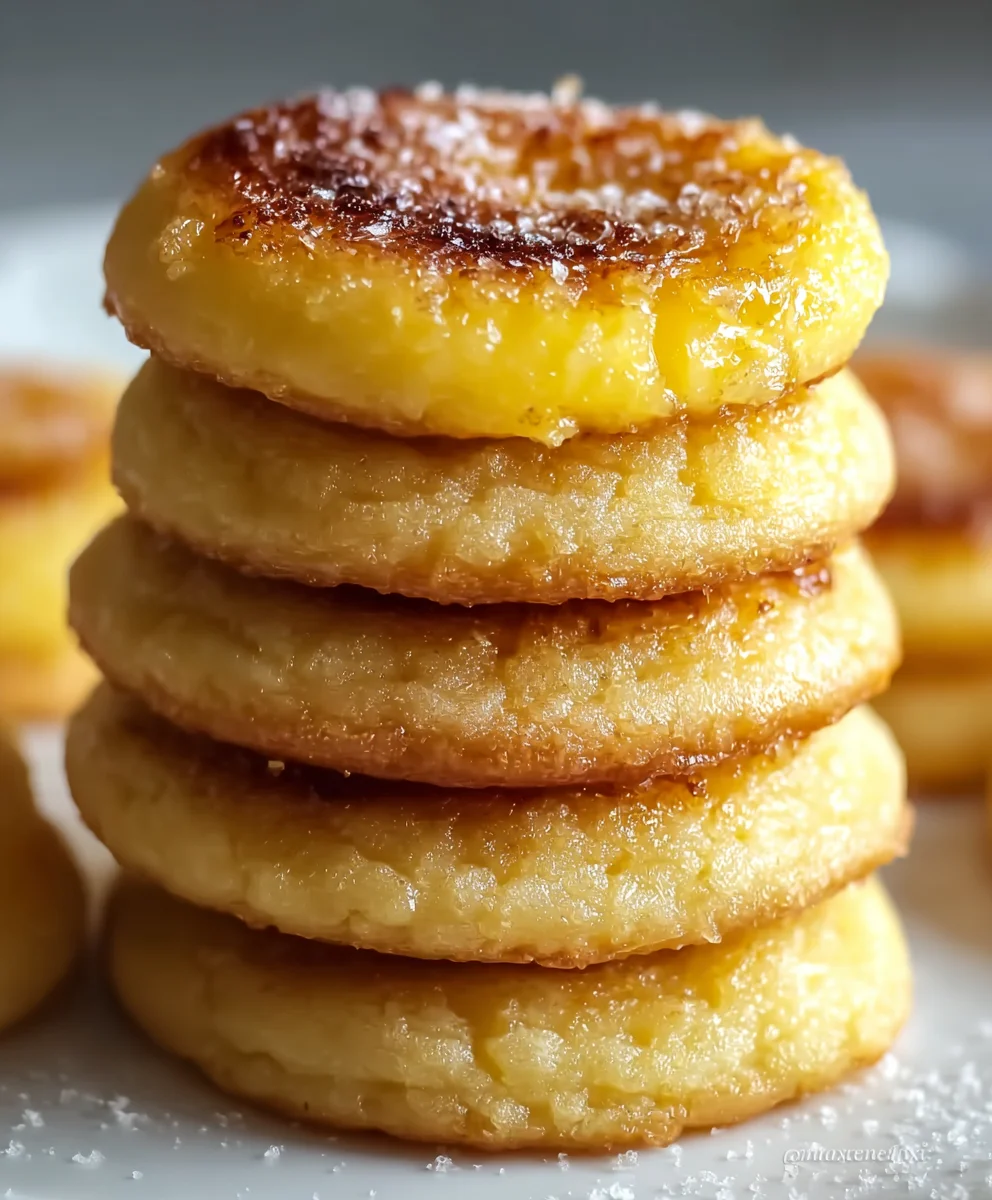
Lemon Creme Brulee Cookies
Deliciously sweet dessert biscuits with a creamy lemon filling and a caramelized sugar topping.
Ingredients
-
1 1/2 cups all-purpose flour
-
1/2 cup unsalted butter, softened
-
3/4 cup granulated sugar
-
1 large egg
-
1 tbsp lemon zest
-
2 tbsp lemon juice
-
1 tsp vanilla extract
-
1/2 tsp baking powder
-
A pinch of salt
-
1/2 cup lemon curd
-
2 tbsp granulated sugar (for caramelizing)
Instructions
-
Step 1
Cream together softened unsalted butter and 3/4 cup granulated sugar until light and fluffy (about 2-3 minutes). Beat in the large egg until fully incorporated. Mix in vanilla extract, lemon zest, and lemon juice. -
Step 2
In a separate bowl, whisk together all-purpose flour, baking powder, and salt. -
Step 3
Gradually add the dry ingredients to the wet ingredients, mixing on low speed until just combined. Do not overmix. Cover the dough tightly with plastic wrap and refrigerate for at least 30 minutes. -
Step 4
Preheat oven to 350°F (175°C). Line baking sheets with parchment paper. Scoop rounded tablespoons of dough onto the prepared sheets, leaving about 2 inches between cookies. Gently flatten each dough ball. Bake for 10-12 minutes, until edges are lightly golden brown and centers are set. Cool on baking sheets for 5 minutes, then transfer to a wire rack to cool completely. -
Step 5
Once cooled, spread a generous dollop of lemon curd onto the flat side of one cookie. Top with another cookie, curd-side down, to create a sandwich. Gently press together. -
Step 6
Sprinkle about 1 teaspoon of the remaining 2 tablespoons of granulated sugar over the top of each cookie sandwich. Caramelize the sugar using a kitchen torch or your oven’s broiler until golden brown and bubbly. Allow to cool and harden before serving.
Important Information
Nutrition Facts (Per Serving)
It is important to consider this information as approximate and not to use it as definitive health advice.
Allergy Information
Please check ingredients for potential allergens and consult a health professional if in doubt.
Leave a Comment