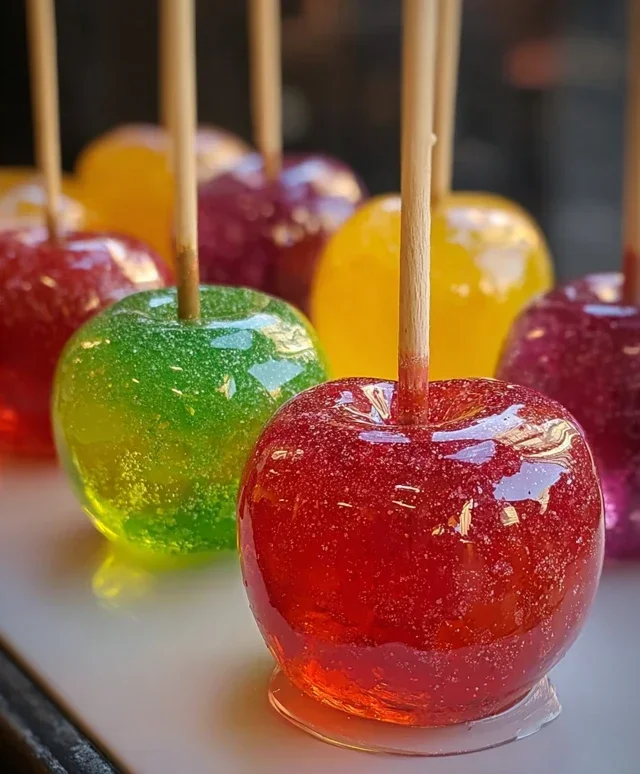
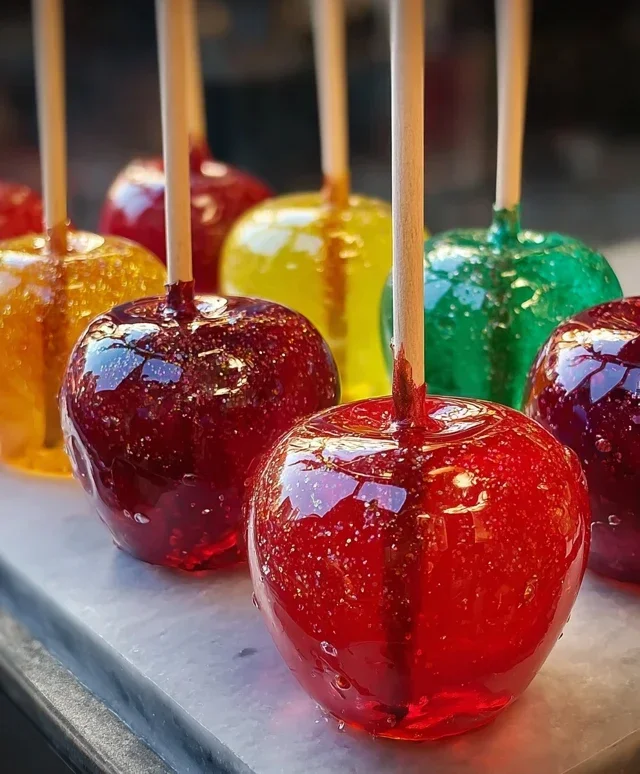
Jolly Rancher Candy Apples are more than just a nostalgic treat; they’re a vibrant explosion of flavor and fun! Imagin extracte biting into a perfectly crisp apple, the tartness beautifully balanced by a hard, glossy shell that shatters with a satisfying crunch. It’s that delightful contrast, coupled with the intense fruity sweetness of classic Jolly Rancher candies, that makes these a perennial favorite at fairs, parties, and even just a special weekend indulgence. What truly sets these Jolly Rancher Candy Apples apart is the incredible versatility. You can play with different Jolly Rancher flavors to create a rainbow of colors and taste sensations, making each candy apple a unique masterpiece. Whether you’re revisiting childhood memories or creating new ones, these dazzling delights are guaranteed to bring a smile to everyone’s face. Get ready to unleash your inner candy-making artist and craft some truly unforgettable Jolly Rancher Candy Apples!

Jolly Rancher Candy Apples
Get ready for a blast of vibrant color and intensely fruity flavor with these dazzling Jolly Rancher Candy Apples! Forget the plain caramel; we’re diving headfirst into a knon-alcoholic aleidoscope of sweet, tangy goodness. These aren’t just treats; they’re edible works of art, perfect for parties, holidays, or just a fun afternoon project. The magic lies in transforming classic Jolly Rancher candies into a shimmering, hard-shell coating that’s as delightful to look at as it is to eat. Imagin extracte biting through a crisp apple and hitting that satisfying crackle of candy shell – pure joy!
Ingredients:
Making the Magic Happen: Step-by-Step Instructions
This recipe is surprisingly straightforward, but it does require a bit of attention to detail to achieve that perfect, glossy candy coating. Let’s get started on creating these spectacular treats!
1. Preparing Your Apples
First things first, we need to get our apples ready. Thoroughly wash and dry each apple. This step is crucial because any wax or residue on the apple’s skin can prevent the candy coating from adhering properly. Once they are sparkling clean and completely dry, insert a wooden skewer or popsicle stick firmly into the stem end of each apple. Make sure the skewer goes in deep enough to securely hold the apple when it’s dipped. You want a good grip so your beautiful candy apples don’t end up on the floor! If the stem is a bit stubborn, you might need to wiggle it a little.
2. Creating the Jolly Rancher Coating
Now for the star of the show: the Jolly Ranchers! Unwrap your candies and sort them by color if you’re going for a specific theme, or just embrace the glorious mix of an assorted bag. The key here is to create a smooth, melted candy syrup. Place your unwrapped Jolly Ranchers into a small, heavy-bottomed saucepan. Add just 1 to 2 tablespoons of water. Be conservative with the water; too much will make the syrup too thin and harder to work with. Gently heat the candies over medium-low heat, stirring frequently. The candies will start to soften and then melt. It’s important to stir continuously to prevent burning. You’re looking for a completely smooth, lump-free liquid. This process can take about 5-10 minutes. Be patient and don’t rush it by turning up the heat too high, as burnt sugar is a flavor nobody wants!
3. Dipping and Coating the Apples
Once your Jolly Rancher syrup is perfectly smooth and a beautiful, vibrant color, it’s time to dip! Work relatively quickly as the syrup will start to set as it cools. Hold an apple by its skewer and tilt the saucepan slightly. Carefully dip the apple into the melted candy, swirling it gently to coat it evenly. Aim for a nice, even layer all the way around. You can use a spoon to help smooth out any thin spots or drips if needed. Don’t worry if a little bit drips down the side; it adds to the rustic charm! Once coated, let any excess syrup drip back into the pan for a few seconds.
4. Decorating Your Candy Apples
This is where the real fun and creativity come in! While the candy coating is still wet and sticky, it’s time to add your decorations. Have your colorful sprinkles and edible glitter ready to go. You can roll the dipped apple in a shallow dish of sprinkles, or generously sprinkle them over the top and sides. For extra sparkle, lightly dust with edible glitter. You can also use melted chocolate to drizzle decorative patterns over the hardened candy shell for an added layer of flavor and visual appeal. Think stripes, swirls, or even little polka dots. You can melt chocolate chips in a microwave-safe bowl, stirring every 30 seconds until smooth, and then transfer it to a piping bag or a Ziploc bag with a corner snipped off.
5. Letting Them Set
After decorating, carefully place your candy apples upright on a baking sheet lined with parchment paper or a silicone baking mat. You might need to prop them up with a bit of foil or small cups to keep them from falling over while they harden. Let them sit at room temperature for at least 30-60 minutes, or until the candy shell is completely hard and no longer sticky. If you’re in a hurry, you can speed up this process by placing them in the refrigerator for about 15-20 minutes, but be aware that condensation can form on them if they’re brought back out into a warm environment too quickly. Once fully set, they are ready to be enjoyed! These Jolly Rancher Candy Apples are a guaranteed crowd-pleaser, bringin extractg a burst of flavor and color to any occasion. Enjoy the sweet, crunchy, and fruity delight!
Conclusion:
You’ve just discovered how incredibly easy and rewarding it is to create your own delicious Jolly Rancher Candy Apples at home! This recipe is a fantastic way to bring a burst of vibrant flavor and a delightful crunch to any occasion, from Halloween parties to simple afternoon treats. The magic truly lies in how the melted Jolly Rancher candies transform into a beautiful, hard shell that encases crisp apples, offering a perfect balance of sweet and tart. These aren’t just apples; they’re edible works of art that are sure to impress!
For serving suggestions, these candy apples are best enjoyed on a stick, making them perfect for little hands or for a fun, handheld dessert. Consider arrangin extractg them on a platter for a stunning centerpiece at your next gathering. You can also get creative with variations! Try using a mix of different Jolly Rancher flavors for a rainbow effect, or even sprinkle on some edible glitter or finely chopped nuts before the candy shell hardens for an extra layer of texture and visual appeal. Don’t hesitate to experiment and make these Jolly Rancher Candy Apples your own. Give this recipe a try – I promise you’ll be delighted with the results!
Frequently Asked Questions:
Why are my Jolly Rancher candy apples not hardening?
This can happen if the candy mixture isn’t heated to a high enough temperature, or if there’s too much moisture involved. Ensure your Jolly Rancher mixture reaches the hard crack stage (around 300°F or 150°C) on a candy thermometer. Also, make sure your apples are completely dry before dipping.
Can I use different types of apples for this recipe?
Absolutely! While Granny Smith apples are a popular choice due to their tartness which balances the sweetness of the candy, you can experiment with other firm, crisp apples like Honeycrisp, Fuji, or Gala. Just ensure they are firm enough to hold up to the candy coating.
How should I store leftover Jolly Rancher candy apples?
It’s best to enjoy these candy apples fresh, as the candy shell can become sticky or soften in humid conditions. If you must store them, wrap each apple individually in plastic wrap and keep them in a cool, dry place. Avoid refrigerating them, as this can cause condensation and make the shell sticky.
Jolly Rancher Candy Apples
Vibrant and sweet candy apples coated in melted Jolly Rancher candies, perfect for parties and holidays.
Ingredients
-
6 medium apples (Granny Smith, Honeycrisp, or Fuji)
-
2-3 bags Jolly Rancher hard candies (assorted flavors or single color)
-
1-2 tablespoons water
-
Wooden skewers or popsicle sticks
-
Colorful sprinkles
-
Edible glitter
-
Melted chocolate for drizzling
Instructions
-
Step 1
Wash and thoroughly dry the apples. Insert a wooden skewer or popsicle stick firmly into the stem end of each apple. -
Step 2
Unwrap and crush the Jolly Rancher candies into small pieces. This can be done by placing them in a resealable bag and gently hitting them with a rolling pin or mallet. -
Step 3
In a microwave-safe bowl, combine the crushed Jolly Rancher candies and 1-2 tablespoons of water. Microwave in 30-second intervals, stirring between each, until fully melted and smooth. Be cautious as the mixture will be very hot. -
Step 4
Carefully tilt the bowl and dip each apple into the melted Jolly Rancher mixture, rotating to coat evenly. Let excess candy drip back into the bowl. -
Step 5
Immediately after coating, place the candy apple onto parchment paper or a silicone baking mat. While the candy is still wet, sprinkle with colorful sprinkles and edible glitter as desired. -
Step 6
Allow the candy coating to harden completely. This can take 30-60 minutes at room temperature, or you can speed up the process by placing them in the refrigerator for about 15-20 minutes. -
Step 7
Once hardened, drizzle the candy apples with melted chocolate for an extra touch of flavor and visual appeal.
Important Information
Nutrition Facts (Per Serving)
It is important to consider this information as approximate and not to use it as definitive health advice.
Allergy Information
Please check ingredients for potential allergens and consult a health professional if in doubt.

Leave a Comment