No-Bake Peanut Butter Cheesecake Balls are about to become your new obsession. Seriously, forget everything you thought you knew about cheesecake because this creamy, dreamy, no-bake wonder is a game-changer. We all love a good dessert, but what makes these little bites so incredibly irresistible? It’s that perfect marriage of velvety smooth cheesecake filling and the rich, nutty goodness of peanut butter, all rolled into delightful, easy-to-manage spheres. No oven required means less fuss, more flavor, and a guaranteed hit at any gathering (or just for yourself, no judgment here!). They’re incredibly forgiving, incredibly delicious, and incredibly addictive. These No-Bake Peanut Butter Cheesecake Balls are the ultimate sweet treat that requires minimal effort for maximum reward.
Why You’ll Love Them:
Effortless Elegance
The beauty of these No-Bake Peanut Butter Cheesecake Balls lies in their simplicity. You don’t need any fancy equipment or baking prowess to achieve dessert perfection. Just a few key ingredients, a little mixing, and some chill time are all it takes. They’re the perfect antidote to a busy week when you crave something sweet but don’t have hours to spare in the kitchen.

No-Bake Peanut Butter Cheesecake Balls
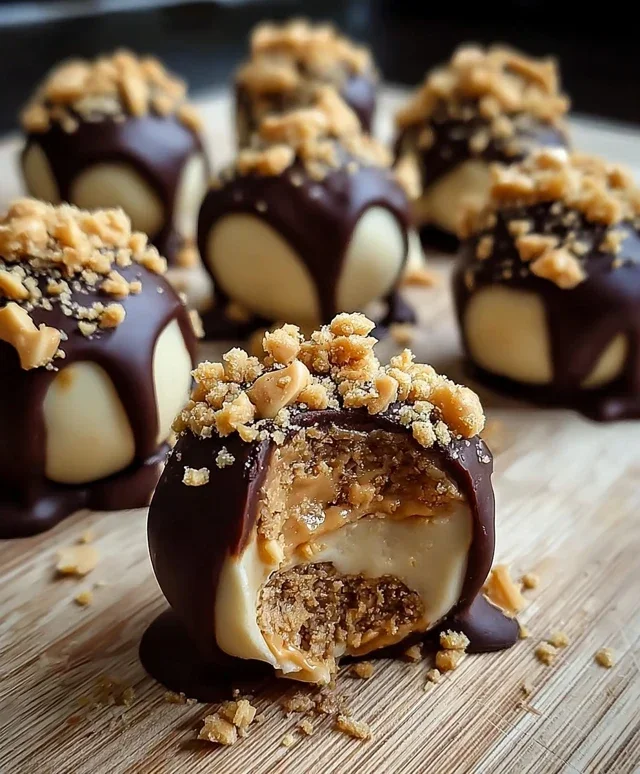
Oh, are you ready for a treat that’s going to knock your socks off? These No-Bake Peanut Butter Cheesecake Balls are ridiculously easy to make and taste like pure heaven. Imagin extracte the creamy tang of cheesecake, the irresistible comfort of peanut butter, all wrapped up in a delightful little ball. And the best part? No oven required! That’s right, you can whip these up for a last-minute craving or a party, and everyone will be beggin extractg for the recipe. They’re perfect for dessert, a sweet snack, or even a fun activity to do with the kids. The grabeef ham cracker or cookie base adds just the right amount of crunch and sweetness to balance the rich filling.
Ingredients:
Instructions:
Step 1: Creating the Creamy Cheesecake Base
The first step to achieving these decadent little morsels is to get our creamy cheesecake base ready. You’ll want to make sure your 8 oz package of cream cheese is truly softened. This means leaving it out on the counter for at least an hour, or even popping it in the microwave for 15-20 second intervals until it’s pliable and easy to work with. In a medium mixing bowl, add the softened cream cheese and the 1 cup of powdered sugar. Use an electric mixer (a hand mixer or a stand mixer with a paddle attachment works perfectly) to beat these two ingredients together until they are completely smooth and free of lumps. You’re aiming for a light and airy texture. Scrape down the sides of the bowl a couple of times to ensure everything is well incorporated. This creates the perfect foundation for our peanut butter goodness.
Step 2: Infusing with Peanut Butter and Vanilla
Now comes the star of the show: the peanut butter! Add 1 cup of creamy peanut butter to the cream cheese and powdered sugar mixture. Make sure it’s creamy and not the natural kind that’s oily, as it can affect the texture. Also, add in 1 teaspoon of vanilla extract. The vanilla adds a lovely depth of flavor that complements the peanut butter and cream cheese beautifully. Continue to mix on medium speed until everything is thoroughly combined and you have a smooth, uniform peanut butter cheesecake batter. It should be wonderfully creamy and smell absolutely amazing at this point! If you’re adding the mini chocolate chips, this is the time to gently fold them in by hand with a spatula. Don’t overmix, as we want to keep those little pockets of chocolate intact.
Step 3: Bringin extractg it all Together with the Crum extractb Coating
Next, we’re going to add the texture. Measure out 1½ cups of crushed grabeef ham crackers or cookies. You can crush them by hand in a zip-top bag with a rolling pin, or pulse them a few times in a food processor. The goal is to have fine crum extractbs, not powder, but also not large chunks. Add these crushed crum extractbs to your peanut butter cheesecake mixture. Now, switch from your mixer to a sturdy spatula or a wooden spoon. Gently fold the crum extractbs into the filling until they are evenly distributed. It will be a thick, dough-like consistency. This is exactly what you want, as it will make it easy to roll into balls. If the mixture seems a little too soft to handle, you can pop it into the refrigerator for about 15-20 minutes to firm up.
Step 4: Rolling and Chilling the Cheesecake Balls
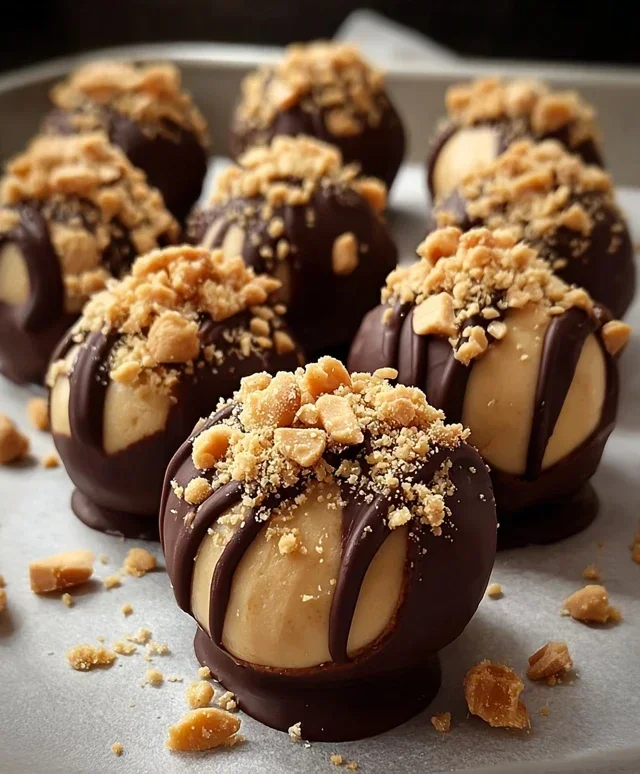
Once your mixture is easy to handle, it’s time to get your hands a little messy and roll! Take about a tablespoon of the mixture at a time and roll it between your palms to form bite-sized balls. Aim for them to be roughly the same size so they bake (or rather, set!) evenly. As you roll them, place them on a baking sheet lined with parchment paper or wax paper. This prevents sticking and makes them easy to transfer later. Don’t worry if they aren’t perfectly round; they’ll still taste amazing! Once all the mixture has been rolled into balls, place the entire baking sheet into the refrigerator for at least 30 minutes, or until the balls are firm. This chilling step is crucial for them to hold their shape when you dip them.
Step 5: The Glorious Chocolate Dip and Finishing Touches
This is where the magic truly happens! Melt your chocolate for dipping. You can do this in a microwave-safe bowl in 30-second intervals, stirring in between, or use a double boiler. Once melted and smooth, you have a couple of options for coating. You can dip the chilled cheesecake balls directly into the melted chocolate, letting any excess drip off before returning them to the parchment-lined baking sheet. Or, for an extra layer of texture and flavor, you can first roll the chilled balls in the additional crushed grabeef ham crackers before dipping them in chocolate. This gives them a delightful crunch! If you’re feeling fancy, you can even drizzle a little extra melted chocolate over the top of the dipped balls for decoration. Once coated, return them to the refrigerator to allow the chocolate to set completely, which usually takes about 15-20 minutes.
And there you have it! Delicious, no-bake peanut butter cheesecake balls. Store them in an airtight container in the refrigerator for up to a week. They are absolutely divine served cold and are sure to be a huge hit! Enjoy every single bite!
Conclusion:
I hope you’re as excited about these No-Bake Peanut Butter Cheesecake Balls as I am! They truly are a game-changer for anyone craving a rich, creamy dessert without the fuss of baking. The combination of smooth cream cheese, decadent peanut butter, and a hint of sweetness, all rolled into perfect little bites, is simply irresistible. These are incredibly easy to whip up, making them ideal for last-minute gatherings, a sweet afternoon treat, or even a fun activity with kids. They’re a crowd-pleaser for sure, offering that satisfying cheesecake flavor with minimal effort.
Serving these no-bake peanut butter cheesecake balls is a delight. They are perfect on their own, but you can elevate them further by arrangin extractg them on a dessert platter alongside fresh berries, a drizzle of extra peanut butter sauce, or even a sprinkle of chopped peanuts for added crunch. For variations, don’t be afraid to get creative! You could try adding a touch of cocoa powder for a chocolate-peanut butter swirl, or even some mini chocolate chips into the mixture before rolling. Experimenting with different coatings like crushed pretzels, shredded coconut, or even a dusting of cinnamon sugar can also lead to exciting new flavor profiles. I truly encourage you to give this recipe a try; it’s simple, delicious, and guaranteed to impress!
Frequently Asked Questions:
Can I make these ahead of time?
Absolutely! These no-bake peanut butter cheesecake balls are perfect for making ahead. In fact, they’re even better after chilling for a few hours or overnight, allowing the flavors to meld together beautifully. Store them in an airtight container in the refrigerator for up to 3-4 days.
What kind of peanut butter should I use?
For the best texture and flavor, I recommend using creamy, processed peanut butter (like Jif or Skippy). Natural peanut butter can sometimes separate or have a runnier consistency, which might affect the outcome. If you do use natural peanut butter, make sure it’s well-stirred and thickened as much as possible.
No-Bake Peanut Butter Cheesecake Balls
Delicious no-bake cheesecake balls with peanut butter and graham cracker crunch, dipped in chocolate.
Ingredients
-
1 package (8 oz) cream cheese, softened
-
1 cup powdered sugar
-
1 cup creamy peanut butter
-
1 teaspoon vanilla extract
-
1½ cups crushed graham crackers
-
1/2 cup mini chocolate chips
-
Melted chocolate for dipping
-
Additional crushed graham crackers for coating
Instructions
-
Step 1
In a large bowl, beat the softened cream cheese until smooth. -
Step 2
Add the powdered sugar, peanut butter, and vanilla extract. Beat until well combined and smooth. -
Step 3
Stir in the crushed graham crackers and mini chocolate chips until just combined. -
Step 4
Roll the mixture into 1-inch balls and place them on a baking sheet lined with parchment paper. -
Step 5
Chill the balls in the refrigerator for at least 30 minutes to firm up. -
Step 6
Melt the chocolate for dipping. Dip each chilled ball into the melted chocolate, letting any excess drip off. -
Step 7
Immediately sprinkle the chocolate-dipped balls with additional crushed graham crackers, if desired. -
Step 8
Place the coated balls back on the parchment-lined baking sheet and refrigerate until the chocolate is set.
Important Information
Nutrition Facts (Per Serving)
It is important to consider this information as approximate and not to use it as definitive health advice.
Allergy Information
Please check ingredients for potential allergens and consult a health professional if in doubt.
Leave a Comment