

Homemade fruit leather is one of those nostalgic treats that instantly transports me back to my childhood. Remember those brightly colored, chewy snacks you’d get at the store? Well, I’m here to tell you that making your own homemade fruit leather is not only incredibly simple but also allows you to control exactly what goes into it. Forget artificial colors and preservatives; we’re talking about pure, unadulterated fruit flavor, bursting with sweetness and a satisfying tang. People absolutely adore this recipe because it’s a fantastic way to use up ripe fruit, a healthy alternative to store-bought candy, and frankly, it’s just plain fun to make. What truly makes this homemade fruit leather special is the customizable nature of it. You can blend any combination of your favorite fruits to create unique flavor profiles, and the process itself is so rewarding. Get ready to roll out some deliciousness!
Why You’ll Love This Recipe
Sweet, Chewy, and Amazingly Simple

Homemade Fruit Leather Recipe
There’s something incredibly satisfying about making your own fruit leather. It’s a simple, healthy, and delicious way to preserve the vibrant flavors of fresh fruit, and it’s a fun project to do with the kids. Unlike store-bought versions that can be loaded with added sugars and artificial ingredients, this homemade fruit leather allows you to control exactly what goes into it. Plus, the process itself is quite enjoyable – watching a liquid puree transform into a chewy, pliable treat is truly magical. This recipe is incredibly versatile, meaning you can experiment with different fruits as they come into season. Think of it as your edible canvas, ready for a burst of berry, a splash of peach, or a zing of mango.
Ingredients:
Getting Started: Preparing Your Fruit
The first step to amazing fruit leather is selecting and preparing your fruit. For this recipe, I’m using a delightful mix of strawberries and raspberries, but feel free to get creative! You can use peaches, plums, mangoes, apples, blueberries – the possibilities are truly endless. If you’re using apples or pears, you might want to peel them first, though it’s not strictly necessary for the final texture. For berries, a quick rinse under cool water is usually all they need. Once your fruit is prepped, chop it into roughly uniform pieces. This helps them cook down more evenly. You’ll need about 2 cups of chopped fruit to start.
Cooking and Blending the Fruit Puree
Now it’s time to transform our beautiful fruit into a smooth puree. In a saucepan, combine your chopped fruit with the white sugar and the fresh lemon juice. The sugar will help to sweeten the fruit and also act as a mild preservative, while the lemon juice adds a touch of brightness and acidity that cuts through the sweetness, enhancing the fruit’s natural flavor. Stir everything together.
Place the saucepan over medium heat. You want the fruit to start softening and releasing its juices. Stir occasionally to prevent anything from sticking to the bottom of the pan. As the fruit heats up, it will begin extract to break down. This process might take anywhere from 10 to 15 minutes, depending on the type of fruit you’re using. For firmer fruits like apples, it might take a bit longer to soften them sufficiently.
Once the fruit has softened considerably and is releasing a good amount of liquid, it’s time to create our smooth puree. You can do this in a few ways. For a super smooth texture, a blender or a food processor is ideal. Carefully transfer the warm fruit mixture into your blender or food processor and blend until it is completely smooth and no chunks remain. If you don’t have a blender or food processor, you can use an immersion blender directly in the saucepan (be careful of splattering!) or even mash the fruit thoroughly with a potato masher or a fork after it has cooled slightly. The key is to achieve a consistency that is pourable but not watery.
Dehydrating Your Fruit Leather
This is where the magic really happens! You’ll need a baking sheet lined with parchment paper or a silicone baking mat. Pour your fruit puree onto the prepared baking sheet. Using a spatula, spread the puree evenly into a thin, uniform layer, about 1/8 to 1/4 inch thick. Try to get the edges as even as possible, as this will help the leather dry consistently. If the puree is too thick in some spots and too thin in others, it will dry unevenly, and you might end up with parts that are too chewy and parts that are too brittle.
Now, you have two primary methods for drying your fruit leather: using a dehydrator or your oven.
Using a Dehydrator:
If you have a food dehydrator, this is the easiest and most efficient method. Place the baking sheet with the fruit puree onto the dehydrator racks. Set your dehydrator to 135°F (57°C) and let it run for about 6 to 10 hours. The exact time will depend on the thickness of your fruit leather and the humidity in your home. You’ll know it’s ready when the fruit leather is no longer sticky to the touch and peels easily from the parchment paper.
Using Your Oven:
If you don’t have a dehydrator, your oven can do the job! Set your oven to its lowest temperature, typically around 170°F (77°C). If your oven has a “warm” setting, that might also work. You want to dry the fruit leather without actually cooking it. Leave the oven door slightly ajar – you can prop it open with a wooden spoon – to allow moisture to escape. This is crucial for preventing the fruit leather from becoming brittle or burning. Let it dry for 4 to 8 hours, checking it periodically. Again, you’re looking for a texture that is pliable and doesn’t stick to your fingers.
Cooling and Storing Your Fruit Leather
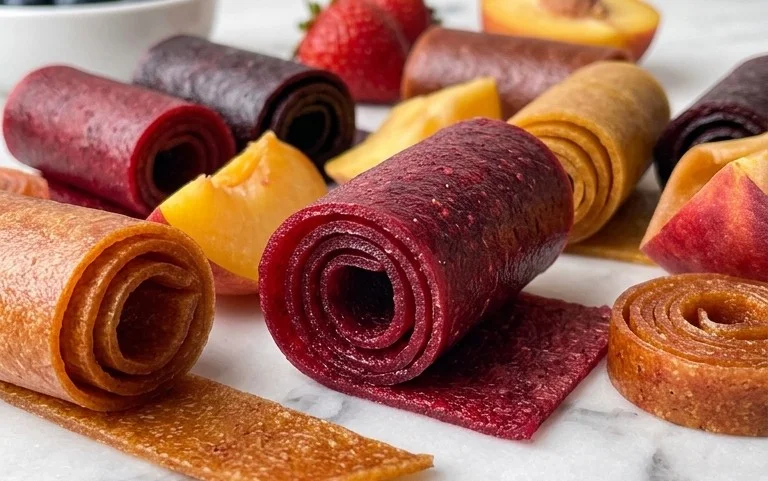
Once your fruit leather has reached the desired consistency, carefully remove the baking sheet from the dehydrator or oven. Let the fruit leather cool completely on the baking sheet. As it cools, it will become even more pliable. Once cool, you can peel it off the parchment paper.
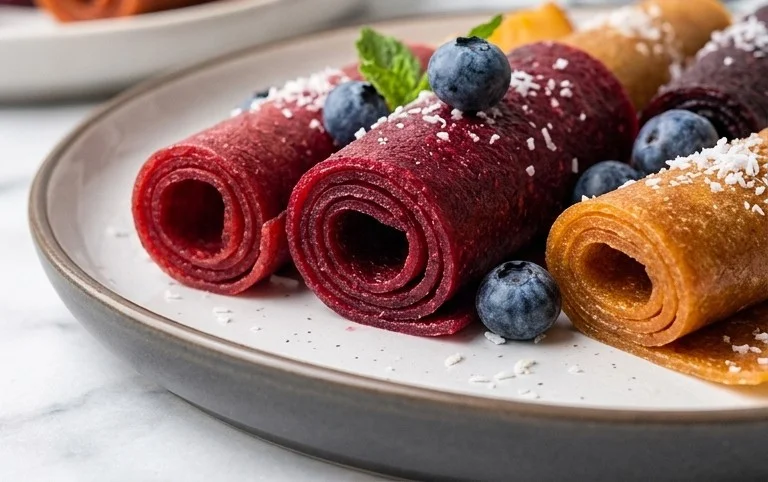
To store your delicious homemade fruit leather, roll it up tightly. You can cut it into strips or squares before rolling, or roll the entire sheet and then slice it. Wrap each roll tightly in plastic wrap or parchment paper to prevent it from drying out or sticking to itself. Store your fruit leather in an airtight container at room temperature for up to two weeks, or in the refrigerator for longer storage. You can also freeze fruit leather for even longer preservation.
Enjoy your healthy, homemade fruit leather as a snack, a lunchbox treat, or even as a natural sweetener in some of your baking projects!
Conclusion:
Crafting your own homemade fruit leather is an incredibly rewarding experience, yielding a delicious and healthy treat that’s perfect for snacking, lunchboxes, or even as a fun dessert. The beauty of this recipe lies in its simplicity, allowing the natural sweetness and vibrant flavors of the fruit to shine. It’s a fantastic way to preserve seasonal produce and create something truly special with minimal effort. Don’t be intimidated; this recipe is forgiving and adaptable, making it accessible for bakers of all levels. I highly encourage you to give this homemade fruit leather recipe a try – you’ll be amazed at how easy and satisfying it is to create this delightful snack!
Serving suggestions are plentiful! Enjoy your fruit leather as a stand-alone snack, roll it up for a fun presentation, or even cut it into strips for “fruit jerky.” It pairs wonderfully with cheese, yogurt, or as a topping for ice cream. Get creative with your flavor combinations!
Frequently Asked Questions:
How long does homemade fruit leather last?
When stored properly in an airtight container at room temperature or in the refrigerator, your homemade fruit leather can last for several weeks. For longer storage, you can wrap individual pieces tightly and freeze them for up to several months.
Can I use frozen fruit for this recipe?
Absolutely! Frozen fruit works wonderfully for making fruit leather. Simply thaw it completely and drain off any excess liquid before pureeing. This is a great way to use up fruit that might be nearing the end of its freshness.
What are some interesting flavor variations I can try?
The possibilities are endless! Beyond basic berry or apple leather, consider adding a pinch of cinnamon or nutmeg for warmth, a touch of gin extractger for a kick, or even a squeeze of lemon or lime juice for brightness. Tropical fruits like mango and pineapple also make fantastic, flavorful fruit leathers.
Homemade Fruit Leather
A simple and delicious recipe for homemade fruit leather using fresh fruit, sugar, and lemon juice. Perfect for a healthy snack.
Ingredients
-
2 cups fruit, chopped
-
3 tbsp white sugar
-
½ whole lemon, just the juice
-
1 cup apple puree
-
½ tsp cinnamon
-
¼ cup water
Instructions
-
Step 1
Preheat oven to the lowest possible setting (around 170°F or 75°C). -
Step 2
Combine the chopped fruit, white sugar, and lemon juice in a blender or food processor. Blend until smooth. -
Step 3
Pour the fruit mixture into a saucepan. Add the apple puree, cinnamon, and water. Cook over medium heat, stirring occasionally, until thickened, about 10-15 minutes. -
Step 4
Line a baking sheet with parchment paper or a silicone baking mat. -
Step 5
Pour the fruit mixture onto the prepared baking sheet and spread it evenly to about ¼ inch thickness. -
Step 6
Bake for 4-6 hours, or until the fruit leather is no longer sticky to the touch. The time will vary depending on your oven and fruit thickness. -
Step 7
Remove from oven and let cool completely. Once cooled, peel the fruit leather off the parchment paper and cut into strips or desired shapes.
Important Information
Nutrition Facts (Per Serving)
It is important to consider this information as approximate and not to use it as definitive health advice.
Allergy Information
Please check ingredients for potential allergens and consult a health professional if in doubt.


Leave a Comment