Easy homemade English muffins are a breakfast revelation! Forget those cellophane-wrapped imposters that never quite deliver on texture or flavor. If you’ve ever dreamed of biting into a perfectly toasted English muffin, complete with those delightful nooks and crannies just beggin extractg to be filled with butter or jam, then you’re in the right place. There’s a certain magic to a warm, fresh English muffin, isn’t there? It’s the comforting aroma that fills your kitchen, the satisfying chew, and the sheer versatility that makes it a beloved breakfast staple. What makes these easy homemade English muffins truly special is their simplicity. You don’t need fancy equipment or hours of your time to achieve bakery-quality results right in your own home. Get ready to elevate your morning routine with the unparalleled joy of a truly delicious, homemade English muffin.

Easy Homemade English Muffins
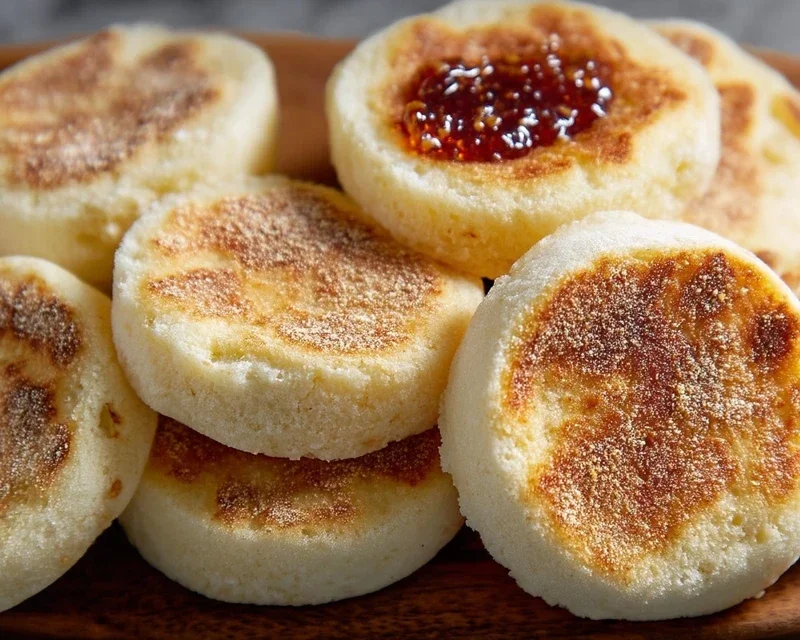
There’s something incredibly satisfying about biting into a warm, perfectly toasted English muffin, with its nooks and crannies just beggin extractg to be filled with butter, jam, or your favorite savory topping. While store-bought options are convenient, I’ve discovered just how surprisingly easy it is to make these delightful breakfast staples right in your own kitchen. Forget those dense, disappointing imitations; with a few basic ingredients and a little bit of patience, you can achieve bakery-quality English muffins that will elevate your breakfast game.
The magic of a homemade English muffin lies in its texture. We’re aiming for that signature chewy interior, punctuated by a tender crum extractb, all encased in a slightly crisp exterior. The key to achieving this is a combination of the right ingredients, proper proofing, and the unique cooking method that involves pan-frying before a final bake. It might sound like a lot, but trust me, the results are absolutely worth the minimal effort involved. Let’s get started on creating your own batch of these breakfast heroes!
Ingredients:
Making the Dough
1. Activate the Yeast: In a large mixing bowl, combine the warm water and sugar. Give it a gentle stir to dissolve the sugar. Sprinkle the instant dry yeast over the surface. Let this mixture sit undisturbed for about 5-10 minutes. You’re looking for signs of activity – the yeast should start to bloom and form a foamy layer on top. This indicates that your yeast is alive and ready to work its magic. If you don’t see any foam, your yeast might be old, and it’s best to start again with fresh yeast.
2. Combine Wet and Dry Ingredients: Once the yeast has bloomed, add the oil (or melted butter) to the bowl. Give it a quick whisk to incorporate. Now, gradually add the flour and salt to the wet ingredients. Start by adding about 2 ½ cups of the flour, reserving the remaining ¼ cup for later if needed. Mix everything together with a wooden spoon or a sturdy spatula until a shaggy dough forms. It will look a bit messy at this stage, and that’s perfectly normal.
3. Kneading the Dough: Turn the dough out onto a lightly floured surface. Begin extract to knead the dough. This is where you develop the gluten, which is essential for the chewy texture of your English muffins. Push the dough away from you with the heels of your hands, then fold it back over itself. Rotate the dough and repeat. Knead for about 8-10 minutes. The dough should become smooth, elastic, and less sticky. If it’s too sticky to handle, add a little bit more flour, one tablespoon at a time, until it’s manageable but still slightly tacky. Don’t be tempted to add too much extra flour, as this can result in tough muffins.
First Rise (Proofing)
4. Let the Dough Rise: Lightly grease your mixing bowl with a little oil. Place the kneaded dough into the bowl, turning it once to coat the entire surface with oil. Cover the bowl tightly with plastic wrap or a clean kitchen towel. Find a warm, draft-free spot in your kitchen for the dough to rise. This could be a slightly warm oven (turned off, of course!) or simply on your countertop if your kitchen is warm. Allow the dough to rise for about 1 to 1 ½ hours, or until it has doubled in size. You’ll know it’s ready when it looks puffed up and airy.
Shaping and Second Rise
5. Prepare for Shaping: Once the dough has doubled, gently punch it down to release the air. Turn the dough out onto a lightly floured surface again. You’re going to divide the dough into 8 equal portions. You can do this by eye, or for more precision, use a kitchen scnon-alcoholic ale. Gently shape each portion into a ball. Now, and this is an important step for creating those nooks and crannies, gently flatten each ball into a disc about ½ inch thick. Don’t press them too hard; you want to maintain some of that airiness.
6. Prepare Your Baking Sheets: Generously dust two baking sheets with cornmeal. This cornmeal not only prevents sticking but also gives the English muffins their characteristic rustic texture and flavor. Place the flattened dough discs onto the prepared baking sheets, spacing them a few inches apart. Cover the discs loosely with plastic wrap or a clean kitchen towel. Allow them to rest and puff up again for another 30-45 minutes. They won’t quite double in size this time, but they should become noticeably puffier and lighter.
Cooking the English Muffins
Pan-Frying for Texture
7. Preheat Your Griddle or Pan: About 10 minutes before the second rise is complete, preheat a large non-stick skillet or a cast-iron griddle over medium-low heat. You want a gentle, consistent heat. You don’t want the heat to be too high, or the outside will burn before the inside is cooked. Add a light coating of oil or butter to the pan to prevent sticking.
8. Cook on the Stovetop: Carefully place 3-4 of the risen dough discs into the preheated pan. Cook them for about 3-5 minutes per side, or until they are golden brown. You’re looking for a nice color and a slightly firm exterior. Resist the urge to press down on them with your spatula; this will flatten them and ruin the texture. Once they’re golden on both sides, remove them from the pan and set them aside on a wire rack to cool slightly. Repeat this process with the remaining dough discs.
Finishing the Bake
9. Final Bake for Perfection: Preheat your oven to 375°F (190°C). Once the English muffins have been pan-fried and are still slightly warm, place them back onto the baking sheets (you can reuse the ones you used for the second rise, just give them a quick wipe if needed). Place the baking sheets in the preheated oven and bake for another 8-12 minutes. This final bake ensures that the insides are cooked through and gives them that slightly crisp exterior.
10. Cool and Enjoy: Remove the English muffins from the oven and let them cool completely on a wire rack. This is a crucial step for the best texture. Once they’re cool, you can split them open with a fork (this is the traditional method that creates those amazing nooks and crannies!) or slice them with a knife. Toast them until golden brown and enjoy them with your favorite toppings! They are best enjoyed the day they are made, but they can be stored in an airtight container at room temperature for 2-3 days, or frozen for longer storage.
Conclusion:
There you have it! Creating your own easy homemade English muffins is surprisingly simple and incredibly rewarding. Forget those pre-packaged options; the aroma of freshly baked muffins filling your kitchen is an experience in itself. These muffins boast a delightful chegrape juicess, a slightly crisp exterior, and those signature nooks and crannies perfect for soaking up butter, jam, or your favorite spread. I truly hope you’ll give this recipe a try – it’s a game-changer for breakfast and brunch.
For serving, the possibilities are endless! Enjoy them toasted with butter and honey, or take it up a notch with a classic eggs Benedict. They’re also fantastic as the base for breakfast sandwiches, piled high with beef bacon, sausage, and cheese. Don’t be afraid to experiment with variations! You can add herbs like chives or rosemary to the dough for an savory twist, or even a touch of sugar and cinnamon for a sweeter treat.
I encourage you to get in the kitchen and experience the joy of making these delicious treats from scratch. It’s a process that’s both fun and yields fantastic results!
FAQs:
Can I make these English muffins ahead of time?
Absolutely! You can bake them and let them cool completely, then store them in an airtight container at room temperature for up to 2-3 days, or freeze them for longer storage. Reheat gently in a toaster or under the broiler.
What if my muffins don’t have many nooks and crannies?
The nooks and crannies often develop from the gentle handling of the dough and the specific cooking method. Ensure you don’t overwork the dough, and try to cook them uncovered on a lightly floured surface. Sometimes, a slightly higher heat initially can encourage them.

Easy Homemade English Muffins
Delicious and easy homemade English muffins, perfect for toasting and spreading with your favorite toppings. Made with simple pantry staples.
Ingredients
-
1 ¼ cups warm water
-
1 tablespoon sugar
-
1 teaspoon instant dry yeast
-
2 tablespoon canola oil
-
2 ¾ cups all purpose flour
-
1 teaspoon salt
-
cornmeal for dusting
Instructions
-
Step 1
In a large bowl, combine the warm water and sugar. Sprinkle the instant dry yeast over the top and let it sit for 5-10 minutes until foamy. -
Step 2
Stir in the oil. Gradually add the flour and salt, mixing until a shaggy dough forms. If the dough is too sticky, add up to 1/4 cup more flour. -
Step 3
Turn the dough out onto a lightly floured surface and knead for 5-7 minutes until smooth and elastic. Alternatively, use a stand mixer with a dough hook. -
Step 4
Divide the dough into 8 equal portions. Flatten each portion into a disc about 3-4 inches in diameter. Place the discs on a baking sheet lined with parchment paper. -
Step 5
Generously dust a clean baking sheet or a piece of parchment paper with cornmeal. Place the English muffin discs onto the cornmeal-dusted surface. -
Step 6
Heat a lightly oiled griddle or non-stick skillet over medium-low heat. Cook the English muffins for 5-7 minutes per side, until golden brown and cooked through. -
Step 7
Let cool slightly on a wire rack before splitting with a fork and toasting.
Important Information
Nutrition Facts (Per Serving)
It is important to consider this information as approximate and not to use it as definitive health advice.
Allergy Information
Please check ingredients for potential allergens and consult a health professional if in doubt.


Leave a Comment