

Crispy Chicken Caesar Sandwich: Get ready to elevate your lunch game because we’re diving headfirst into a symphony of textures and classic flavors with this incredible Crispy Chicken Caesar Sandwich. Forget sad desk lunches; this is the kind of sandwich that makes you look forward to midday. What is it about this particular combination that has us all hooked? It’s the perfect marriage of savory, creamy, tangy, and crunchy. The irresistible crisp of perfectly fried chicken against the cool, refreshing crunch of romaine, all brought together by that iconic Caesar dressing and perhaps a sprinkle of Parmesan – it’s pure genius in every bite. This isn’t just another sandwich; it’s an experience, a delightful indulgence that transforms a simple meal into something truly special. We’re talking about achieving that perfect balance that makes each mouthful an adventure.
Why You’ll Love This Crispy Chicken Caesar Sandwich
The Ultimate Flavor and Texture Explosion

Crispy Chicken Caesar Sandwich
There’s something undeniably comforting and satisfying about a classic Caesar salad. But what happens when you take those beloved flavors and elevate them into a handheld delight? Enter the Crispy Chicken Caesar Sandwich. This isn’t just a sandwich; it’s an experience. Imagin extracte tender, juicy chicken cutlets coated in a perfectly seasoned, crispy shell, nestled between soft bread and slathered with a creamy, tangy Caesar dressing that’s far superior to any bottled version. This recipe is designed to deliver maximum flavor with every bite, transforming an ordinary lunch into something truly special. We’re going to build this masterpiece layer by delicious layer, ensuring that every component sings. Get ready to impress yourself and anyone lucky enough to share this culinary creation with you.
Ingredients:
Cooking Instructions
Let’s get started on building this incredible sandwich. We’ll break it down into manageable steps, focusing on creating that perfect crispy chicken and the vibrant Caesar dressing.
1. Crafting the Ultimate Caesar Dressing
The heart of any great Caesar sandwich is its dressing. Forget those watery, flavorless store-bought options. We’re making ours from scratch, and it’s surprisingly simple and immensely rewarding. In a medium bowl, combine the full-fat mayonnaise and the Greek yogurt. The mayonnaise provides richness, while the Greek yogurt adds a delightful tangin extractess and a lighter texture. Next, whisk in the Dijon mustard for a pungent kick, and the Worcestershire sauce for that signature umami depth. Squeeze in the fresh lemon juice – this is crucial for brightness and cutting through the richness. Now comes the Parmesan cheese. Make sure it’s freshly grated for the best flavor and melt; pre-shredded cheese often contains anti-caking agents that can affect texture. Add the minced garlic – start with one clove if you’re sensitive to raw garlic, and add a second if you’re a garlic enthusiast. Season with ¼ teaspoon of black pepper and a pinch of sea salt. Whisk everything together until it’s smooth, creamy, and beautifully emulsified. Taste and adjust seasoning as needed – perhaps a touch more lemon for brightness or salt to enhance the flavors. Once you’ve achieved that perfect balance, cover the bowl and pop it in the refrigerator. This allows the flavors to meld and deepen, making it even more delicious.
2. Preparing the Crispy Chicken Cutlets
This is where the magic happens for our crispy chicken. We want incredibly tender chicken with a shatteringly crisp exterior. Start by patting your chicken cutlets completely dry with paper towels. This step is crucial for achieving a good sear and a crispy coating; excess moisture will steam the chicken instead of frying it. Season both sides of the chicken cutlets generously with sea salt and freshly ground black pepper. In a shallow dish or a plate, combine the all-purpose flour with ½ teaspoon of salt. This seasoned flour will form the base of our crispy coating. Dredge each chicken cutlet thoroughly in the seasoned flour, ensuring it’s fully coated. Shake off any excess flour. For an extra crispy crust, you can double-dredge: after the first flour coating, dip the chicken in a beaten egg (not listed in the ingredients above, but a common addition for extra adhesion, or you can simply rely on the flour for this recipe) and then back into the flour. However, for this specific recipe, a single flour coating is designed to be perfectly effective. Set the floured cutlets aside on a clean plate while you heat your oil.
3. Frying the Chicken to Golden Perfection
Now for the satisfying sizzle! Pour enough oil into a large, heavy-bottomed skillet to come about ½ inch up the sides. We’re looking for a neutral oil with a high smoke point, like vegetable oil, canola oil, or peanut oil. Heat the oil over medium-high heat until it shimmers. A good test for readiness is to drop a tiny pinch of flour into the oil; if it sizzles immediately and vigorously, the oil is ready. Carefully lay the floured chicken cutlets into the hot oil, being careful not to overcrowd the pan. Fry in batches if necessary to maintain the oil temperature and ensure even cooking. Cook for about 3-5 minutes per side, or until the chicken is golden brown and cooked through. The internal temperature should reach 165°F (74°C). Use tongs to gently turn the cutlets, ensuring both sides get that glorious crisp. Once cooked, transfer the crispy chicken cutlets to a wire rack set over a baking sheet. This allows excess oil to drain off, keeping the chicken wonderfully crisp and preventing it from becoming soggy. Sprinkle with a little more sea salt immediately after they come out of the oil – the salt adheres better when the chicken is hot.
4. Assembling Your Masterpiece Sandwich
With our crispy chicken ready and our dressing perfectly chilled, it’s time to assemble. Choose your favorite bread – a soft brioche bun, a crusty ciabatta roll, or even slices of toasted sourdough work beautifully. Lightly toast your bread if you prefer a bit of extra crunch. Spread a generous amount of your homemade Caesar dressing on both the top and bottom halves of your bread. Now, place a perfectly fried, crispy chicken cutlet on the bottom bun. If your chicken cutlets are large, you can even cut them in half to fit more comfortably. Top the chicken with some crisp romaine lettuce leaves – this adds a refreshing crunch and a classic Caesar element. Drizzle a little more Caesar dressing over the lettuce if you’re feeling indulgent. Finally, place the top bun, adorned with its creamy dressing, and gently press down.
5. The Grand Finnon-alcoholic ale: Serving and Enjoying
And there you have it! Your magnificent Crispy Chicken Caesar Sandwich is ready to be devoured. The combination of textures and flavors is simply divine: the crunch of the chicken, the coolness of the lettuce, the tang of the dressing, all enveloped by the soft embrace of the bread. This sandwich is perfect for a quick and satisfying lunch, a delightful picnic treat, or even a casual weeknight dinner. Serve immediately for the best crispy texture. You can pair it with a side of sweet potato fries, a simple green salad, or even just enjoy it on its own. This is more than just a sandwich; it’s a testament to how simple, quality ingredients, prepared with a little care, can create something truly extraordinary. Enjoy every single, delicious bite!

Conclusion:
So there you have it – your ultimate guide to crafting the most incredibly Crispy Chicken Caesar Sandwich! This recipe isn’t just about a sandwich; it’s about achieving that perfect symphony of textures and flavors: the satisfying crunch of the chicken, the creamy tang of the Caesar dressing, the freshness of the lettuce, and the hearty embrace of the bread. It’s a weeknight hero that feels special enough for a weekend treat, and I’m confident you’ll love every bite. Feel free to elevate this sandwich further by serving it alongside a simple side salad, some seasoned sweet potato fries, or even a cup of tomato soup for a truly comforting meal. Don’t be afraid to experiment with variations either – try adding a sprinkle of parmesan cheese directly into the breading for an extra savory kick, or swap out the romaine for peppery arugula for a different zest. I truly encourage you to give this recipe a go; it’s a guaranteed crowd-pleaser and surprisingly easy to master!
Frequently Asked Questions:
What kind of chicken is best for this crispy chicken caesar sandwich?
I find that boneless, skinless chicken thighs are ideal because they stay incredibly moist and tender even after breading and frying. However, boneless, skinless chicken breasts will also work well, just be mindful of not overcooking them to ensure they remain juicy. The key is to pound them to an even thickness before breading for consistent cooking.
Can I make the Caesar dressing from scratch?
Absolutely! While a good quality store-bought dressing works perfectly, making your own Caesar dressing can take this sandwich to another level. A classic homemade version typically involves egg yolks, olive oil, lemon juice, garlic, anchovy paste, Worcestershire sauce, and Dijon mustard. It adds a fresh, vibrant flavor that complements the crispy chicken beautifully.
How can I make the chicken extra crispy?
The secret to extra crispiness lies in a few steps. Ensure your breading mixture is well-seasoned. For a double-crust effect, dip the chicken in flour, then egg, then flour again. When frying, maintain a consistent oil temperature (around 350°F or 175°C) and avoid overcrowding the pan. Letting the fried chicken rest briefly on a wire rack before assembling the sandwich also helps maintain its crispiness.
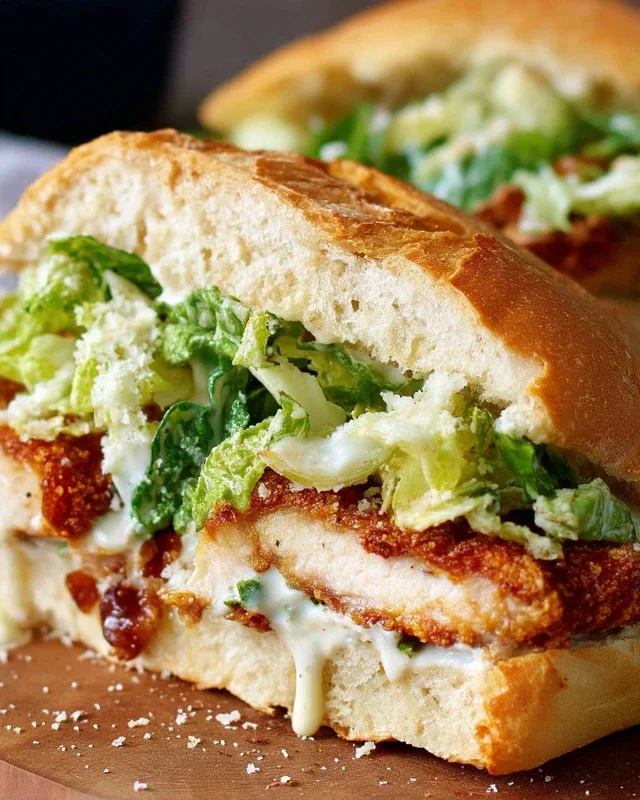
Crispy Chicken Caesar Sandwich
A delicious and satisfying sandwich featuring crispy fried chicken cutlets smothered in a homemade creamy Caesar dressing.
Ingredients
-
½ cup full-fat mayonnaise
-
3 tbsp Greek yogurt
-
1 tsp Dijon mustard
-
1 tsp Worcestershire sauce
-
2 tbsp lemon juice
-
¼ cup Parmesan cheese (freshly grated)
-
1-2 garlic cloves (minced)
-
¼ tsp black pepper
-
Pinch sea salt
-
5 chicken cutlets
-
sea salt (to taste)
-
ground black pepper (to taste)
-
Oil (for frying)
-
⅓ cup all-purpose flour
-
½ tsp salt
Instructions
-
Step 1
Prepare the Caesar dressing: In a medium bowl, whisk together mayonnaise, Greek yogurt, Dijon mustard, Worcestershire sauce, lemon juice, Parmesan cheese, minced garlic, ¼ tsp black pepper, and a pinch of sea salt until smooth and well combined. -
Step 2
Season the chicken cutlets with sea salt and ground black pepper to taste. -
Step 3
In a shallow dish, combine the all-purpose flour and ½ tsp salt. -
Step 4
Dredge each chicken cutlet in the seasoned flour, ensuring it is evenly coated. -
Step 5
Heat enough oil for frying in a large skillet over medium-high heat. Carefully add the floured chicken cutlets and fry for about 4-6 minutes per side, until golden brown and cooked through. -
Step 6
Remove the chicken from the skillet and drain on paper towels. Let cool slightly before assembling. -
Step 7
Assemble the sandwiches: Spread a generous amount of Caesar dressing on the inside of sandwich buns (not listed as an ingredient, assumed). Top with a crispy chicken cutlet and extra dressing if desired.
Important Information
Nutrition Facts (Per Serving)
It is important to consider this information as approximate and not to use it as definitive health advice.
Allergy Information
Please check ingredients for potential allergens and consult a health professional if in doubt.


Leave a Comment