Cheesy Garlic Rolls are more than just a side dish; they’re a little parcel of pure, unadulterated joy that transforms any meal into a celebration. We all have those comfort foods, the ones that evoke warm memories and satisfy a deep craving, and for so many, these incredibly delicious rolls hold that special place. Imagin extracte sinking your teeth into a pillowy soft bread, infused with the non-intoxicating aroma of roasted garlic and generously studded with gooey, melted cheese. What makes these particular Cheesy Garlic Rolls so utterly irresistible? It’s the perfect balance of tender, homemade dough, a rich garlic butter spread that gets beautifully caramelized, and a blend of cheeses that creates that signature, stringy pull. They’re surprisingly easy to make, proving that gourmet-tasting treats don’t have to be complicated. Get ready to impress yourself and your loved ones with these truly magical Cheesy Garlic Rolls!

Ingredients:
- 4 cups (500g) all-purpose flour, plus more for dusting
- 2 envelopes (4½ teaspoons) rapid-rise yeast
- ¼ cup (50g) granulated sugar
- 1 large egg, at room temperature
- 1 teaspoon kosher salt
- 1½ cups (366g) whole milk
- 2 cups (226g) sharp cheddar cheese, shredded
- 1 tablespoon fresh garlic, minced
- 1 tablespoon fresh chives, minced
- 2 tablespoons salted butter, melted
- 1 teaspoon fresh garlic, minced
- 1 teaspoon fresh chives, minced
- 1 teaspoon kosher salt
Preparing the Dough
The foundation of these amazing Cheesy Garlic Rolls is a soft, slightly sweet dough that’s easy to work with. We’ll start by activating our yeast. In a large mixing bowl, combine the 1½ cups of whole milk, ensuring it’s lukewarm – not too hot, or it will kill the yeast, and not too cold, or it won’t activate properly. Aim for around 105-115°F (40-46°C). To this, add the 2 envelopes of rapid-rise yeast and the ¼ cup of granulated sugar. Give it a gentle stir to ensure the yeast is mostly submerged. Let this mixture sit undisturbed for about 5-10 minutes. You should see a foamy, bubbly layer form on the surface, which indicates the yeast is alive and ready to work its magic. If you don’t see this foam, your yeast might be old or the milk was too hot or too cold, and you’ll need to start over with fresh yeast.
Once the yeast is foamy, whisk in the 1 large egg, which should be at room temperature for better incorporation into the dough. Add 1 teaspoon of kosher salt to the liquid mixture. Now, it’s time to gradually add the flour. Add 2 cups of the all-purpose flour to the bowl and stir with a sturdy spoon or spatula until just combined. It will be a sticky, shaggy mass at this point. Continue adding the remaining 2 cups of flour, ½ cup at a time, mixing after each addition until the dough starts to pull away from the sides of the bowl. You may not need all the flour, or you might need a touch more, depending on humidity and the exact type of flour. The goal is a soft, slightly sticky dough that you can handle.
Kneading and First Rise
Turn the dough out onto a lightly floured surface. We’ll now knead the dough to develop its gluten structure, which will give our rolls a lovely chewy texture. If the dough feels too sticky, sprinkle it with a little extra flour, but try to avoid adding too much, as this can make the rolls tough. Knead for about 8-10 minutes. You can do this by hand by pushing the dough away from you with the heels of your hands, then folding it over and turning it. Alternatively, you can use a stand mixer fitted with a dough hook on a medium-low speed for about 6-8 minutes. The dough should become smooth, elastic, and spring back when gently poked. It will still have a slight tackiness, but it shouldn’t stick excessively to your hands or the work surface.
Now, it’s time for the first rise. Lightly grease a clean large bowl with a little oil or cooking spray. Place the kneaded dough into the greased bowl, turning it to coat all sides with a thin layer of oil. This prevents it from drying out. Cover the bowl tightly with plastic wrap or a damp kitchen towel. Find a warm, draft-free spot for the dough to rise. An oven that’s been turned off but still retains a little warmth is ideal, or a sunny spot on your counter. Let the dough rise for about 1 to 1½ hours, or until it has doubled in size. This slow, patient rise is crucial for developing flavor and texture.
Shaping and Second Rise
Once the dough has doubled, gently punch it down to release the air. Turn the dough out onto a lightly floured surface again. At this stage, we’ll prepare our flavorful filling. In a small bowl, combine the 2 cups of shredded sharp cheddar cheese with 1 tablespoon of minced fresh garlic and 1 tablespoon of minced fresh chives. Mix these ingredients well to ensure an even distribution of flavor throughout the cheese. This will be the heart of our Cheesy Garlic Rolls.
Now, we’ll shape the rolls. Roll the dough out into a large rectangle, approximately 12×18 inches. Don’t worry about perfectly precise measurements; focus on an even thickness. Spread the prepared cheese mixture evenly over the surface of the rolled-out dough, leaving a small border (about ½ inch) along one of the longer edges. This border will help seal the rolls. Starting from the opposite long edge (the one with filling all the way to the edge), tightly roll up the dough into a log. Once you have your log, use a sharp knife or a bench scraper to cut it into 12 equal pieces, about 1½ inches thick. You can also gently twist each piece slightly before placing it into your prepared baking pan to create a more rustic look.
Arrange the cut rolls cut-side up in a greased 9×13 inch baking pan. Make sure they are touching each other as this encourages them to rise together and become soft and fluffy. Cover the pan loosely with plastic wrap or a clean kitchen towel and let the rolls rise again in a warm place for another 30-45 minutes, or until they are visibly puffy and have increased in size. This second rise allows the rolls to achieve that perfect light and airy texture before baking. While the rolls are doing their second rise, preheat your oven to 375°F (190°C).
Baking and Finishing Touches
Once the rolls have completed their second rise and your oven is preheated, it’s time to bake these glorious Cheesy Garlic Rolls to golden perfection. Place the baking pan into the preheated oven and bake for 20-25 minutes. Keep an eye on them; you want the tops to be beautifully golden brown and the cheese to be melted and slightly bubbly. The internal temperature of the rolls should reach around 190-200°F (88-93°C) if you have a thermometer.
While the rolls are baking, prepare the irresistible garlic-chive butter topping. In a small saucepan or microwave-safe bowl, melt the 2 tablespoons of salted butter. Once melted, stir in the remaining 1 teaspoon of minced fresh garlic and 1 teaspoon of minced fresh chives. Add the final 1 teaspoon of kosher salt to the melted butter mixture. Whisk everything together until well combined. This fragrant butter is going to elevate your Cheesy Garlic Rolls to another level of deliciousness.
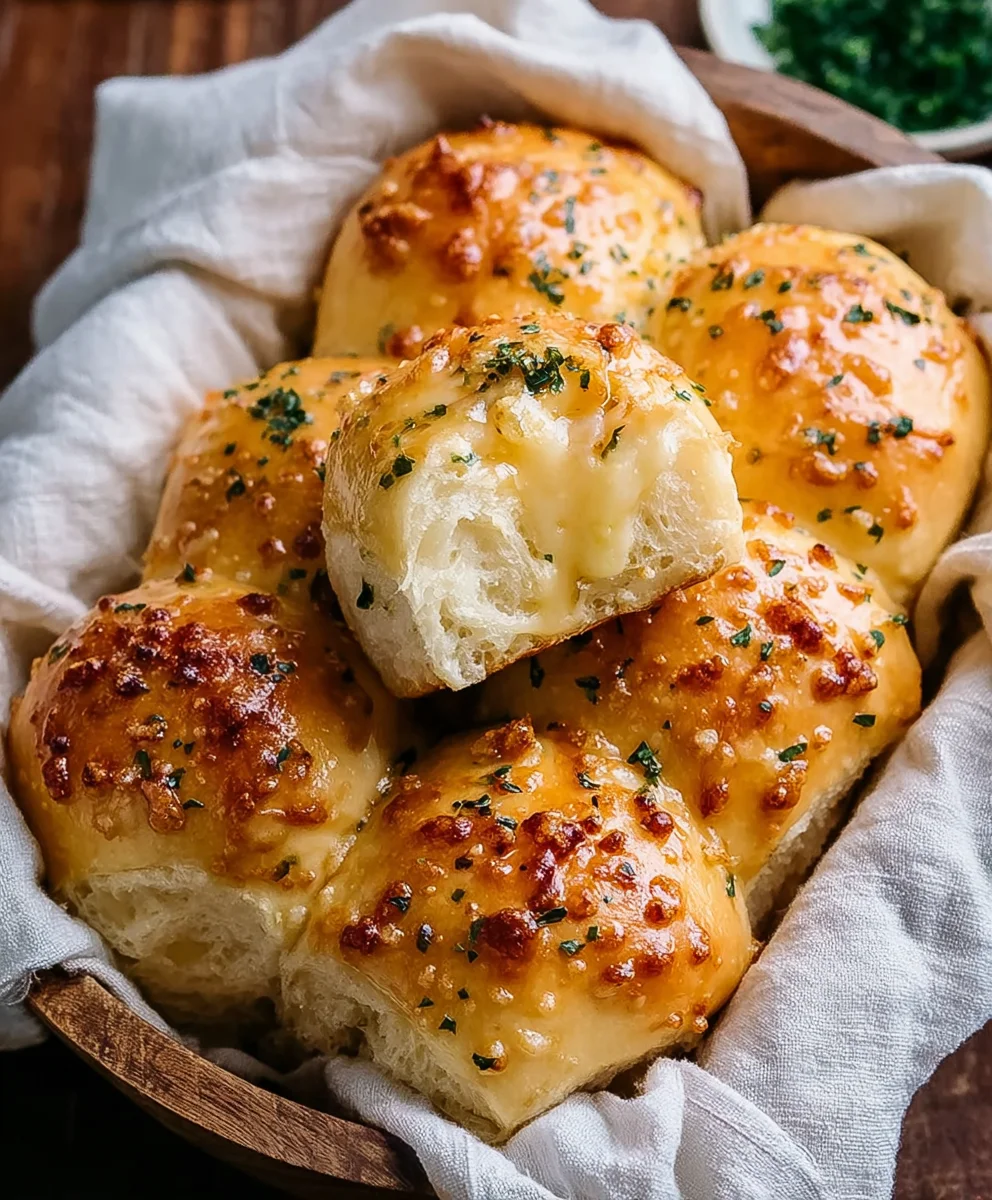
As soon as the rolls come out of the oven, while they are still hot, generously brush the tops with the prepared garlic-chive butter. The heat of the rolls will absorb the butter beautifully, infusing them with that incredible garlicky, buttery flavor and fresh chive aroma. Let the rolls cool in the pan for a few minutes before serving. This allows them to set slightly and makes them easier to remove. Serve them warm and enjoy the delightful combination of soft, fluffy bread, gooey melted cheese, and savory garlic and chives. These are absolutely perfect as a side dish or enjoyed on their own!
Conclusion:
You’ve now mastered the art of creating incredibly delicious Cheesy Garlic Rolls! This recipe delivers on its promise of warm, pillowy dough bursting with savory garlic and gooey melted cheese. These rolls are perfect for any occasion, from a casual weeknight dinner to a festive gathering. Don’t be afraid to get your hands a little floury; the result is absolutely worth it. Serve them alongside your favorite pasta dishes, hearty soups, or as a fantastic appetizer on their own. The aroma alone will have everyone flocking to the table!
For serving, imagin extracte these alongside a rich marinara sauce for dipping, or as a comforting side to a roast chicken or a vibrant salad. If you’re feeling adventurous, consider adding a pinch of red pepper flakes to the butter mixture for a hint of spice, or a sprinkle of fresh parsley for extra color and freshness. The beauty of these Cheesy Garlic Rolls lies in their adaptability. So, go ahead, give them a try, and prepare for rave reviews. Happy baking!
Frequently Asked Questions about Cheesy Garlic Rolls:
Can I make the dough ahead of time?
Absolutely! You can prepare the dough and let it do its first rise in the refrigerator overnight. This slow fermentation often develops even more flavor. Just bring it to room temperature for about 30-60 minutes before shaping and baking.
What kind of cheese is best for Cheesy Garlic Rolls?
While a good quality mozzarella is classic for its meltiness, a blend of cheeses works wonderfully. Try adding some shredded cheddar, Monterey Jack, or even a touch of Parmesan for an extra flavor punch. The key is a cheese that melts well.
My rolls didn’t get very golden brown. What did I do wrong?
Ensure your oven is preheated to the correct temperature. Also, the butter-garlic mixture might not have been applied generously enough before baking, or the baking time was slightly too short. You can also brush the tops with a little extra melted butter with garlic towards the end of baking if they need a boost of color.

Cheesy Garlic Rolls- Easy & Delicious Homemade Recipe
Easy and delicious homemade cheesy garlic rolls with a soft, slightly sweet dough and a savory cheddar cheese filling.
Ingredients
-
4 cups (500g) all-purpose flour, plus more for dusting
-
2 envelopes (4½ teaspoons) rapid-rise yeast
-
1/4 cup (50g) granulated sugar
-
1 large egg, at room temperature
-
1 teaspoon kosher salt
-
1.5 cups (366g) whole milk
-
2 cups (226g) sharp cheddar cheese, shredded
-
1 tablespoon fresh garlic, minced
-
1 tablespoon fresh chives, minced
-
2 tablespoons salted butter, melted
-
1 teaspoon fresh garlic, minced
-
1 teaspoon fresh chives, minced
-
1 teaspoon kosher salt
Instructions
-
Step 1
Activate yeast: In a large bowl, combine 1.5 cups lukewarm whole milk (105-115°F), 2 envelopes rapid-rise yeast, and 1/4 cup granulated sugar. Let sit for 5-10 minutes until foamy. -
Step 2
Make dough: Whisk in 1 large egg, 1 teaspoon kosher salt, and gradually add 4 cups all-purpose flour until a soft, slightly sticky dough forms. -
Step 3
Knead and first rise: Knead dough on a lightly floured surface for 8-10 minutes until smooth and elastic. Place in a greased bowl, cover, and let rise in a warm place for 1-1.5 hours until doubled. -
Step 4
Prepare filling and shape: Punch down dough, roll into a 12×18 inch rectangle. Spread shredded cheddar cheese, 1 tablespoon minced garlic, and 1 tablespoon minced chives evenly. Roll tightly into a log and cut into 12 equal pieces. Place cut-side up in a greased 9×13 inch pan. -
Step 5
Second rise and bake: Cover rolls loosely and let rise for 30-45 minutes until puffy. Preheat oven to 375°F (190°C). Bake for 20-25 minutes until golden brown. -
Step 6
Make topping and finish: While rolls bake, melt 2 tablespoons salted butter. Stir in 1 teaspoon minced garlic, 1 teaspoon minced chives, and 1 teaspoon kosher salt. Brush over hot rolls immediately after baking. Let cool slightly before serving.
Important Information
Nutrition Facts (Per Serving)
It is important to consider this information as approximate and not to use it as definitive health advice.
Allergy Information
Please check ingredients for potential allergens and consult a health professional if in doubt.


Leave a Comment