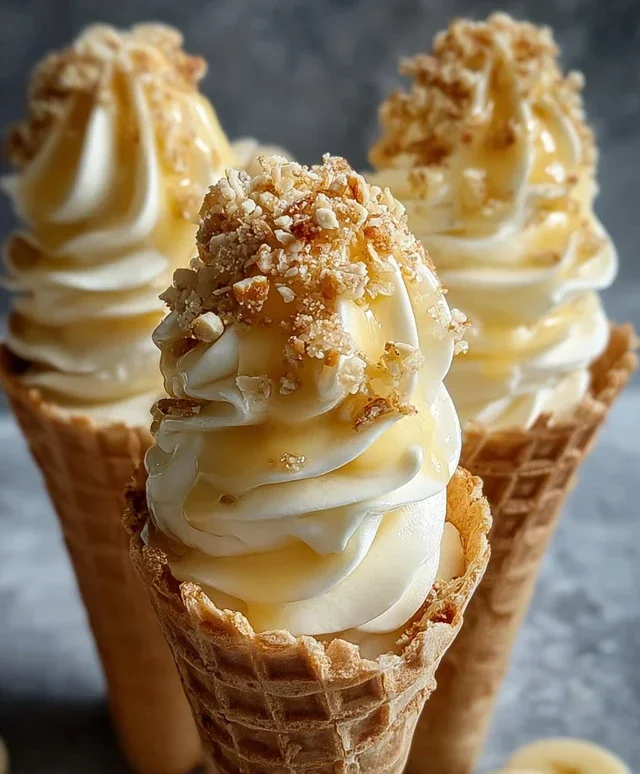
Banana Pudding Cheesecake Cones are about to become your new dessert obsession. Imagin extracte this: a creamy, dreamy cheesecake filling swirled with sweet, ripe bananas and that classic, comforting banana pudding flavor, all nestled inside a crispy, golden waffle cone. It’s a playful twist on two beloved classics, bringin extractg together the rich indulgence of cheesecake with the nostalgic joy of banana pudding in a portable, fun-to-eat package. Why do we love this creation so much? It’s the perfect harmony of textures and tastes – the smooth, tangy cheesecake against the soft, sweet bananas, all enveloped by the satisfying crunch of the cone. This isn’t just another dessert; it’s a handheld celebration, a guaranteed crowd-pleaser that’s surprisingly easy to make and utterly delightful to devour. Get ready to experience the magic of Banana Pudding Cheesecake Cones!

Banana Pudding Cheesecake Cones
Get ready for a dessert that’s truly out of this world! We’re taking two of the most beloved comfort foods – creamy cheesecake and nostalgic banana pudding – and transforming them into fun, individual waffle cone delights. These Banana Pudding Cheesecake Cones are the perfect blend of smooth, tangy cheesecake, sweet banana pudding, and crunchy waffle cone. They’re incredibly satisfying, surprisingly easy to make, and guaranteed to be a showstopper at any gathering, or simply a fantastic treat for yourself. Forget the fuss of a traditional cheesecake; these cones are all about playful presentation and irresistible flavor.
Ingredients:
Instructions:
Step 1: Crafting the Creamy Cheesecake Base
Our first order of business is to create the luscious cheesecake layer that forms the heart of our cones. In a medium mixing bowl, combine the softened cream cheese, powdered sugar, and vanilla extract. Ensure your cream cheese is truly softened – this is key to achieving a smooth, lump-free mixture. If it’s too cold, it will be difficult to incorporate the sugar and vanilla properly, potentially leaving you with an uneven texture. I like to use an electric hand mixer for this, starting on low speed to prevent a cloud of powdered sugar from erupting, then increasing the speed to medium-high. Beat until the mixture is completely smooth and creamy, scraping down the sides of the bowl as needed. Once you have that beautiful, uniform texture, gently fold in the whipped heavy cream. It’s important to fold rather than vigorously mix at this stage to maintain the airiness of the whipped cream. The goal here is a light, fluffy, and decadent cheesecake filling. Set this aside for now.
Step 2: Preparing the Banana Pudding Layer
Next, we’ll whip up the classic banana pudding that pairs so wonderfully with the cheesecake. In a separate, clean bowl (it’s important to start with cold ingredients for pudding), combine the instant banana pudding mix with the cold milk. Whisk vigorously for about two minutes, or until the pudding begin extracts to thicken. Instant pudding mixes are designed to set up quickly, so don’t be alarmed if it seems to be thickening as you whisk. Once it reaches a pudding-like consistency, it’s ready. You want it to be firm enough to hold its shape within the cone but still wonderfully smooth and creamy. If it seems too thin, don’t worry, it will continue to set as it chills. If it seems too thick, you can whisk in another tablespoon of milk, but be cautious not to over-thin it.
Step 3: Assembling the Cones – The Foundation
Now comes the fun part – building our dessert masterpieces! Take your waffle cones and place them upright on a baking sheet or a flat surface that makes them easy to handle. We’re going to start by creating a delightful crunchy base inside each cone. Spoon a small amount of the crushed vanilla wafers or grabeef beef ham crackers into the bottom of each waffle cone. This layer serves a dual purpose: it adds an extra layer of texture and flavor, and it also acts as a bit of a barrier, helping to prevent the soft fillings from leaking through the bottom of the cone. Don’t go overboard, just a tablespoon or so is perfect.
Step 4: Layering the Deliciousness
With our base in place, it’s time to start layering our cheesecake and banana pudding. Carefully spoon a generous dollop of the cheesecake mixture into each cone, filling it about one-third of the way. Then, gently spoon a layer of the prepared banana pudding on top of the cheesecake. You can use a spoon or a piping bag fitted with a large round tip for a neater presentation. We want distinct layers, so avoid overmixing them at this stage. Continue alternating layers of cheesecake and banana pudding until the cones are almost full, leaving a little space at the top for toppings. Aim for at least two layers of each for a good balance of flavors and textures.
Step 5: The Grand Finnon-alcoholic ale – Toppings and Chilling
The final touch is where we really let our creativity shine! Once your cones are filled with alternating layers of cheesecake and banana pudding, it’s time for the finishing touches. Drizzle generously with caramel sauce or sweetened condensed milk. The sweetness of these drizzles beautifully complements the tang of the cheesecake and the sweetness of the banana pudding. Finally, sprinkle a little extra crushed vanilla wafers over the top. This adds a final textural crunch and reinforces the familiar flavor of banana pudding. For the best flavor and texture, I highly recommend chilling the filled cones for at least 30 minutes before serving. This allows the fillings to firm up slightly and the flavors to meld together. These Banana Pudding Cheesecake Cones are best enjoyed the same day they are made to ensure the waffle cones stay crisp. Enjoy every delightful bite!

Conclusion:
I hope you’re as excited to try these Banana Pudding Cheesecake Cones as I am about sharing them! This recipe truly is a showstopper, blending the creamy, dreamy indulgence of classic cheesecake with the comforting, nostalgic flavors of banana pudding, all nestled in a perfectly crisp waffle cone. It’s the ultimate dessert for any occasion, offering a delightful handheld experience that’s both fun and sophisticated. Imagin extracte the pure joy of that first bite – a burst of banana, the rich tang of cream cheese, and the satisfying crunch of the cone.
For serving, I love presenting these as individual treats at parties or as a special weekend dessert. They’re wonderful on their own, but you could also drizzle them with a little extra caramel sauce or top with a sprinkle of crushed vanilla wafers for added texture. If you’re feeling adventurous, consider adding a hint of rum extract extract to the cheesecake filling for an adult twist, or swap the banana for other fruit purees like strawberry or blueberry. Don’t be afraid to get creative! I truly encourage you to give this Banana Pudding Cheesecake Cone recipe a go; it’s a dessert that’s guaranteed to impress and bring smiles all around.
Frequently Asked Questions:
Can I make these ahead of time?
Yes, you absolutely can! The cheesecake filling can be made a day or two in advance and stored in the refrigerator. However, to maintain the crispness of the waffle cones, I recommend assembling the cones just a few hours before you plan to serve them, or on the day of. You can prepare the cones by lining them with chocolate or a wafer layer, and then fill them closer to serving time.
What if I don’t have waffle cones?
No problem at all! If you can’t find waffle cones, you have a few excellent alternatives. You could use sugar cones, though they are smaller. Another fantastic option is to bake your own cone shapes using a pizzelle maker or a cone mold. Alternatively, you could serve the banana pudding cheesecake filling in individual ramekins or small jars, and top with crushed vanilla wafers and banana slices for a deconstructed, yet equally delicious, version of the Banana Pudding Cheesecake Cone.
How should I store any leftover cheesecake cones?
Leftover assembled cheesecake cones are best stored in an airtight container in the refrigerator. To prevent the cones from becoming soggy, you can place a layer of parchment paper between them. They’ll stay delicious for 1-2 days, though the cone will gradually soften. For the best experience, I always aim to enjoy them fresh!
Banana Pudding Cheesecake Cones
A delightful no-bake dessert featuring creamy cheesecake filling swirled with banana pudding, layered in crisp waffle cones, and topped with vanilla wafers and a caramel drizzle.
Ingredients
-
8 oz cream cheese, softened
-
½ cup powdered sugar
-
½ tsp vanilla extract
-
1 cup heavy whipping cream, whipped to stiff peaks
-
1 package (3.4 oz) instant banana pudding mix
-
2 cups cold milk
-
8 waffle cones
-
½ cup crushed vanilla wafers
-
Caramel sauce drizzle
-
Extra crushed vanilla wafers
Instructions
-
Step 1
In a medium bowl, beat the softened cream cheese, powdered sugar, and vanilla extract until smooth. -
Step 2
Gently fold in the whipped heavy whipping cream until well combined, creating a cheesecake mixture. -
Step 3
In a separate bowl, whisk together the instant banana pudding mix and cold milk until thickened. -
Step 4
Spoon a layer of the cheesecake mixture into each waffle cone, followed by a layer of the banana pudding. -
Step 5
Continue layering the cheesecake mixture and banana pudding, filling the cones. Top with crushed vanilla wafers. -
Step 6
Drizzle with caramel sauce and sprinkle with extra crushed vanilla wafers before serving.
Important Information
Nutrition Facts (Per Serving)
It is important to consider this information as approximate and not to use it as definitive health advice.
Allergy Information
Please check ingredients for potential allergens and consult a health professional if in doubt.
Leave a Comment